In this Use Case, we want to make use of the Microsoft Office 365 suite to tackle our after-call work.
When a call is terminated, the Agent gets a message on Teams with some predefined After-Call Work (ACW) actions to choose from. In our Use Case these actions are:
- Sending a pre-defined welcome message to the Customer.
- Sending a Customer satisfaction survey to the Customer.
- Creating a follow-up meeting in Teams with the Customer.
When a call is terminated and missed, the flow sends a missed call Adaptive Card in the group's general channel.
PRECONDITIONS
- You already have a running flow that looks up Customer data in your CRM. We are using HubSpot in our showcase. 🔍 You can learn more about this in Use Case - Looking Up Caller Information in HubSpot.
- To make the actions work, we need at least the Customer's email address from the CRM. For the missed call case, we need the link to the Customer's CRM data sheet.
See the Use Case illustration...
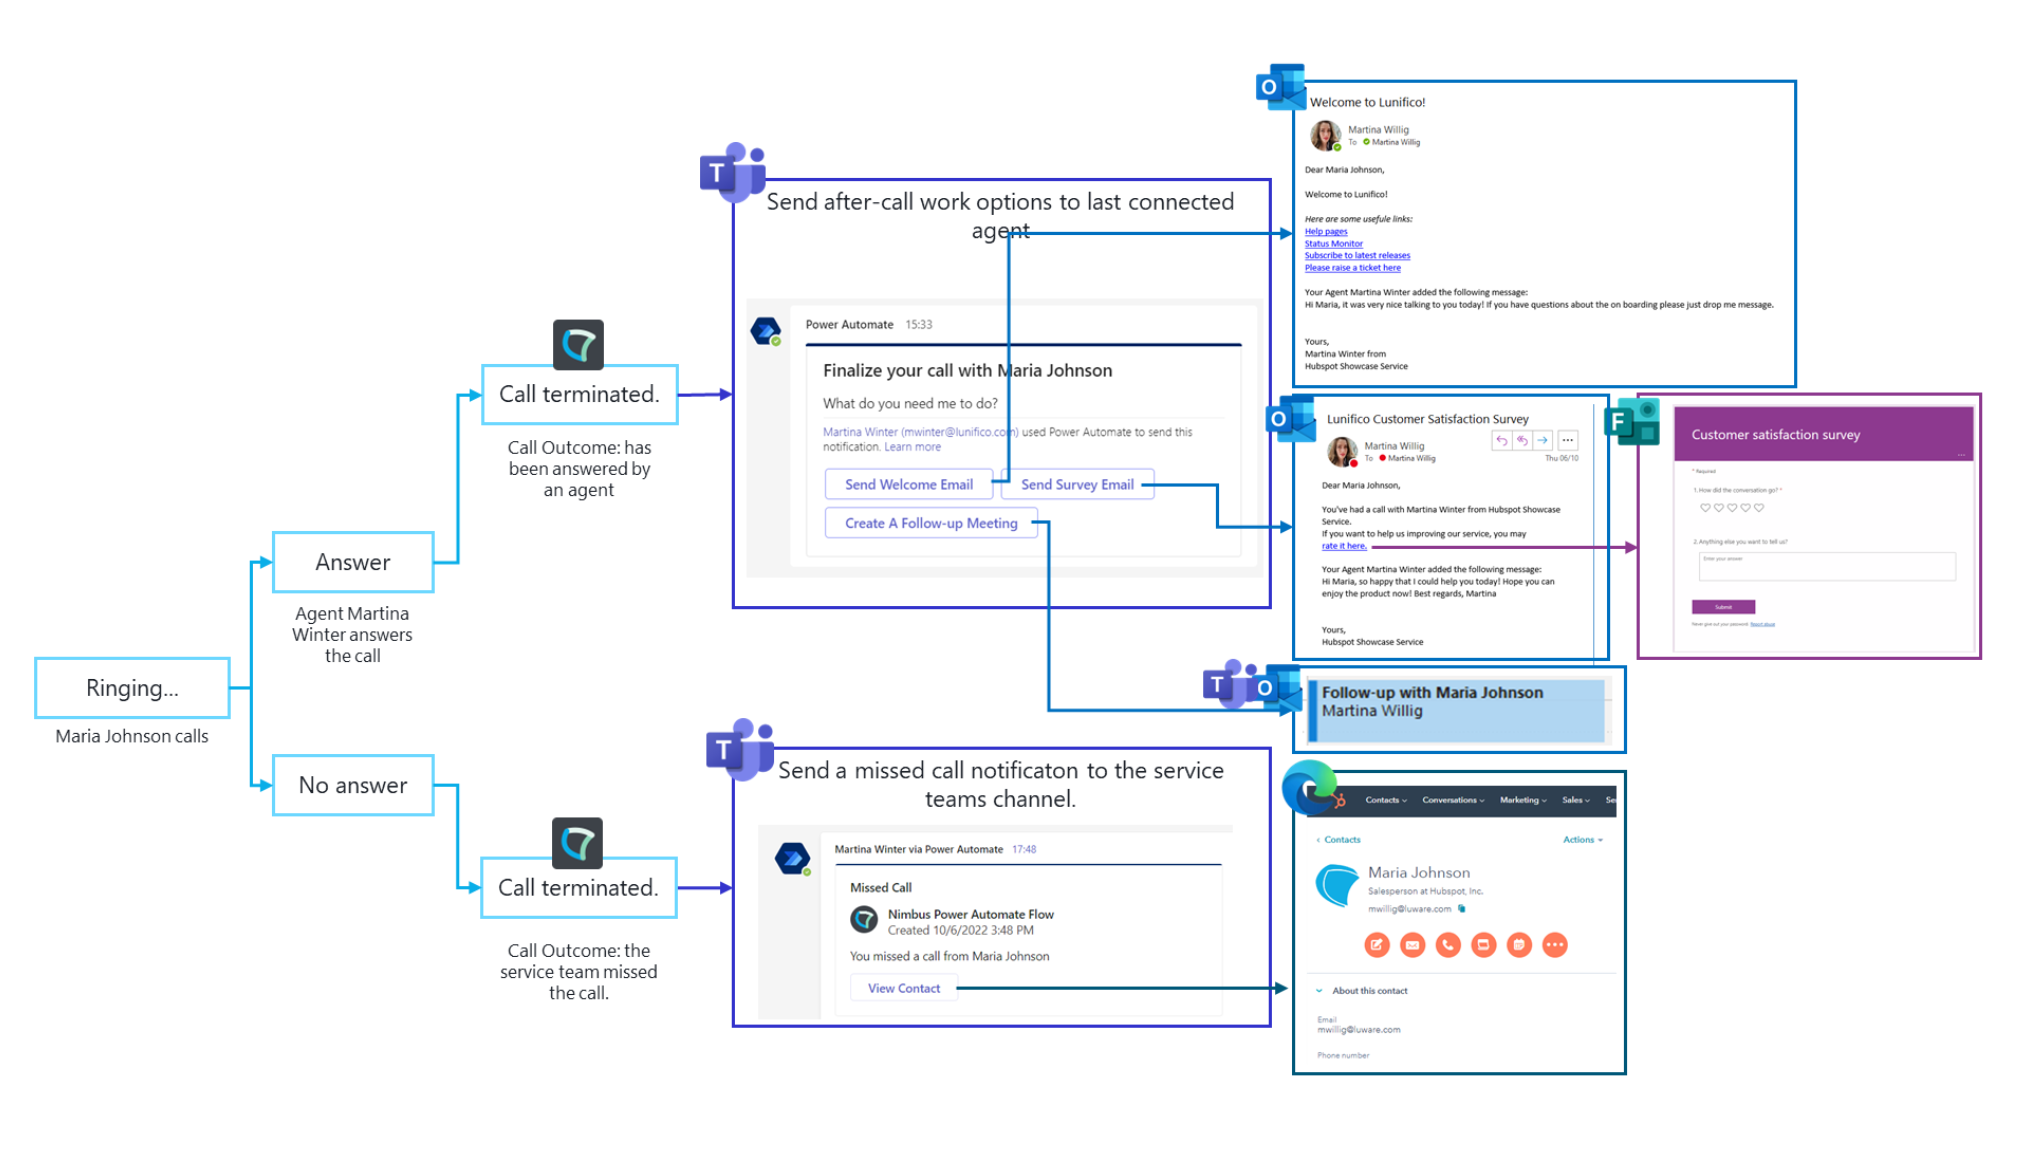
The whole flow looks like this:
See the Flow Overview….

LIMITATIONS
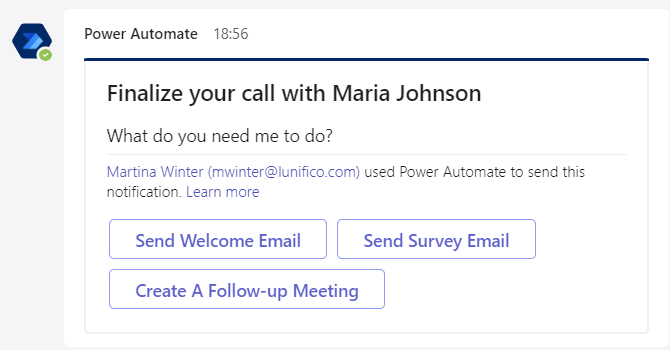
This Use Case makes use of the "Post a choice of options as the flow bot to the User" element. This Power Automate Teams element provides simple buttons with options and pre-implemented actions. A User can't provide additional input to these actions as the actions don't wait for a response.
💡 A different approach would be an implementation with adaptive cards which we investigate in another Use Case. In that case, the User can provide input to the flow element. For instance, if she/he wants to send out a standard mail but edit it before sending.
INC Icon Legend Accordion
Show Icon Legend
| 💡 = A hint to signal learnings, improvements or useful information in context. | 🔍 = Info points out essential notes or related page in context. |
| ☝ = Notifies you about fallacies and tricky parts that help avoid problems. | 🤔 = Asks and answers common questions and troubleshooting points. |
| ❌ = Warns you of actions with irreversible / data-destructive consequence. | ✅ = Intructs you to perform a certain (prerequired) action to complete a related step. |
Create the First Branch of the Flow
| Create a new Power Automate Flow with a Nimbus "When a task changes state" trigger and set the event to "Terminated". |  |
|
Add Initialize variable "HasBeenConectedToAgent" to it and set LastConnectedAgent as a string value to the variable. 💡 This value is either is filled with the Agents Teams UPN ( |
 |
Add a Condition element to the flow and set the condition to “HasBeenConnectedToAgent” IS GREATER THAN <leave blank>". |
 |
"True" branch
|
Add the following elements to the flow:
Your flow should now look as follows | |
 | |
This element creates a post using Adaptive Cards in MS Teams that looks like this. |
 |
When the User interacts with the card, a comment can be added 💡 Note, that if no answer is supplied, the flow runs for 30 days. |
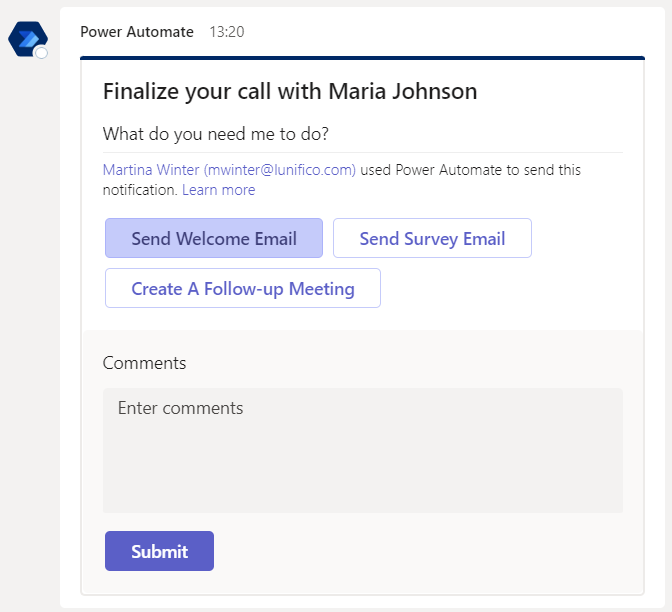 |
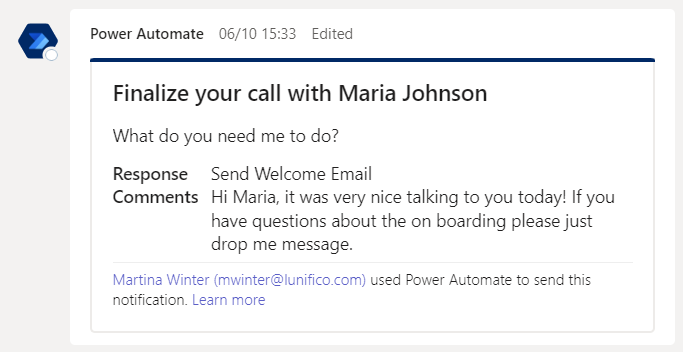
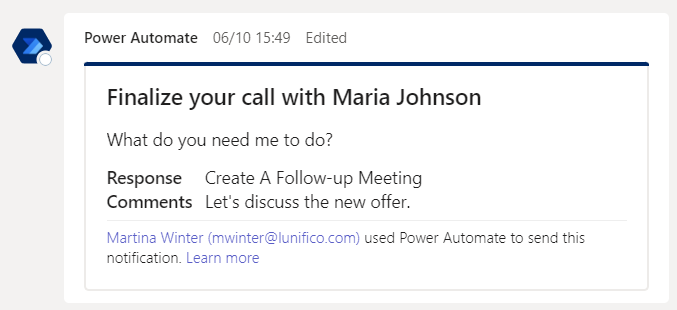
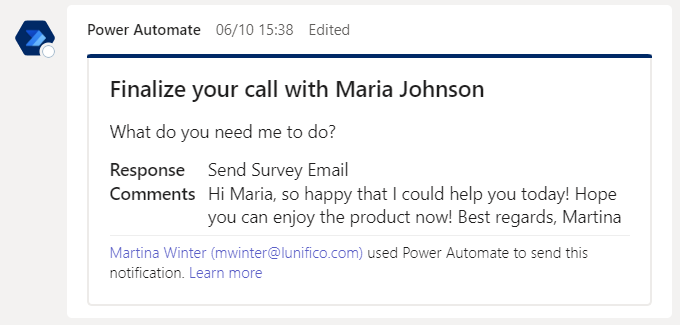
After submitting an answer, the Customer sees the choice with provided comments. ✅ In the next step we implement the different options of the switch clause. |
   |
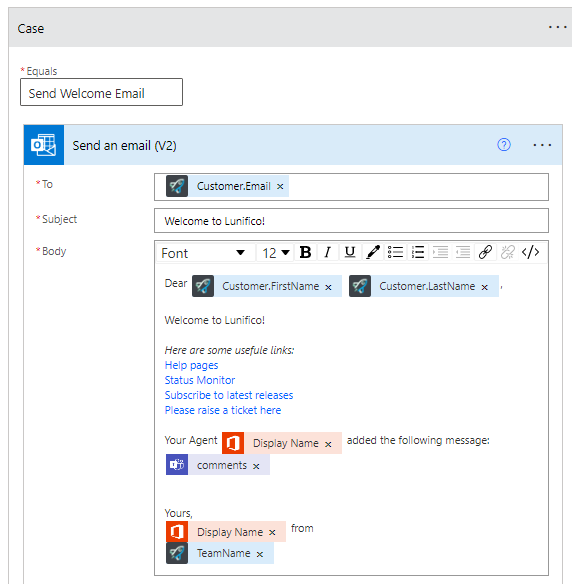
Option Item 1: "Send Welcome Email" with Microsoft Outlook
- Add a "Send an email (V2)" step to the flow. We want to send the mail to the Customer:
- To =
@{triggerOutputs()?['body/Customer/email']}
- To =
- Edit Subject and Body according to your needs.
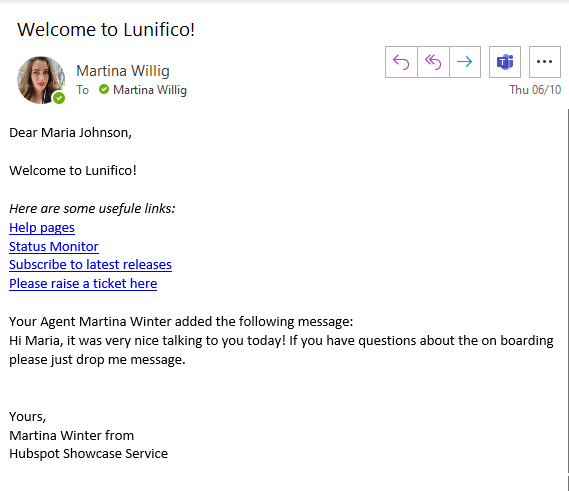
| This is the email in our example: | We are using the comments field from the previous element to personalize the email. Once triggered, this step sends the following email to the Customer: |
 |
 |
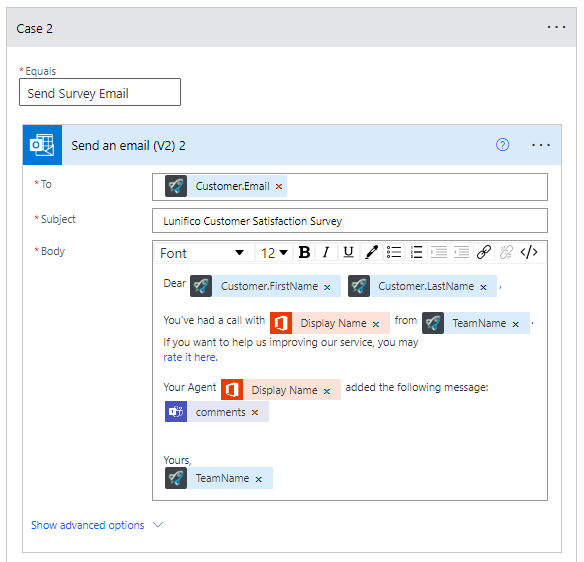
Option Item 2: "Send Survey Email" with Microsoft Forms and Microsoft Outlook
-
Build a survey on forms.office.com. Copy the public link to the survey.
💡 Our survey example looks like this: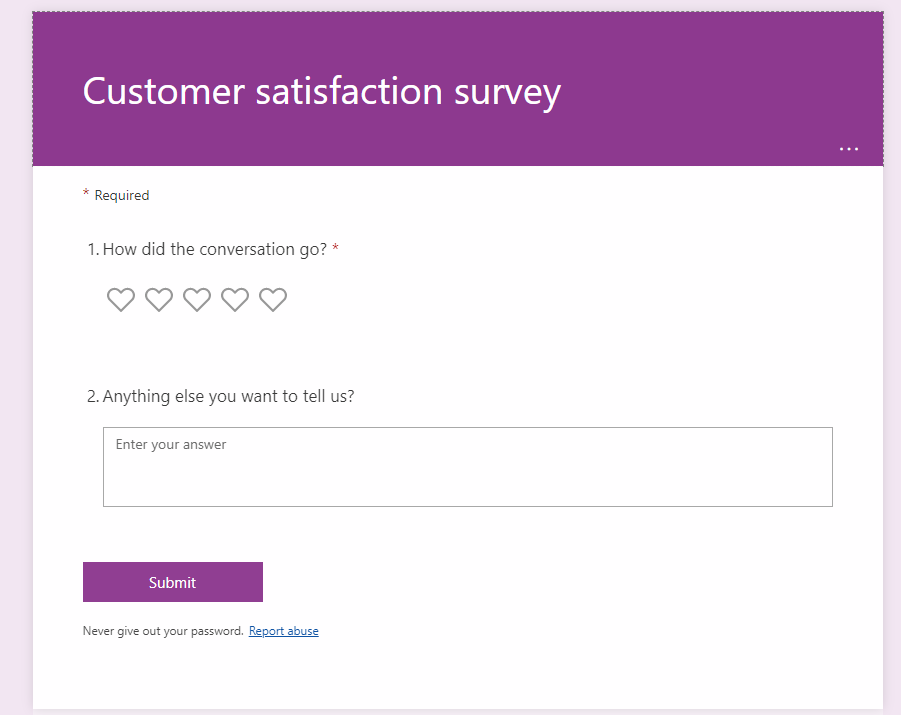
- Add a "Send an email (V2) " element to the flow. We want to send the mail to the Customer:
- To =
@{triggerOutputs()?['body/Customer/email']}
- To =
- Edit Subject and Body according to your needs.
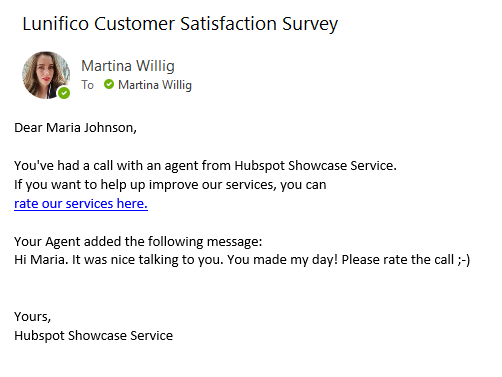
| This is the email in our example: | We are using the comments field from the previous element to personalise the email. Once triggered, this step sends the following email to the Customer: |
 |
|
Option Item 3: "Create A Follow-up Meeting" with Microsoft Teams
|
For the final third case, add a "Get future time" element. 💡 We do so because we want to schedule the meeting two days ahead of the call. |
 |
| Also follow up with a "Create a Teams meeting" element to the flow. 💡 Unfortunately, you can't select working days from the "Get future time" element. → If you want to add x working days, then you need to implement some steps as described in this solution: How to add only working days to a date using Power Automate (tomriha.com). |
 |
|
The "Create a Teams meeting" element takes the following values:
|
 |
|
Also, note that this case could be even more flexible if the Agent could provide the date to the flow dynamically, adding flexibility in scheduling the meeting. As this would need extra steps we're just leaving this as a hint for now.
| |

Option: Default
💡 You do not need to implement this case.
"True" Branch: Handling Errors
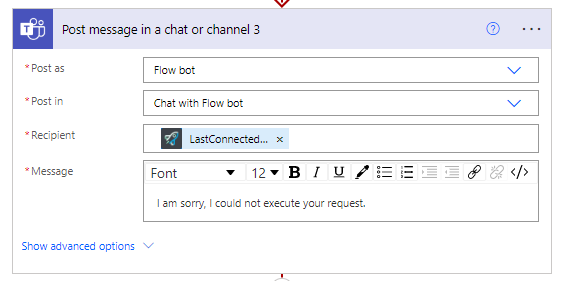
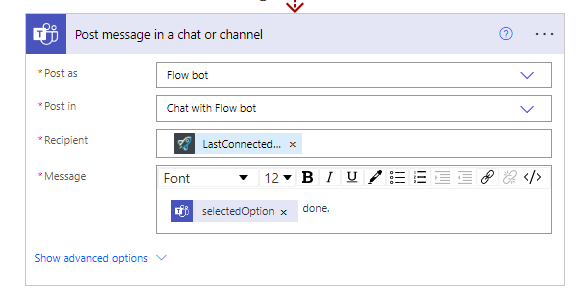
✅ After creating the switch case element we want to send a message to the chat so that the Agent is informed about the execution of the action.
| Content | Action failed | Action was successful |
|---|---|---|
Add "Post a message in a chat or channel" actions twice and connect them. 💡 The first element should trigger if the case action ran into an error, the second if the error message was skipped, thus the case had been successful. This should look as follows: |
 |
 |
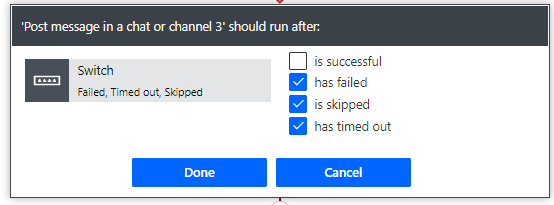
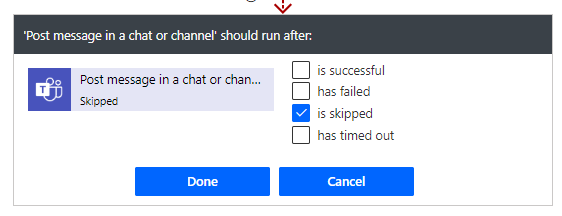
Configure run after-part
|
 |
 |
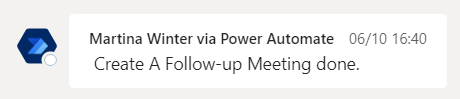
Outcome in Teams |

|
 |

"False" Branch
✅ In this case, we've missed the call and want to post an Adaptive Card to the channel of the service.
|
Add a "Post adaptive card in a chat or channel" element to the flow with the following content:
Adaptive Card = copy the code block below and edit the fields according to your needs: |
 |
|
Adaptive Card Body: | |
|
☝ NOTE: We added an action button that points to the URL to the Customer's page in the CRM. This URL needs to be populated to Nimbus within the lookup flow which is a prerequirement for this flow. → Make sure you have read the ✅ Prerequirements of this Use Case and that the Customer lookup-flow within your CRM of choice has run successfully. → This card looks like this when posted into the channel |
 |