In this use case, we're going to describe how you can set up Nimbus to look up internal user numbers from within your Azure AD directory.
By default, Nimbus does not perform this reverse lookup, but via Power Automate and our Nimbus Power Automate Connector you can use a Microsoft Graph Query to perform this task.
PRECONDITIONS
Licensing:
- Tenant Admin rights to access your user AD and perform this Flow on behalf of all your services
- Power Automate "Premium" license (to use the HTTP action)
- Phone numbers maintained in Azure AD must be stored in valid E.164 format or a predictable pattern - otherwise our query won't find any matches
Entra ID App Registration:
An App Registration, which must grant User.Read.All application permissions for the Graph API. An App Registration can be created as described under Register a client application in Microsoft Entra ID for the Azure Health Data Services | Microsoft Learn
🤔 Why is this necessary?
The App Registration’s credentials will be used to retrieve caller information from Azure AD via Graph API. Nimbus need the registration to retrieve the data via the HTTP action.
NOTES
This example is giving priority to the first found result returned by the Graph query. Other potential matches will not be considered.
🔎 See https://docs.microsoft.com/en-us/graph/query-parameters for more query customization options to fine-tune your search.
CLIENT SECRET EXPOSURE
Within the HTTP action in this example the client secret value is stored in clear text
→ You must therefore ensure that this data is not exposed to anyone without proper authorization.
→ Alternatively, you can also use the "Get secret" Action, available as part of the built-in Azure Key Vault Connector in Power Automate.
✅ This is a Microsoft Azure feature which requires a "Premium license" plus an "Azure Key Vault" which consumes Azure Storage Resources that will incur additional costs outside of your Nimbus subscription.
Flow Overview
This flow consists of the following steps:

Start Flow
- Go to the Flow landing page.
- Go to "My Flows".
- Click "+ New Flow" and create a blank "Automated Cloud Flow".
- Give your new flow a meaningful name, e.g. "Create entry in list".
- In the text box underneath, search for “Nimbus” and choose the “When a task changes state” trigger.
- Click the Create button.
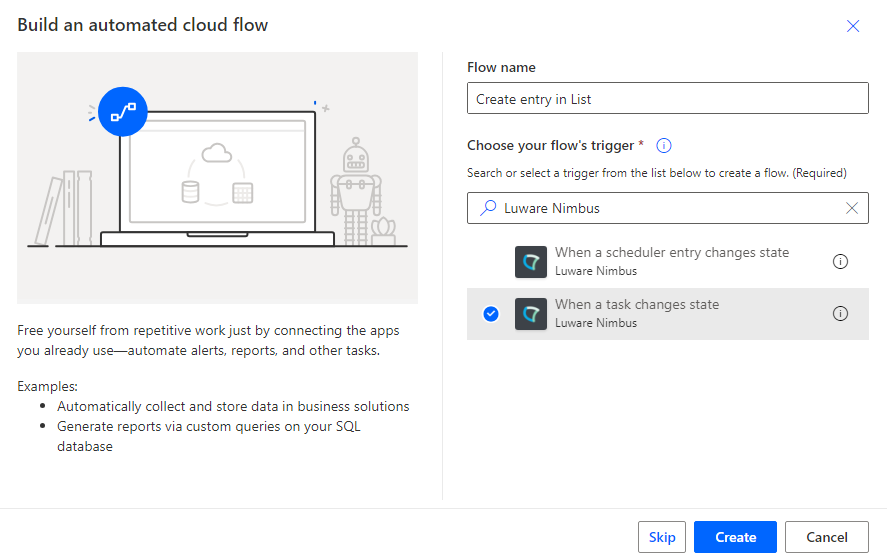
- Select the “When a task changes state” trigger.
- In the “Services Item” dropdown, select the Nimbus service's UPN.
💡 You can also get the data of multiple services at this point, but for the sake of simplicity we keep it to one service in this example. - In the “Task Events” dropdown select “System Accepted”.
- In the “Advanced parameters” dropdown enable “Modalities” and "Directions".
- In the “Modalities Item” dropdown select “Audio”.
- In the “Directions Item” dropdown select “Inbound”.
Initialize variable
To convert the Nimbus data for Graph Query, a variable needs to be initialized using Nimbus data.
- In the editing area click
 to add a new action.
 - Search for "initialize variable" and select “Initialize variable” under the “Variable” section.
- Configure the action as follows:
| Field | Value to fill in / 🌟 = Nimbus dynamic content | |
|---|---|---|
| Name | CallerID |  |
| Type | String | |
| Value |
This expression will replace any occurrence of a "+" sign in the E.164 number with a |
|
HTTP GET Request via Graph API
Next we use the variable to form a Graph Query via the HTTP step. Configure it as follows:
- In the editing area click to add a new action.
- Search for "HTTP" and select “HTTP” under the “HTTP” section.
- Configure the action as follows:
| Field | Value to fill in / 🌟 = Nimbus dynamic content | ||||
|---|---|---|---|---|---|
| URI |
If you have chosen a different name for the dynamic variable from the previous step, then you will need to replace CallerID accordingly. |
 |
|||
| Method | GET | ||||
| Headers |
Enter the following key/value pair:
|
||||
| Authentication | Active Directory OAuth | ||||
| Authority | https://login.microsoft.com | ||||
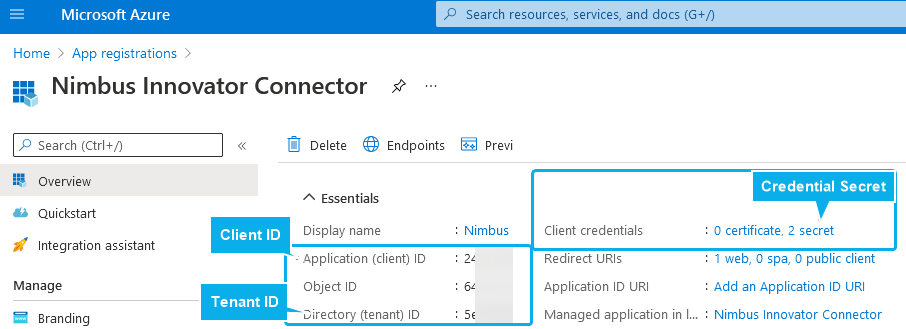
| Tenant | Directory (tenant) ID 🤔 Where to get this info? |
||||
| Audience | https://graph.microsoft.com | ||||
| Client ID |
Application (client) ID 🤔 Where to get this info? |
||||
| Credential Type | Secret | ||||
| Secret |
Client Secret Value 🤔 Where to get this info? ☝ The value can only be viewed & copied directly after creation, so you may need to create a new client secret in your App Registration. |
||||
Where to get the App Registration
As a Tenant Admin, head to https://portal.azure.com and find your Nimbus App Registration. (also see → Preconditions above on this page).
Parse JSON
With the search result returned by the previous HTTP step, we can now parse the Azure AD information to retrieve the individual user fields:
- In the editing area click to add a new action.
- Search for "Parse JSON" and select “Parse JSON” under the “Data Operation” section.
- Configure the action as follows:
| Field | Value to fill in / 🌟 = HTTP dynamic content | |
|---|---|---|
| Content | 🌟 Body |  |
| Value |
Add the following JSON Schema |
|
Update Task
Finally we update the current Nimbus task with the Update Task action.
- In the editing area click to add a new action.
- Search for "Nimbus" and select “Update task” under the “Luware Nimbus” section.
- Configure the action as follows:
| Field | Value to fill in / 🔃 = Nimbus dynamic content / ❴ ❵ = Parse JSON dynamic content | |
|---|---|---|
| Task ID | 🔃 Task ID
|
 |
| Customer First Name | ❴ ❵ givenName |
|
| Customer Last Name | ❴ ❵ surname |
|
| Customer Display Name | ❴ ❵ displayName |
|
| Customer Company | ❴ ❵ companyName |
|
| Customer Job Title | ❴ ❵ jobTitle |
|
| Customer Department | ❴ ❵ department |
|
| Customer Street Address | ❴ ❵ streetAddress |
|
| Customer Postcode | ❴ ❵ postalCode |
|
| Customer City | ❴ ❵ city |
|
| Customer State | ❴ ❵ state |
|
| Customer Country | ❴ ❵ country |
|
| Customer Primary Telephone Number | |
|
| Telephone Numbers |
Click on |
|
| Customer UPN | ❴ ❵ userPrincipalName |
|
| Customer IM Address | |
|
| Customer Email | ❴ ❵ mail |
|
 to and add