The Problem: Iterating through Excel rows inside a Power Automate flow can become time-consuming when the sheet exceeds a certain number of rows.
Improving performance can only be done by a replacing the Excel sheet with a better performing data source. An Azure Table Storage is such a powerful data source.
Show a preview of the flow...
PRECONDITIONS
For this Use Case you need:
- A Power Automate Premium subscription (for the "Azure Table Storage" Element).
- An Azure subscription with Resource Group. A Storage Account within the Resource Group is needed.
🔍 See: Quickstart - Create an Azure Storage table in the Azure portal and Storage account overview
💡 These subscription costs are outside of Luware and Nimbus product scope.
Show Icon Legend
| 💡 = A hint to signal learnings, improvements or useful information in context. | 🔍 = Info points out essential notes or related page in context. |
| ☝ = Notifies you about fallacies and tricky parts that help avoid problems. | 🤔 = Asks and answers common questions and troubleshooting points. |
| ❌ = Warns you of actions with irreversible / data-destructive consequence. | ✅ = Intructs you to perform a certain (prerequired) action to complete a related step. |
How-To Steps
Create Table Storage in Azure
- Log into the Azure portal.
-
Create a Table - you can follow the instructions on Quickstart - Create an Azure Storage table in the Azure portal | Microsoft Docs.
🔍 By default rowKey is a string. It is important that your rowKey holds the phone number, because this column is indexed and thus efficient to search. -
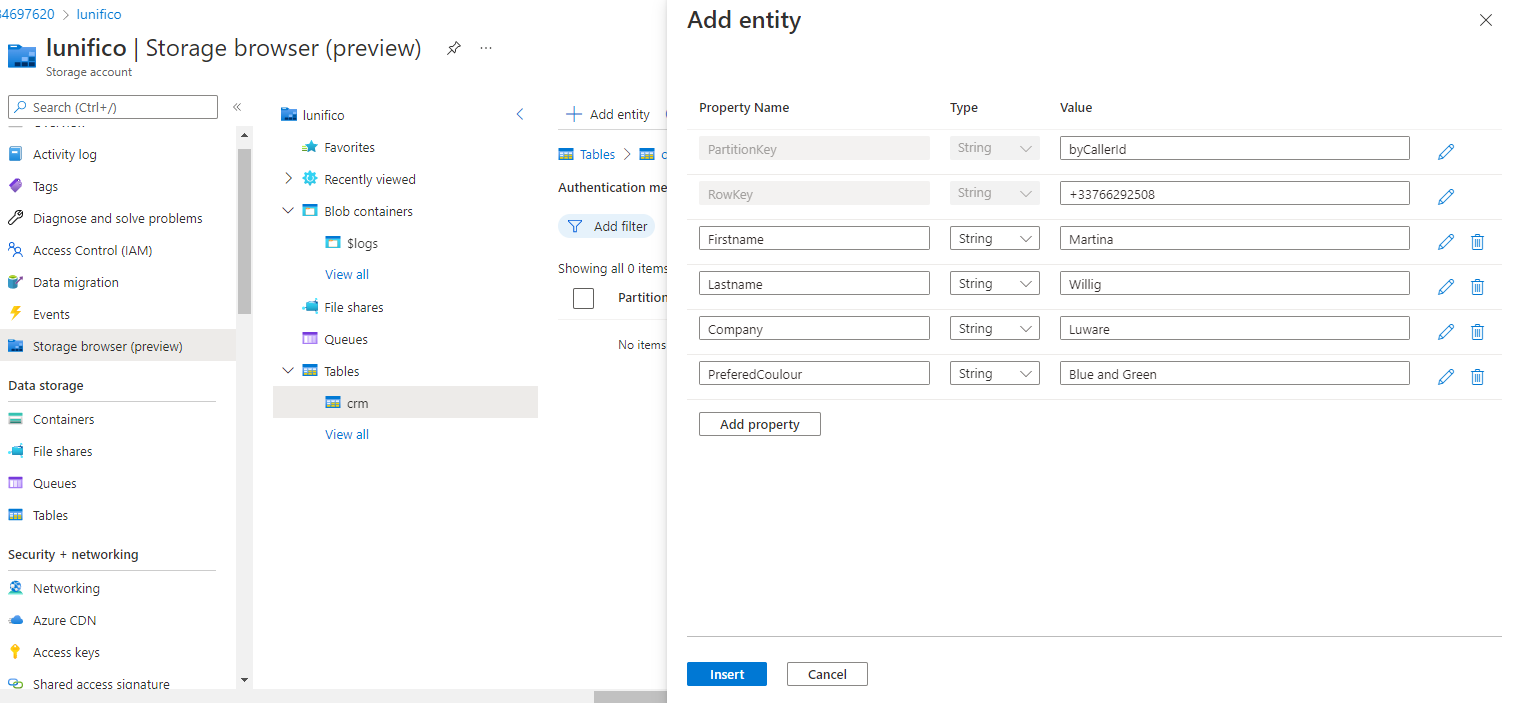
Next, insert some example data for testing purpose. You can use the Storage browser → Tables → (your table name) → Add entity
🔍 Note, that the phone number holds the complete string with country prefix, in the same format as Microsoft Caller ID holds it in our Power AutomateConnector.
Once the table is created and has at least one entry to query on, you can use it inside your Power Automate flow.
Create the flow
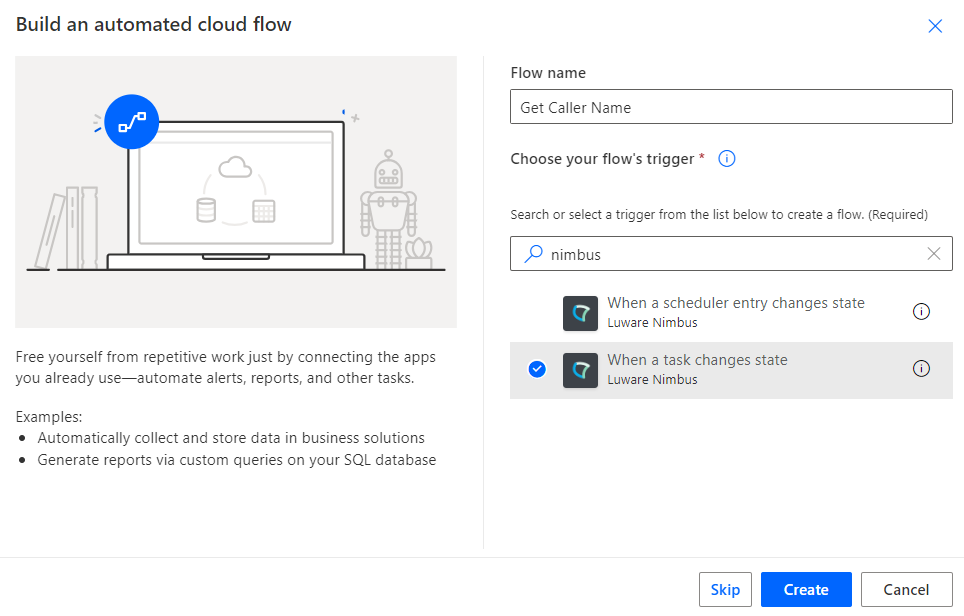
- Visit the Flow landing page: https://make.powerautomate.com/
- Go to "My Flows".
- Click "+ New Flow" and create a blank "Automated Cloud Flow".
- Give your new flow a speaking name, e.g., "Get Caller Name".
- In the text box underneath, search for “Nimbus” and choose the “When a task changes state” trigger.
- Click the Create button.
- Select the “When a task changes state” trigger.
- In the “Services Item” dropdown select the Nimbus service's UPN.
💡 You can also get the data of multiple services at this point, but for the sake of simplicity we keep it to one service in this example. - In the “Task Events” dropdown select “System Accepted”.
- In the “Advanced parameters” dropdown enable “Modalities” and "Directions".
- In the “Modalities Item” dropdown select “Audio”.
- In the “Directions Item” dropdown select “Inbound”.
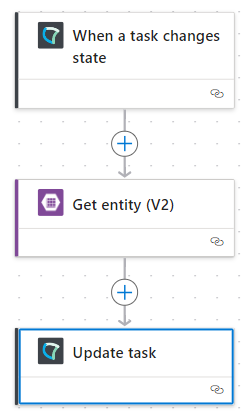
- In the editing area click
 to add a new action.
 - Search for "Azure table storage get entity" and select “Get entity (V2)” under the “Azure Table Storage” section.
- Configure the action as follows:
| Field | Value to fill in / 🌟 = Nimbus dynamic content | |
|---|---|---|
| Partition Key | Enter the value you used for PartitionKey in your Azure Table (In our example this is byCallerId) | 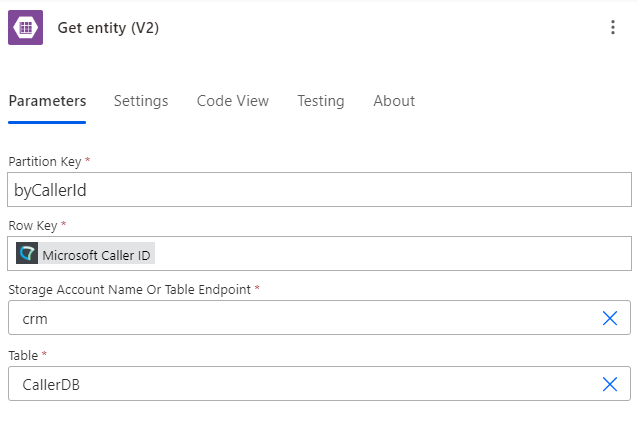 |
| Row Key | 🌟Microsoft Caller ID | |
| Storage Account Name Or Table Endpoint | Enter the name of the storage account | |
| Table | Enter the name of the Table containing the data | |
💡 In case no connection exists yet for the Azure Table Storage, Power Automate will ask you first to connect. To get more information about the options, please have a look at the Azure Table Storage - Connectors article.
- In the editing area click to add a new action.
- Search for "Nimbus" and select “Update task” under the “Luware Nimbus” section.
- Configure the action as follows:
| Field | Value to fill in / 🌟 = Nimbus dynamic content | |
|---|---|---|
| Task ID | 🌟 Task ID | 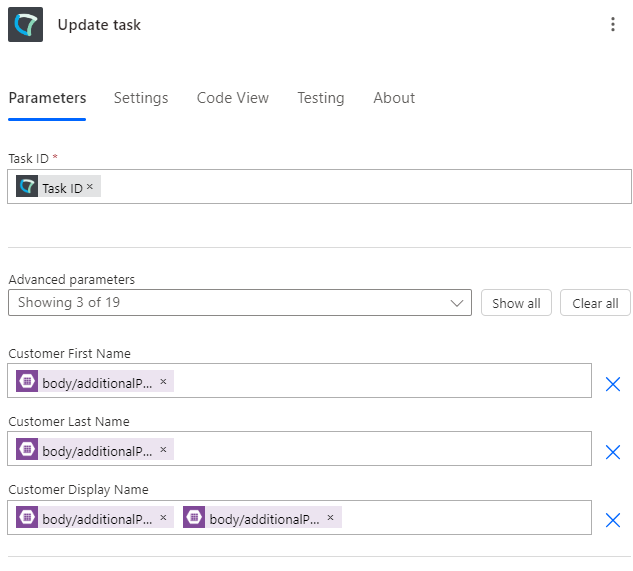 |
| Customer First Name | |
|
| Customer Last Name | |
|
| Customer Display Name |
|
|
Fill the Azure Table with Excel Data
Now that everything works, we just need to fill the Excel data into the Azure Storage Table.
You can easily upload a csv using the Microsoft Azure Storage Explorer (Download at http://storageexplorer.com/). Or you write a script for PowerShell. Here is the code snippet for adding a new row:
$cloudTable = 'crm'
$callerNumber = '+44786536774'
$item = @{Firstname="Mathias"; Lastname="Meier"; Company= "Big Dreams"; PreferedCoulour= "Red"}
Add-AzTableRow -table $cloudTable -PartitionKey 'byCallerId' -rowKey $callerNumber -proper