Click to Call allows you to make calls (via Assistant UI) by clicking on specifically prepared HTML links.
PRECONDITIONS
- Enterprise Routing Contact Center Licensing - "Click to Call" links make use of Outbound Service Call / Call On Behalf as a Enterprise Routing or Contact Center licensed feature. Additionally, the "Outbound Calls" option must be enabled in the Distribution Service Settings for the service to be selectable within Assistant.
- User Licensing - Assistant users must be members of this service to have it as a selection option before making the call.
- Assistant Installation - This feature requires the Assistant App to be installed on each user PC. This will register nimbus-call protocol within the user's PC so Assistant can recognize the call as a Nimbus session.
- PSTN Licensing - If you are calling to PSTN numbers via Click to Call, your outbound service also needs a PSTN number applied via the General Service Settings. Contact your administrator if you require a number and related PSTN license. Note that these licenses cost are handled by Microsoft and are outside of Luware Nimbus scope.
Supported link variants
Please note that Assistant supports the following protocols:
-
To prefill the target field:
tel:<target>callto:<target>nimbus-call:<target>
-
To start a call directly:
tel:<target>:<serviceId | service UPN>callto:<target>:<serviceId | service UPN>nimbus-call:<target>:<serviceId | service UPN>
💡 All supported protocols are explained below in various examples. To register tel and callto protocols permanently on the Assistant app, refer to the “Troubleshooting and Tips” chapter below.
The following link variants are supported:
Variant A: Nimbus call protocol - Outgoing call without service preselected
In this variant the user can click a link, then needs to select a service to call on behalf of in the Assistant UI:
<p>This is the standard Nimbus service call protocol and should open Nimbus Assistant dialpad.</p></br>

<a href="nimbus-call:+41791234567">
Nimbus Call to +41791234567 without Service preselected
</a>
<br/><br/>


<a href="nimbus-call:mwinter@lunifico.com" >
Nimbus Call to UPN mwinter@lunifico.com without Service preselected
</a>
<br/><br/>
Variant B: Nimbus call protocol - Outgoing call with service preselected for impersonation
In this variant the user can click a link and the service to call on behalf of is already preselected in the Assistant UI:
<p>This is the standard Nimbus service call protocol and should open Nimbus Assistant dialpad
with a service preselected.</br>
This example uses Nimbus Service: "contact.center.uk@lunifico.com".
Adapt to your service UPN as needed.</p>

<a href="nimbus-call:+41791234567:contact.center.uk@lunifico.com">
Nimbus Call to +41791234567 with Service
</a>
<br/><br/>

<a href="nimbus-call:a6c49c4b-ac44-4b52-ba4b-ea8c95e9c28c:contact.center.uk@lunifico.com" >
Nimbus Call to a microsoftTeamsUserId with Service
</a>
<br/>
Variant C: MS Teams default callto / tel protocols - handled outside of Nimbus
Of course you can still use the default MS Teams functionality and baseline call protocol. These calls are not reflected in the Nimbus UI and not subject to Reporting.
<p>This is the standard MS Teams direct call protocol and should initiate a Teams call.</p>

<a href=callto:+41791234567 >
Teams Call to +41791234567
</a>
<br/><br/>

<p>This is the old MS Teams direct call protocol and should initiate a Teams call if configured locally.</p>

<a href=tel:+41791234567 >
Teams Call to +41791234567
</a>
🔍 Read the section below to register Assistant as the default for these protocols.
Troubleshooting and Tips
🤔 Click to Call not working?
Installing the latest Assistant App should create new entries for the nimbus-call protocol within the windows registry.
Click here for troubleshooting steps...
1. First, ensure that all preconditions are met, in particular your installed version of Assistant.
2. Open the registry editor (Start > Run > Regedit) to ensure that the key has been registered:
Computer\HKEY_CLASSES_Root\nimbus-call
3. Once installed, prepare a mini-HTML site to test your links, using the variant scenarios described above.
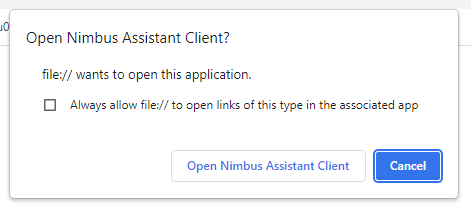
4. Clicking on a prepared link should detect the Nimbus protocol and associated it with Assistant:

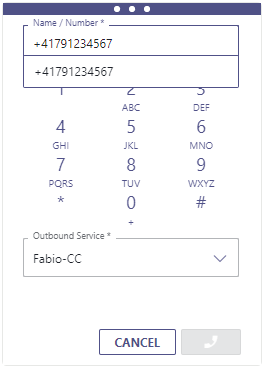
5. The call window should now open with the correct name/number and "Outbound Service" shown
6. Note that the "Outbound Service" will only be selectable for users (members) assigned to that service and if the service is enabled for the Outbound call direction (🔍 see Service Administration > Service Settings).
💡 If the link points to an invalid or user-foreign service the pulldown will show the first available service entry instead.
7. Other things to check when clicks on a link are not working:
- Assistant App not running in the background.
- Wrong number (format) - Expecting E.164.
- Permissions on the target machine missing (e.g. Windows registry keys are missing or the App was not installed correctly).
🤔 Can I register Assistant as default for callto and tel protocols?
Yes, however some registry keys have to be set for Assistant in order to register as an application that supports these protocols.
🤔 Can I register Assistant as default for callto and tel protocols?
Yes, however some registry keys have to be set for Assistant in order to register as an application that supports these protocols.
Show me the necessary setup steps....
1. Start a new text file that will act as your registry key import, e.g. "AssistantProtocolRegistry.txt"
2. Edit the text file and add the following contents:
Windows Registry Editor Version 5.00

[HKEY_CURRENT_USER\SOFTWARE\Classes\callto]
@="URL:callto"
"URL Protocol"=""

[HKEY_CURRENT_USER\SOFTWARE\Classes\tel]call
@="URL:tel"
"URL Protocol"=""

[HKEY_CURRENT_USER\SOFTWARE\Classes\NimbusClient.callto]

[HKEY_CURRENT_USER\SOFTWARE\Classes\NimbusClient.callto\Shell]

[HKEY_CURRENT_USER\SOFTWARE\Classes\NimbusClient.callto\Shell\Open]

[HKEY_CURRENT_USER\SOFTWARE\Classes\NimbusClient.callto\Shell\Open\Command]
@="\"C:\\Program Files\\Luware AG\\Nimbus Assistant Client\\Assistant.Client.exe\" \"%1\""

[HKEY_CURRENT_USER\SOFTWARE\NimbusClient]

[HKEY_CURRENT_USER\SOFTWARE\NimbusClient\Capabilities]
"ApplicationDescription"="NimbusClient"
"ApplicationName"="NimbusClient"

[HKEY_CURRENT_USER\SOFTWARE\NimbusClient\Capabilities\URLAssociations]
"callto"="nimbusclient.callto"
"tel"="nimbusclient.callto"

[HKEY_CURRENT_USER\SOFTWARE\RegisteredApplications]
"NimbusClient"="Software\\NimbusClient\\Capabilities"
☝ Note that the path to 'Assistant.Client.exe' has to be adjusted if NA is not installed in the default directory.
3. Rename your text file to a ".reg" file extension and import it to your registry. Afterwards, restart your machine.
4. After a restart, NA will show up in the "Default Apps" system settings of Windows, where it can be assigned as the default application for 'tel:' and 'callto:' protocols:
5. Afterwards, links containing the prefixes will be opened directly in Assistant.
Also have a look at our Use Case - Adding a Nimbus Click to Call button in Salesforce.