In this scenario we demonstrate how to schedule a Callback out of a Nimbus queue, when a caller has chosen this option instead of waiting any longer.
Expand to see a preview of the flow…

PRECONDITIONS
In this use case we assume that you've already created a Nimbus service and workflow, which we will now extend to facilitate automatic callbacks.
Contact Center Your service needs to have a Contact Center service license assigned to be able to use the advanced workflow activities and schedule outbound calls via Power Automate. See Nimbus Features for a full overview of all available features by license.
INC Icon Legend Accordion
Show Icon Legend
| 💡 = A hint to signal learnings, improvements or useful information in context. | 🔍 = Info points out essential notes or related page in context. |
| ☝ = Notifies you about fallacies and tricky parts that help avoid problems. | 🤔 = Asks and answers common questions and troubleshooting points. |
| ❌ = Warns you of actions with irreversible / data-destructive consequence. | ✅ = Intructs you to perform a certain (prerequired) action to complete a related step. |
Preparing in Nimbus
Define the parameters
First, we define two Parameters named "CallBackNumber" and "CallMeBack" which our workflow requires:


We leave their default values empty.
Adding a callback option to the Nimbus workflow
In this example, we're using an “Input Customer” Conversation Handling Activity in our Nimbus workflow to ask the caller whether they would prefer to keep waiting or rather leave the queue and be called back later instead.

We are using the “Save to Parameter” Conversation Handling Activity to store the caller's phone number and indicate that they specifically asked for a callback.
💡You can extend your workflow to be even more dynamic at this point, e.g. by first playing back the number that will be used for the callback as part of an announcement and asking the caller to confirm whether this is correct or they would like to enter a different number instead (using the “Collect Information” workflow activity).
Creating the Power Automate Flow
We will now proceed with creating a new Power Automate flow that reacts specifically to the "CallMeBack" parameter being updated by the Nimbus workflow.
- Sign in to Power Automate at https://make.powerautomate.com/.
- Go to "My Flows".
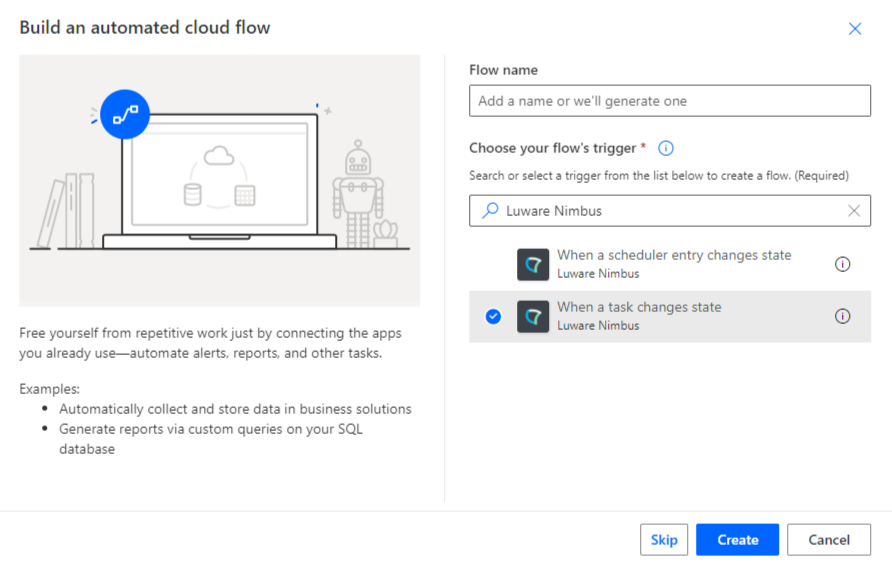
- Click "+ New Flow" and create a blank "Automated Cloud Flow".
- Give your new flow a meaningful name, e.g., Schedule Callback.
- In the text box underneath, search for the Nimbus Power Automate Connector and choose the “When a task changes state” trigger.
- Click “Create”.
Configure the trigger
- Select the "When a task changes state" Trigger Event.
- In the "Services" dropdown, select the Nimbus service's UPN.
💡 You can also select multiple services. - In the "Task Events" dropdown, select "Parameter Updated".
- Switch to the “Settings” tab and click "Add" (under “Trigger conditions”).
- Enter
@and(equals(triggerOutputs()?['body/updatedParameterName'], 'CallMeBack'),equals(triggerOutputs()?['body/updatedParameterValue'], 'True'))
💡 This will ensure that the Power Automate flow only starts if the "CallMeBack" parameter is updated and only if its assigned value is "True".
☝ We are specifically monitoring updates to the "CallMeBack" parameter here as the "CallBackNumber" Parameter may receive multiple updates within the Nimbus workflow until finalized.

Extract Callback Number
- Click
 and select "Add an action".
- Search for and select the "Filter array" action.
- Click into the "From" field and select “Task Information Custom Context Parameters”.
- Under "Filter Query", click into the left-side "Choose a value" field and choose "Insert Expression" and add the expression
item()['Name'] - On the right side, enter "CallBackNumber" (or whichever name you chose for your parameter) in plain text.
☝Case Sensitivity check: Ensure the Parameter Name within Nimbus matches with what is defined within Power Automate. (e.g.CallBackNumberhas to be the same way in Nimbus and Power Automate, a different spelling likeCallbackNumberwon't work.)

- Next, click and select "Add an action" again.
- Search for and select the "Initialize variable" action.
- Set the name to "CallBackNumber".
- Set the type to "String".
- For the value, enter
first(body('Filter_array'))?['Value']as an expression.

Schedule Outbound Call
- Click and select "Add an action".
- Search for and select the "Schedule a new outbound call" action from the "Luware Nimbus" connector.
- Schedule a new outbound call at a time of your choosing. In our example, we're using the following expression to get a point in time ten minutes from now:
getFutureTime(10,'Minute')
