In this Use Case we want to create different tasks in Microsoft Planner depending on the call outcome:
- Missed Calls without leaving a Voicemail shall create call back tasks
- Missed Calls with a Voicemail left shall create tasks with the Voicemail content
- Handled Calls should create follow-up tasks for the Agent who handled the call.
Each case will result in a different Power Automate flow. We will therefore need to create 3 flows.
PRECONDITIONS
- A Nimbus Service has been set up.
- You require service owner rights to make changes to the service Workflows and Nimbus Configuration. This also allows you to share the Planner task list within the MS Teams channel of your Service.
INC Icon Legend Accordion
Show Icon Legend
| 💡 = A hint to signal learnings, improvements or useful information in context. | 🔍 = Info points out essential notes or related page in context. |
| ☝ = Notifies you about fallacies and tricky parts that help avoid problems. | 🤔 = Asks and answers common questions and troubleshooting points. |
| ❌ = Warns you of actions with irreversible / data-destructive consequence. | ✅ = Intructs you to perform a certain (prerequired) action to complete a related step. |
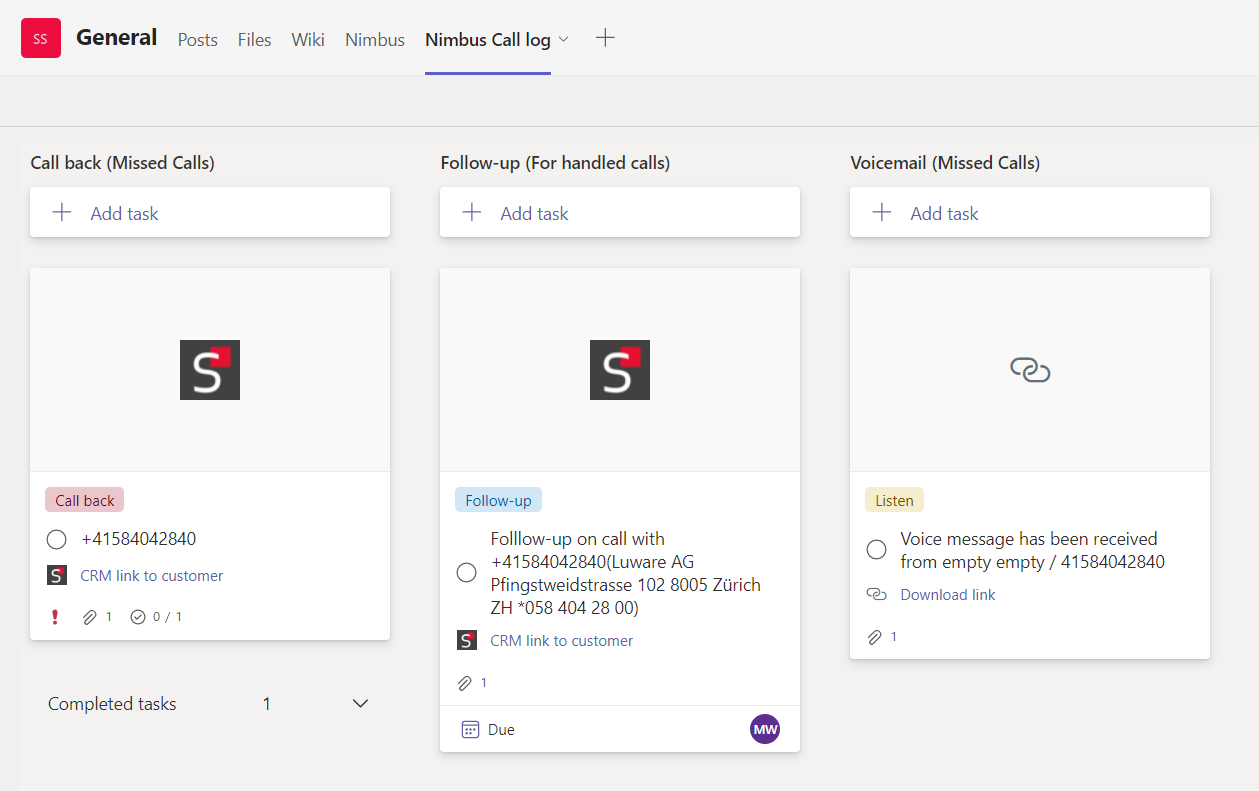
Create the planner list and buckets
Add a new Tab on your team and create a new planner list. Add 3 buckets to it
- Call back
- Follow-up
- Voicemail
Here is a preview of what we expect to see, once the Power Automate flows are all set up:
Configuration in Nimbus
In Nimbus we need to create a new Parameters and set up the Workflow:
- Create a Parameter named "
WentToVoiceMail" and set its value to -1 .
- Tn the Workflow:, before sending any calls to a “Voicemail” Activity, set the value of this parameter.
We can use the activities "Save To Parameter “ or ”Collect Information" to do so.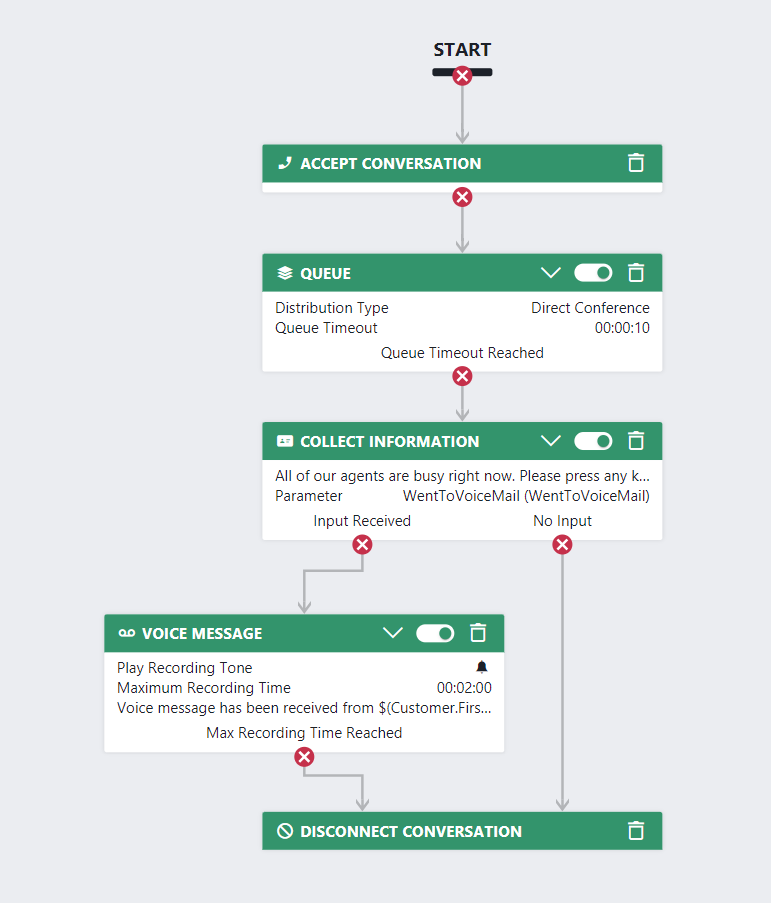
- Finish your workflow as needed (e.g. with Voicemail and Caller disconnect).
Now it's time to prepare the flows in the background.
Flow 1: After every handled call, create a follow-up task in Planner
Create a new Power Automate flow and name it: "<Nimbus Service Name>- Follow-up Task on ConnectedToUser in Planner".
Show Flow Overview

The flow steps are explained in the following.
Description |
Settings |
Element |
|---|---|---|
| To trigger the flow, begin with "When a task changes state" from the Nimbus Connector and listen to the Connected to User event. |
|

|
| Now add a "Create a task" action from the Planner connector to the flow. |
💡 We also set the label Blue to Yes to help distinguish the task in planner. |
 |
|
Add a "Update task details" activity to the flow. We also want to see the Voicemail link on the task. |
💡 The reference link could be your customer CRM's URL. |
 |
Flow 2: On missed calls without Voicemail left, create a call-back task in Planner
Create a new Power Automate flow and name it: "<Nimbus Service Name> - Callback on WentToVoicemail = -1 and LastConnectedUser null in Planner".
Show Flow Overview

Description |
Setting |
Element |
|---|---|---|
| To trigger the flow begin with "When a task changes state" from the Nimbus Connector and listen to the Terminated event. |
|
 |
| Add an "Filter array" activity to the flow to filter the WentToVoiceMail parameter value from all the custom context parameters. |
1. 2. is equal to 3. WentToVoiceMail |
 |
| Add an "Initialize variable" action to the flow to store the WentToVoiceMail parameter's value. |
|
 |
| Add another "Initialize variable" action to the flow to store the LastConnectedUserId parameter's value.. |
|
 |
| Add a "Condition" action to the flow. We need to check if LastConnectedUserId is null. |
|
 |
|
In the "True" branch we want to go further. Add a "Condition" action to the flow. We need to check if a Voicemail has been recorded. If not, then we want to create the call back task. If the user pressed any key (as indicated in our workflow), then the call went to the voicemail workflow activity. |
|
 |
|
In the "False" branch we want to go further. Add a "Create a task" action to the flow. This allows us to create a task in planner. |
💡 We also set the label Red to Yes to help distinguish the task in planner, |
 |
| We also want to set some details on the task. Add a "Update task details" action to the flow. Add information according to your own use case. |
We also add a checklist item "Call back" and set it to False. |
 |
Flow 3: For every Voicemail left, create a voice-message handling task in Planner
Create a new Power Automate flow and name it: "<Nimbus Service Name> - Voicemail Task on Received Voicemail Card in Planner".
Show Flow Overview

Description |
Setting |
Element |
|---|---|---|
|
We know that Nimbus Voicemails create Adaptive cards in Teams. Therefore, begin the flow with a Teams trigger "When a new channel message is added". |
|
 |
|
Add a "Initialize variable" action to the flow. From the Adaptive Card, we want to get to the VoiceMessageUrl. |
💡You might need to use |
 |
|
Add another "Initialize variable" action to the flow. From the Adaptive Card, we want to get the Title text. |
💡You might need to use |
 |
|
Now add a "Condition" action to the flow. We need to check on the Url. Only if a Voicemail has been left, we want to create the task in planner. |
|
 |
|
In the “True” branch, add a "Create a task" action to the flow. We set the title to the Voicemail adaptive card text. |
💡 We also set the label Yellow to Yes to help distinguish the task in planner, |
 |
|
We also need to add the Voicemail Url as a link to the task. Add a "Update task details" to the flow. Add information according to your own use case. |
|
 |