🔍Related Page: This use case is a more complex extension to Use Case - Creating an incident task in ServiceNow.
In this scenario we want to create an incident record in ServiceNow, based on the information the caller gives us.
The flow is as follows:
- A caller calls the IT Helpdesk Number.
- In the Nimbus workflow, there is a "Customer Input" element asking whether the caller wants to get agent help or open a specific ticket type.
- If the caller chooses the incident report, we save the decision into a Parameter. Based on this parameter, we will create a technical or administrative ticket in ServiceNow.
- The Power Automate flow starts with a "When a task changes state" Session Event item and checks on the "ParameterUpdated" Trigger Event.
Show a preview of the flow...

PRECONDITIONS
In this use case we assume that you've already created a Nimbus service.
Enterprise Routing Your service needs to have a Enterprise Routing service license assigned to be able to use the advanced Workflow Activities. See Nimbus Features for a full overview of all available features by license.
Additionally, ensure to read and follow the Nimbus Power Automate Connector preconditions, as this Use Case will make use of Nimbus Trigger Events and Flow Actions.
You will also need:
- A Power Automate Premium subscription for the "Service Now" connector element. The subscription is also required for the Nimbus Connector.
- A ServiceNow connection. Alternatively you can use a dev box as described below.
INC Icon Legend Accordion
Show Icon Legend
| 💡 = A hint to signal learnings, improvements or useful information in context. | 🔍 = Info points out essential notes or related page in context. |
| ☝ = Notifies you about fallacies and tricky parts that help avoid problems. | 🤔 = Asks and answers common questions and troubleshooting points. |
| ❌ = Warns you of actions with irreversible / data-destructive consequence. | ✅ = Intructs you to perform a certain (prerequired) action to complete a related step. |
Create your ServiceNow Dev Box
- Sign up on https://developer.servicenow.com
- Go to the instructions on how to obtain a Personal Developer Instance (PDI) and create your instance.
✅ Note down the connection details for later! - Check that in In ServiceNow the status of your instance should show "Online".
- Open and log into your box.
- Find the Incidents table and open it.
- Find the user who has read/write permissions on it (per default Incident.Manager)
- You can always view connection credentials in My Instance ->"Manage instance password"
- If you don’t use your instance for more than 10 days, ServiceNow will back it up. Recovery might take very long or cause errors, so we recommend creating a fresh one if you need to test again.
Prepare in Nimbus
In Power Automate we can evaluate the choice of the collect information workflow item and create a ServiceNow ticket accordingly.
- In Nimbus, go to Configuration > Parameter > click on "Create New".
- In this example we store the input into a Parameter called "HotlineName"

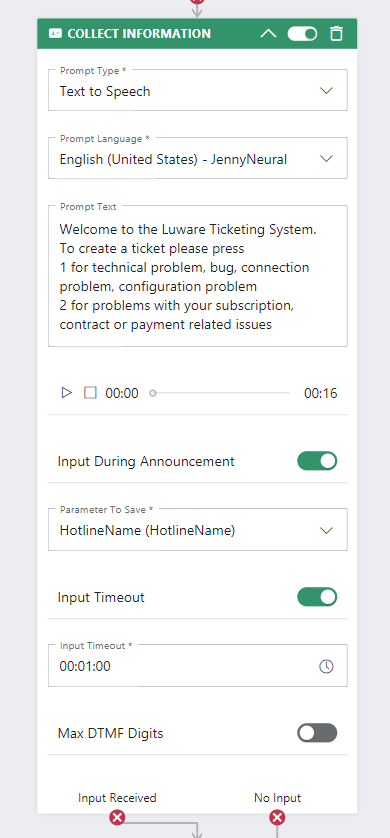
- Then we create a workflow where we use this parameter to store the customer input using the "Collect Information"activity.
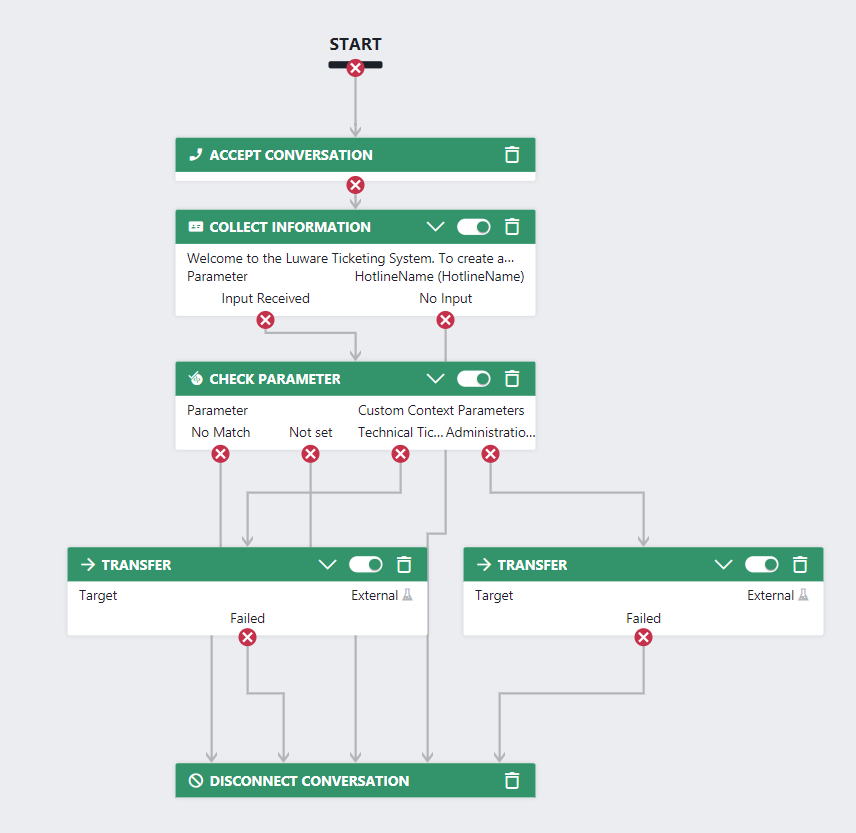
Click here to see an overview of this workflow

- We start the workflow with "Accept Conversation" and link it to "Collect Information". This is where the caller will input the choice. We choose the option "Parameter to Save" to store the input to our new Parameter "HotlineName".
💡 After the "Collect Information" workflow step we will use the Power Automate "Parameter Update" trigger event and create the ServiceNow ticket in the background. We will cover this in the next step as we iterate over the choices and route the call accordingly in your flow's outcome.
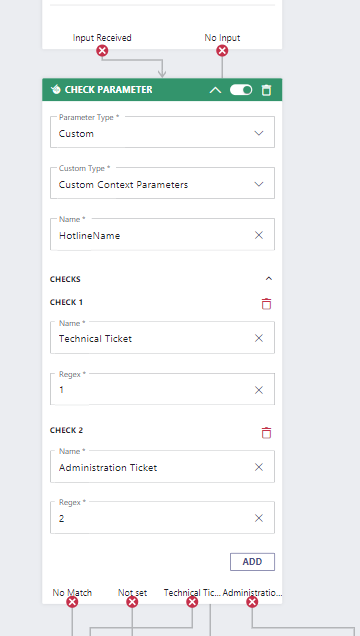
- To complete your Nimbus workflow, add a check "Check Parameter" workflow activity after the "input received" exit and connect the outcomes accordingly.
💡 In our example:- Check 1 is a Technical Ticket (User dialed #1 via DTMF)
- Check 2 is an Administration Ticket (User dialed #2 via DTMF)
- The exits are then connected to a "Transfer" activity each, leading the user to to the corresponding services.

Create the flow
🔍 In Power Automate we can evaluate the choice of the "Collect Information" workflow activity and create a ServiceNow ticket accordingly.
- We start with "When a task changes state" Trigger Event and want to listen to the "Parameter Updated" Task event.

- Add a "Switch" element to the flow as for each branch you want to create a different ticket in ServiceNow.
Switch on the context parameter created in Step 2.-
On = triggerOutputs()?['body/updatedParameterValue']

-
On = triggerOutputs()?['body/updatedParameterValue']
Create the ServiceNow Ticket
- In each branch of your Switch case, add a ServiceNow "Create record" element to the flow.
- The first one it will ask you to connect to your ServiceNow instance.
💡 Give it a clear title, choose Authentication Type “Basic Authentication” and use the credentials copied from the earlier Dev Box preparation step (ServiceNow → My Instance → "Manage instance password")
- In your Record Type choose the table name where you want to create the tickets in.
- Name your ServiceNow "Create Record" step to handle the "Technical Ticket" (Check1 from the "Collect Information" workflow step in Nimbus).
- Under Advanced parameter, select the fields you want to fill in and and dynamic content. For instance using the following Context Fields provided by the Nimbus connector:
- Sys ID = <Nimbus Taskid>
- Created = <Nimbus Created>
- Description= New ticket via Nimbus service <Nimbus Service Name>
- Type = triggerOutputs()?['body/updatedParameterValue']
-
Created By = NimbusPowerAutomate Adapter

- Repeat this step for the other branch of your Switch case, this time handling the Administration ticket (Check2 from the "Collect Information" workflow step in Nimbus).
💡 You can copy and paste the other "Create Record" flow step to save time and avoid mistakes.
Update the Nimbus Task

- Finally, add a Nimbus "UpdateTask" Flow Action to the flow and write back the information to the ticket.
- Under Advanced parameters, tick the box for “custom Fields” and “Custom Context Parameters”
- Customer.CustomFields name = ServiceNowTicket , value = Sys ID
-
CustomContextParameter name = ServiceNowUrl , value = concat("<your serviceNowURL>/", Sys ID)

Test your flow
- Run your flow by calling your main service number
- Input the corresponding user choice (DTMF tones) for the incident response team
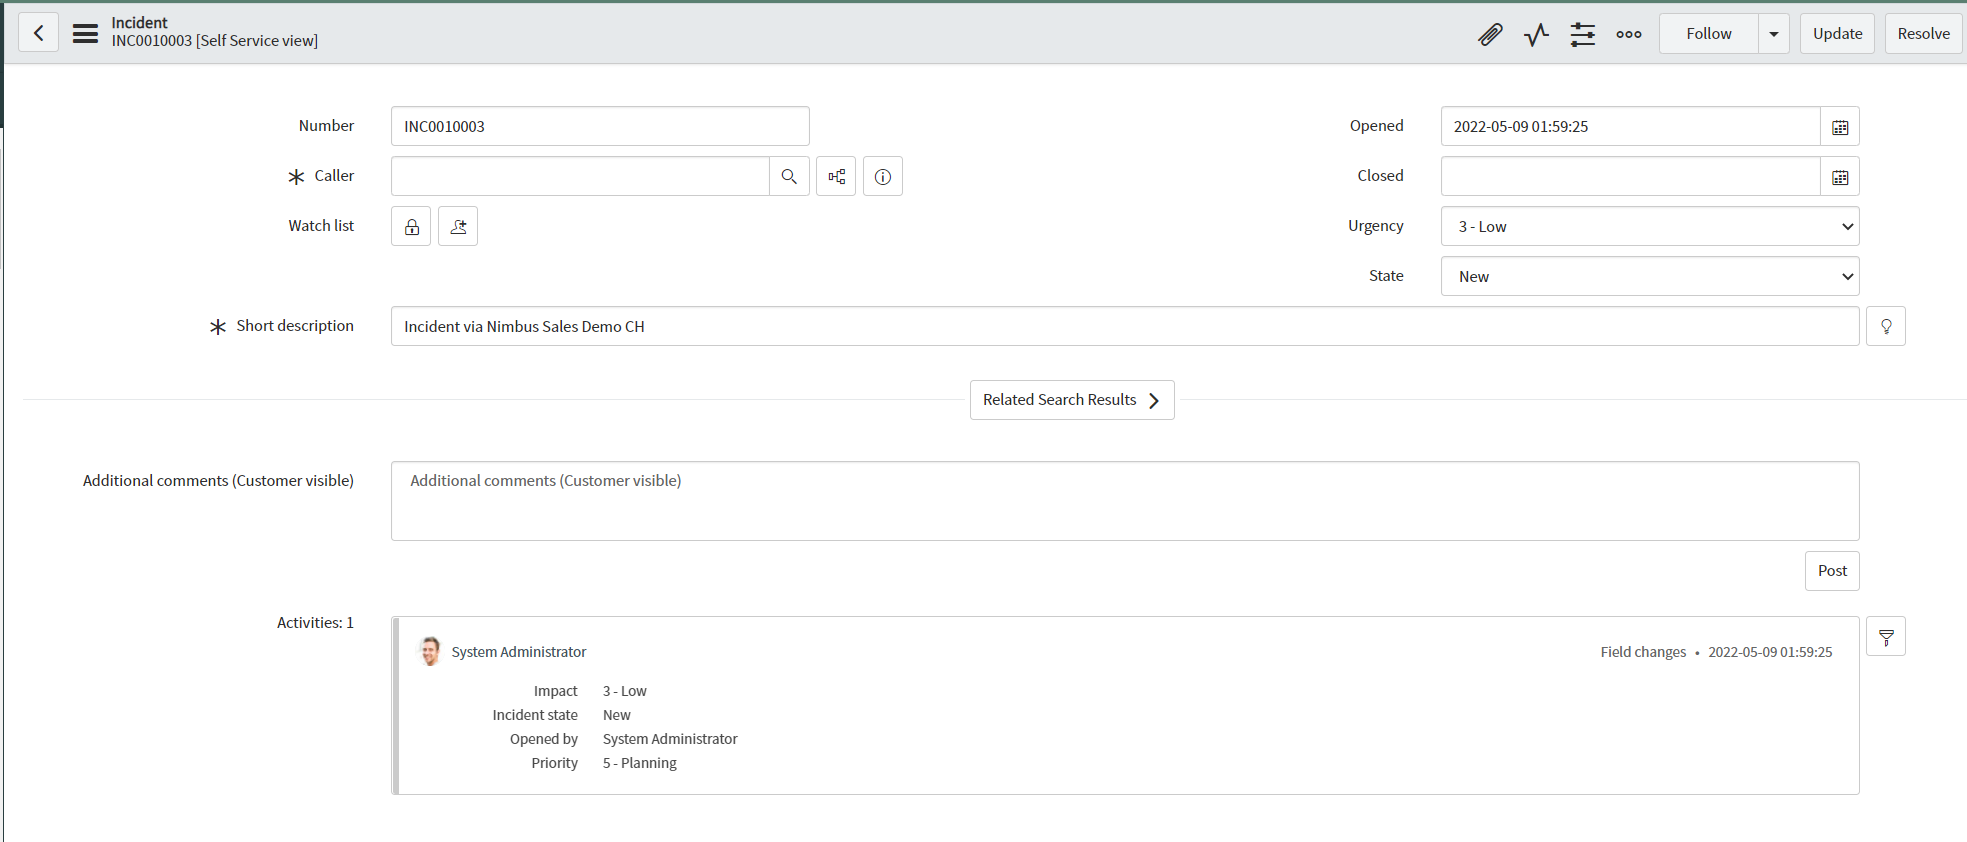
- Verify in ServiceNow that the incident ticket has been created accordingly.
