Workflows allow you to customize the handling and distribution of incoming tasks of any modality. Workflows can also handle customer interaction and manage transfers to other services. Advanced workflows react to Opening Hours and respond depending on Parameters or other actions as defined by individual Workflow Activities. In short: they are essential for bringing your service to life.
Managing Workflows
Workflows can be managed from both Nimbus Portal and Admin UI in Configuration.

Workflow Actions
In this view you can:
- View all available workflows. 💡Users with limited rights will see a reduced list, while Administrators can access all available workflows.
- Copy any existing workflow to use as base for your new edit.
- Configure properties like Name, Organization Units. 💡Certain properties are fixated after creation and cannot be changed.
- Edit Workflows inside a specialized editor that allows to add, configure and connect Workflow Activities.
- Export workflows to your computer, to be imported on other Nimbus instances.
- Create new workflows either based on blank or existing system templates.
💡GOOD TO KNOW
- All workflows are of a (modality-specific) workflow type, each with distinct activities available. Workflow types are not interchangeable in Export or Import and cannot be converted in different types.
- In order to take effect, workflows need to be selected in each service's individual Settings > Modality Tab. Each modality uses their distinct workflow type, so multiple different workflows can be in effect at the same service.
- Multiple services can use the same workflow simultaneously. While a workflow is in use, deletion is not allowed, but editing the workflow is.
- Workflows may rely on additional on other configured Resources (music, sound files, announcements), which are organized in Playlists. Advanced configuration items such as Custom Parameters, Web Requests or Virtual Users unlock powerful workflow features and interactions with other systems1.
1🔎Visit our Introduction to Nimbus Use Cases, as many of them introduce the use of advanced workflow concepts. A good start is Use Case - Creating a Call Workflow.
Creating a Workflow
You can create your own custom workflows and templates, or use Nimbus-predefined ready-to-use Workflow Templates. Upon creation, you will be asked which workflow type (modality) you wan to use.
Workflow Type
✅ This is the first step in your workflow creation. Clicking Create New starts the workflow creation. On the first screen, you have to select the workflow type (modality):

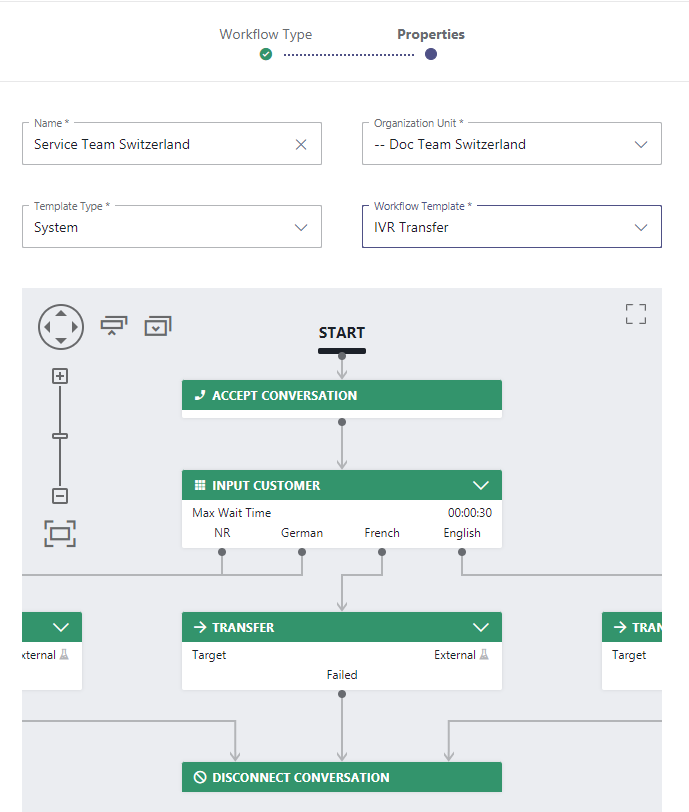
Workflow Properties
✅ This is the second step in your workflow creation.
-
Pick a "Name" for your workflow .
💡 This name can be freely chosen and will appear in other listings and selection dialogs. You can also change this name later. -
Pick an Organization Unit (OU) where your workflow will be placed in.
💡 This determines where your workflow will be later visible in selection dialogs, e.g. Service Settings. You can also change this later. -
Pick a Template Type.2 There are two types of Workflow Templates to pick from.
⮑ A preview of the template will be shown. - When you are all set, click "Create" and start with Workflow Editing.
1🔎Which Template Type to pick
INC Workflow Template Types
| Template Type | Description |
|---|---|
| System Templates |
Provided by Luware, system templates are a good a starting point for you to freely build upon. ☝️Note that:
|
| Custom Templates |
Custom Workflow Templates are of your own design. They can be based on any other template. ☝️Note that:
|
💡Good to know: All workflow templates and their children workflows are of a (modality-specific) workflow type, each with distinct workflow activities. During Export or Import they cannot be substituted or converted to different types, meaning that you cannot replace a template with a workflow or vice-versa.
Workflow Export and Import
Workflow Export Import
Workflows and workflow templates can be exported and imported as JSON files. This turns workflow editing into a portable asset you can reuse across tenants, clusters, and environments instead of rebuilding it by hand each time.
PRECONDITIONS
✅ Permissions
- Either workflow export/import features are available on both Nimbus User Portal and Admin Portal.
- Export requires read access to workflows / workflow templates. Any user with access to the Workflows overview can export files from within the editor.
- Import1 requires manage (write) access to workflows / workflow templates, since it creates or updates a workflow on save. Any user with create/write permissions on workflows can use this features. Additionally, users in Admin Roles can directly import workflows from the Workflows overview.
1 🔎Good to know: Nimbus performs a validation on workflow imports, checking if the workflow is still compatible. More information on this can be found below and within the “Error Handling” chapter on this page.
What is Part of an Export
An exported file carries the workflow structure: which Workflow Activities are used, how they are connected and positioned, and their non-tenant-specific configuration. Tenant-specific references, such as Parameters, Playlists, Resources, addresses, services, and users, are validated against the destination tenant on import. Those that still resolve are kept, those that do not are cleared and flagged so you can fill them in before saving.
☝️Note that Nimbus distinguishes by Workflows and Workflow Templates. You cannot import a Workflow as Workflow Template and vice-versa.
🔎Cross-Tenant and Cross-Cluster Portability
Because the exported JSON file is tenant- and cluster-agnostic, a workflow exported from one tenant or cluster can be imported into another. Typical scenarios for this would involve:
- Promoting a validated workflow from a test tenant to production.
- Migrating workflows from a source cluster to a new target cluster.
- A partner sharing a "starter" workflow with customers, who fill in their own references.
- Keeping a portable backup copy of a workflow for restore, documentation, or audit purposes.
💡 After filling in the destination references and saving, the import is recorded in Change History, including the informational source cluster.
Export/Import Overview
🔍 Export and import functionality is available from two places within the Nimbus UI. The Workflow Editor and the Overview are described in more detail below:
|
Editor: in the toolbar of the Workflow Editor and the Workflow Template Editor.  |
Workflow Overview: in the workflow list in Configuration > Workflows. 
|
Both Exports / Import specifics are described in the following.
Export
Exporting a Workflow or Workflow Template
Exporting downloads a JSON file named after the workflow or workflow template (for example My Workflow.workflow.json). You can export both saved workflows and unsaved, in-progress edits.
| Perspective | How to export |
|---|---|
| In the editor |
|
| In the Workflow Overview |
|
🔎 Exporting a workflow based on a templateIf the workflow is based on a workflow template, a decision dialog appears (from both the editor and the Workflow Overview) so you choose explicitly what to export:
💡 Workflows that are not based on a template export directly, skipping this dialog. | |
Export contents
The export file contains the following:
| ✅ Included | ❌ Not included |
|---|---|
|
|
🔍 Tenant-specific references are carried in the file as values, but are re-validated against the destination tenant on import.
Import
Importing a Workflow or Workflow Template
Importing reads a JSON file, validates it, and — if accepted — opens the Workflow Editor in edit mode with the full structure in place and the original exported name.
| Perspective | How to import |
|---|---|
| In the editor | Click the Import icon (⬆) in the editor toolbar and select a JSON file. After validation, the imported structure is loaded into the editor. |
| In the Workflow Overview | In Workflows, click the Import button next to "Create New" and select a JSON file. The same validation runs, and the editor then opens with the imported workflow staged. |
⮑ After a successful import
- The workflow keeps its original name. You can rename it freely before saving.
- Tenant-specific references that still resolve on the destination tenant remain filled in.
- References that cannot be resolved are cleared, and their Activity blocks are marked with an error marker and a tooltip prompting you to pick a value.
- Save is activity-blocked until every flagged workflow activity block is complete. Like any other change, workflow imports directly in the editor need to be saved manually.
☝Note: When your workflow name already exists…
… the import does not save automatically. However, keep in mind that any save over an currently (productively) used workflow is possible and takes immediate effect. We therefore generally recommend saving.
… with the same name: When the imported name already exists in the destination scope, a dialog asks you to choose:
- Replace — the existing workflow is updated on Save (the imported structure replaces it under the existing workflow's id and name).
-
Keep both — the imported workflow is saved as a new workflow under the next free
<Name> (n)suffix (e.g. My Workflow (1)). - Cancel — the import is aborted and the editor is left unchanged.
… with no name conflict, but existing content:
- When you are already Workflow Editing and the imported Workflow name does not collide with another workflow name, Nimbus will still asks if you want to overwrite the existing workflow before replacing the open workflow's content.
⮑ On confirm, the imported workflow activity blocks replace the current content while keeping the workflow's id and name.
Error Handling
The importer is built to be crash-resistant: even a file with unsupported or deprecated elements still loads, with the affected Activity blocks flagged, so the editor stays usable. The table below lists the common scenarios you may encounter and how Nimbus responds.
| Scenario | What happens / what to do |
|---|---|
| A workflow with the same name already exists | A conflict dialog offers Replace, Keep both, or Cancel. Nothing is overwritten until you choose Replace and then Save. |
| Missing tenant-specific references | Workflow activity blocks, whose references do not resolve on the destination tenant, are cleared and shown with an error marker. The editor remains usable, but Save is activity-blocked until you pick valid values (e.g. the correct Parameter, Playlist, or Resource). A text-backed TTS prompt whose audio resource is missing is marked so it can be re-created on the target tenant. |
| Incompatible file format version |
Every export includes a file format version. An import is rejected on version version mismatch:
🤔When does a workflow version change? Whenever Nimbus introduces a new workflow activity or introduces significant changes on workflow activities, the version is increased. This is also done to protect customer-side productive workflows from “outdated” imports. |
| Malformed or manually edited (manipulated) file |
☝️Editing the JSON by hand is not supported. A file that is not valid JSON, has been hand-edited into an invalid shape, or fails schema validation is rejected with a "malformed file" error and is not loaded. |
| Unknown or unsupported Activity block type | If the file references a Activity block type the target does not recognize, import is rejected with an "unknown Activity block type" error. 💡Deprecated-but-known elements still load, with the affected Activity blocks flagged and Save Activity blocked. |
| Workflow-type / kind mismatch |
☝️Workflow types are not interchangeable: (Modality-specific and Workflow (Non) Template). A workflow export file can only be imported into the matching editor — e.g. an Audio file cannot be imported into the Email editor, and a workflow file cannot be imported into the Workflow Template Editor (or vice versa). 💡All mismatches are rejected; no conversion between types takes place. |
| Template-derived workflow |
A workflow that derives from a Workflow Template cannot be re-imported in that derived form. → Export it without the template connection, or export the template separately. |
Known Limitations
Not supported (by design):
🔍 The following are intentionally not part of Export / Import and work as intended:
- Export of referenced resources. Only the structure travels — Parameters, Playlists, audio files, and other resources must already exist on the target tenant.
- Bulk import/export. One workflow (or template) per file.
- Workflow-type conversion and automatic migration/downgrade of files.
- Semantic validation. Files are checked for format, version, kind, and workflow type — not for whether the resulting workflow is logically sound (e.g. correct sequence of activities, all nodes connected, etc.).
- Import/export formats other than JSON.
✅ Finished? Once you are done with your workflow, don't forget to select and apply it in your Modalities Service Settings. We recommend a test call to check if everything is working as intended.
Additional Topics
🤔 Already familiar with editing workflows?
- Head right to the Workflow Activities page as a reference point and start building your own custom workflow from scratch.
- You can find more information here: