Our Nimbus Power BI Template is designed so that it can be incrementally refreshed. This allows you to store data for a set period of time and then add data to it incrementally. This Use Case outlines prerequisites, required tools, and detailed steps for avoiding load failures when setting up and initiating the incremental refresh in Power BI. While the basic setup for this is straightforward, there may be scenarios in which you need to perform more advanced actions on the incrementally refreshed report for various reasons.
Example scenarios could be:
- Initial refresh timeout: your tenant produces so much data that when you do the first manual refresh to initialize the incremental refresh in Power BI online, the first refresh times out when trying to fill the archive.
- You want to change the archive policy of your incrementally refreshed report without having to start all from scratch.
- The report failed and stopped loading data for a few days. Once you start it again, there is a gap in the archive that you want to refill.
It is possible to connect to the instance of your incrementally refreshed report with some advanced tools and refresh the partitions manually, so that you can address the above scenarios.
Preconditions
✅You will require a Nimbus user in one of the valid Reporting Roles to perform the refresh. If you are new to the topic, (re)visit our related information on Setting Up Power BI.
✅A Power BI Pro or Premium Per User (PPU) or Power BI Premium license is required.1
💡A trial license also works to test this feature.
✅Required tools installed:
- Power BI desktop (for the initial incremental refresh policy set up)
-
Tabular Editor → https://tabulareditor.com
💡We have successfully tested this with Tabular Editor v. 2.25.0. -
Microsoft SQL Service Management Studio
💡We have tested this with MS SSMS v. 20.2.30.0.
✅Access and correct rights in Power BI online: https://app.powerbi.com/. The Power BI user must have XMLA endpoint write access rights (set by Power BI administrators).
Learn how…
✅ How to Enable XMLA
-
Go to the Power BI Admin Portal:
https://app.powerbi.com/admin-portal/capacities -
Select Capacity Settings:
- Click on the capacity name.
- Expand Power BI Workloads.
-
Set XMLA Endpoint Mode:
- Change from Read-only to Read-write.
-
Tenant Settings:
- Ensure XMLA endpoints are allowed at tenant level.
1🔍Note: About Power BI Licensing
☝Luware Support does not cover advice on Power BI licensing. To determine your need and best setup, contact your Microsoft account executive.
Learn why…
The larger the amount of data you wish to process, the higher the license required, since each license has limitations in terms of file size that it can store as well as Processing Power for each refresh. The more data you store the more resources you will use (this is true whether using Power BI desktop or Power BI online).
The Nimbus Power BI template is a blueprint of how the Nimbus data can be exploited. It can be run with a small amount of data on even with the lowest Power BI license to get an appreciation of the capabilities of the data model. The Power BI licensing needs are not dictated by the Nimbus template but rather by a number of factors unique to your business in relation to how you intend to use the Power BI tool, the amount of data that you intend to process, and the number of users. We are therefore unable to make license recommendations on a Microsoft product.
INC Icon Legend Accordion
Show Icon Legend 💡 = A hint to signal learnings, improvements or useful informati...
Show Icon Legend
| 💡 = A hint to signal learnings, improvements or useful information in context. | 🔍 = Info points out essential notes or related page in context. |
| ☝ = Notifies you about fallacies and tricky parts that help avoid problems. | 🤔 = Asks and answers common questions and troubleshooting points. |
| ❌ = Warns you of actions with irreversible / data-destructive consequence. | ✅ = Intructs you to perform a certain (prerequired) action to complete a related step. |
Avoiding the initial refresh timeout
Scenario: You have a large amount of data and the report times out when doing the first manual refresh loading the archive.
✅Step 1 - Set up the incremental refresh policy in the file
In Power BI desktop you have to set up the incremental refresh policy. This is explained under PBI Incremental Refresh.
☝Important: follow all the steps 1 to 4 for the Incremental Refresh but stop there. Do not perform a manual refresh of the model once you load the file on Power BI online. This is what we do as part of the advanced Incremental refresh instructions further below in this Use Case.
PBI Incremental Refresh steps
PBI Incremental Refresh
Starting with Template template version 1.96 (15-07-2024), the Nimbus Power BI Template enables users to set up the report so that it can be refreshed incrementally. This page shows specific aspects of the Incremental Refresh functionality applicable to the Nimbus template.
About Incremental Refresh in Power BI
Incremental Refresh is a functionality in the Power BI software that partitions the semantic model and enables incremental loading of new data instead of the entire dataset at each refresh.
💡This Power BI feature can be enabled optionally – e.g. to regularly refresh the report for rolling updates in the last x number of days, months etc..
💡 The template can continue to be used also for ad-hoc refresh operations, without incremental refresh. If not making use of incremental refresh, users must remember to set the required date range in the parameters before each refresh to ensure that the desired date range is loaded into the report.
☝Power BI Service requirement
Although incremental refresh policy is set up on Power BI desktop, it comes into effect only once the report is exported to the Power BI Services (online). After the initial set up, the report must be uploaded and distributed via Power BI Services. This is how the Incremental Refresh functionality is designed to work by Microsoft1 .
🔎 1For additional information on what it is and how it works, refer to the Incremental Refresh documentation on the Microsoft website as well as the → Prerequisites below.
Setting Up Incremental Refresh on the Template
PREREQUISITES
Note the prerequisites below before setting up incremental refresh:
Microsoft Licensing plans
Incremental refresh is supported for Power BI Premium, Premium per user, Power BI Pro, and Power BI Embedded models. To understand what your Power BI license allows, please refer to the Microsoft Power BI plans or contact your Microsoft representative.
Downloads to .pbix format
Incremental refresh is set up in Power BI desktop, however, it is only activated once the report is loaded and refreshed once in Power BI online. Once the Incremental Refresh is set up and running on Power BI Online, the download to *.pbix to Power BI desktop is disabled. This is by design by Microsoft.
Nimbus Template version updates
Once the template is set up and running with incremental refresh, a semantic model is saved in Power BI online and the data will be incrementally refreshed. From then on, changes to the template can only be done in the Power BI online environment and the model cannot be edited easily.
If a new template is loaded with the same name, a warning will be displayed asking if you want to replace it.
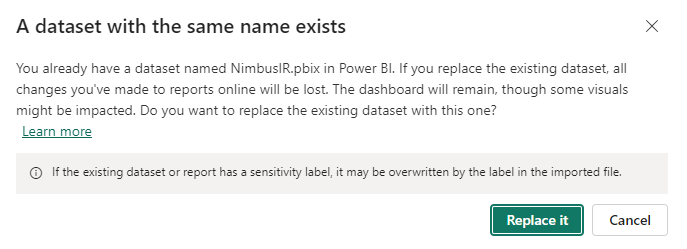
When overwriting the model, the data archived will be lost and the incremental refresh will have to be started again (incremental refresh will have to be set up again from scratch). This needs to be considered when deciding about uploading a new template version with the latest changes.
Advanced techniques for managing the partitions and model changes can be explored using external tools. It is recommended that those who intend to use these advanced techniques and tools have some minimum technical knowledge of data management to understand the concepts and that they familiarize themselves with the Microsoft documentation on advanced incremental refresh as well as other sources available online.
Initial refresh time limits
When setting up the Incremental Refresh, the report will need to be refreshed once to retrieve the initial archive. Depending on the size of your data and the length of the archive you set in the incremental refresh policy this could take some time.
Regardless of whether incremental refresh is enabled or not, Power BI Pro models have a refresh time limit of two hours. For models in a Premium capacity, the time limit is five hours. If the initial refresh for your tenant hits these limits, advanced incremental refresh techniques for loading the initial archive will have to be adopted. For more information refer the following Microsoft documentation and guidelines:
- Incremental refresh for semantic models and real-time data in Power BI - Power BI | Microsoft Learn
- Advanced incremental refresh and real-time data with the XMLA endpoint in Power BI - Power BI | Microsoft Learn
You may also follow the advanced example in Use Case - Avoiding load failures with PBI incremental refresh
Memory size and capacity
Depending on the incremental refresh policy set, the number of sessions generated by your tenant and the amount of data you intend to archive in the report, the semantic model may grow into large sizes.
Irrespective of whether you decide to take advantage of the incremental refresh or not, your Power BI license and Power BI environment settings will impact the amount of data you can load into your semantic model. When limits are reached, errors may occur.
As explained by Microsoft, what you can do in the Power BI service depends on three things:
- The type of license and subscription you are using.
- The type of workspace that stores the content.
- The roles and permissions you are assigned in a workspace.
If you are not familiar with the license and capabilities of your Power BI deployment, please consult with your IT department. If you need advice on which Power BI license is best to fulfil your business requirements, please contact Microsoft.
Set up the Incremental Refresh policy
✅ The Power BI Template must be set up and saved into a *.pbix file. If you have not set it up yet, go through the steps in Setting Up Power BI, then return to this page once you have the template saved as Nimbus.pbix.
- Navigate to the model view in the Nimbus template in Power BI desktop.
- Go to the tab “Inc Refresh Facts”.

- Each of the tables visible in this tab can be set for incremental refresh. To do so, start by clicking on the 3 dots on the right-hand corner of the first table.
-
Select Incremental Refresh from the dropdown menu.
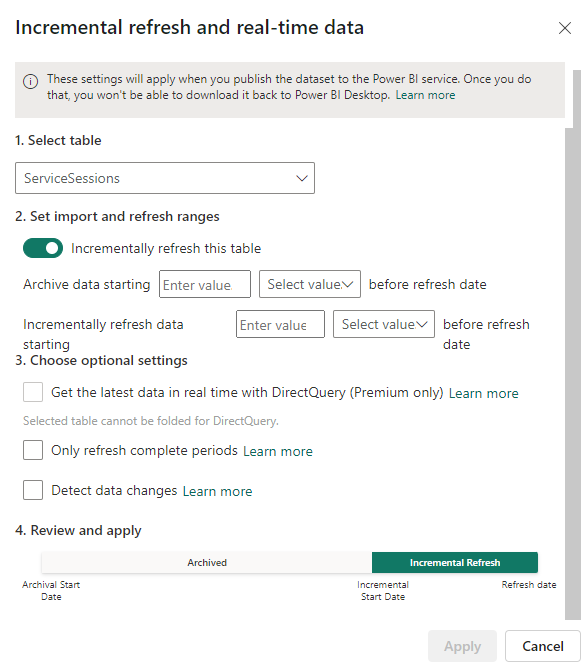
⮑ The window will open to show the incremental refresh policy window and the selected table. -
Toggle on “Incrementally refresh this table”.
⮑ The options to incrementally refresh the table appear. -
Set the values for “Archive data starting” and “Incrementally refresh data”:
⮑ You are defining the policy that dictates how much history shall be retained in the file in relation to the refresh date and which range should be reloaded at each refresh. - Repeat all these steps for each of the fact tables shown in this tab and save the Nimbus.pbix report.
Incremental Refresh policy options
✅ We recommend you to set the policy accordingly to your requirements.
- When selecting the archive data range, consider the capacity and memory allocated to your environment, based on the licensing and Power BI deployed by your organization.
- Optional settings are not possible with the Nimbus OData connection/data model. You can ignore these.
🔎 All the steps for setting the incremental refresh policy are explained in the Microsoft documentation Define Policy.
Learn about the “Incremental Refresh” initial messages…
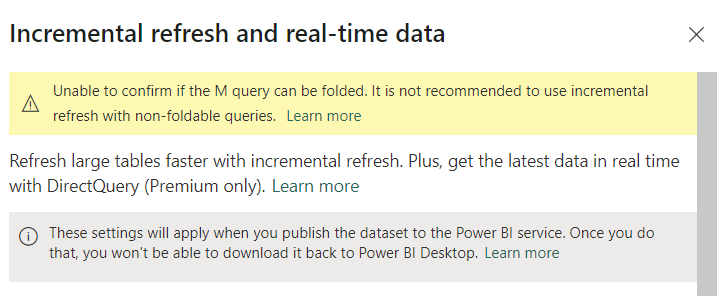
- You can ignore the warning about being "unable to fold the M query”. The template is tested to work with incremental refresh.
- Direct query is not applicable with OData connections. This option is not available.
- There is no real-time data from Nimbus OData reporting.
- Follow the “Learn more” link provided by Microsoft in this window to learn more about Incremental Refresh.
Publish the report to Power BI Services
-
Save the report and publish to a Power BI workspace.
🔎If you are not sure about this step, refer to our KB page Publish to Power BI Service.
Activate the incremental Refresh policy
- Once publishing to Power BI service is complete, go to the semantic model settings.
- Ensure that the connection credentials are correct.
-
Check if the parameters are set as required (enable optional tables if needed).
💡 Notice that RangeStart and RangeEnd are no longer visible. This is because Power BI will automatically set the dates based on the Incremental Refresh policy you have set. -
Set the Large semantic model storage format to ON if you have a premium license.

💡 This must be done before the first refresh. It is required if your tenant generates huge amount of data and you are loading an extensive range of dates into your archive which may grow your semantic model beyond 1GB. This setting can improve refresh operation performance and ensure the model does not max out size limits.
🔍 Refer to the Microsoft documentation about large semantic models in Power BI premium for more information. -
Once the above is set, perform an initial refresh operation on the model. This refresh should be an individual (manual) refresh so that you can monitor the progress. This will load the initial archive based on the set incremental refresh policy.
💡The initial refresh operation can take quite a while to complete. Partitions must be created, historical data loaded, objects such as relationships and hierarchies built or rebuilt, and calculated objects recalculated. If the load fails at this stage you may need to consider Use Case - Avoiding load failures with PBI incremental refresh.
Subsequent Data Refresh
At this point, you can set a scheduled refresh or you can refresh the report manually when you need it.
From now on, each time the report is refreshed, Power BI will follow the original Incremental Refresh policy by filling and maintaining the archive rolling window as set and incrementally refreshing the data based on the value entered for the incremental refresh.
✅ Step 2 - Create the partitions with Tabular Editor
In order to create the partitions while avoiding the time-out for the initial refresh, we connect with Tabular Editor and we create the partitions with it.
Connect with Tabular Editor
-
Copy the connection string from the Server Settings of the Semantic Model in Power BI
Data Source=powerbi://api.powerbi.com/v1.0/myorg/<YourSpaceName>; -
Paste the connection string into Tabular Editor connection.

💡Make sure you use the string starting from “powerbi” (e.g. remove “DataSource=”).
Stop at the “;” after the space name (remove the report name).
Example:Data Source=powerbi://api.powerbi.com/v1.0/myorg/IncrementalRefresh;Initial Catalog=Nimbus-1.110;
Becomes →powerbi://api.powerbi.com/v1.0/myorg/IncrementalRefresh;
⮑ Once authenticated and connected you will be presented with a list of reports semantic models available to you. -
Select the one you need to work on.
⮑ Once connected to the report, it will show the model in Tabular Editor.
- Expand tables and go to each of the incremental refresh tables one by one to create the partitions:
-
Right-click on each Incremental Refresh table and select “Apply Refresh Policy”.

⮑This will create the partitions which you can see when you expand the table:
- Repeat this action for each of the Incremental Refresh tables.
- Finally, click on Save.

💡At this point you can go to Power BI and do an initial manual refresh. This will refresh the report but only the set increment. The rest of the partitions will have to be filled manually after connecting to the model via MS SQL Server Management.
✅Step 3 - Fill the partitions with data using SQL Server Management Studio
Once the partitions are created, each one of them can be refreshed manually. To do this, you need to connect to the model via MS SQL Server Management Studio.
-
Open and connect to MS SQL Server Management Studio:
Server type: "Analysis Services"
Server Name: sameconnection stringused for Tabular Editor above
Authentication: “Microsoft Entra MFA”
User Name: your Power BI user name with XMLA edit rights (💡Not the Nimbus User for OData access).
⮑ Once connected you have the list of databases available to you in Power BI. -
Select the database you need and navigate to Tables to see the list of tables available in that semantic model.

- Select one by one the list of fact tables that need to be incrementally refreshed.
-
Right click and select: Partitions

⮑ A window will pop up showing the created partitions and which data has already been loaded.
-
From here select one or (
CTRL-Key) multiple partitions you wish to refresh and click on the process icon.
💡Note: You can select multiple partitions to refresh together–however be aware of the processing limits of your environment and the amount of data you are trying to process. If a failure occurs, try again selecting single partitions or make your partitions smaller.
⮑A new window opens up -
Select mode: “Process Data” and confirm with OK.

⮑The system will start refreshing and filling the partition with data…
⮑and finish with “Success” eventually.
-
☝Important: you must repeat this step for each partition you want to fill with data/refresh AND for each incrementally refreshable table in the report.
Once you finished processing each partition, you can close the windows.
Notes on partition size
- The size of the partitions (days, months, quarter, years - depending on what you choose for the archive when setting up the archive policy) depend on the partition and the amount of data it can take a while to refresh the partition.
- If the partition is too large the refresh may still time out. This means you will have to set up smaller partitions (e.g. if you decided to set the archive to 24 months, it means that each historical partition in the archive will be one month long. When you refresh the partition it will try to pull/process an entire month of data for that single partition. If this operation times out, you have to choose as smaller partition for the archive (e.g. X number of days) à this will create daily partitions which you will have to fill. When you do a data refresh, you can select multiple partitions to be refreshed at once, when doing so in MS SQL Server Management Studio. You will have to try and test, since this is dependent on the amount of data and your Power BI processing capabilities.
✅Step 4 - Process Recalc after loading facts
Once you have loaded all the partitions you want to load into the report, you must do a “Process Recalc” in order for the data to link to the other tables. A Process Recalc also applies after loading data with MS SQL Server Management and before you can use the report.
Without a Process Recalc you may see the following error when trying to visualize the data in the actual report (or in existing visualizations):
Error fetching data for this visual
The expression referenced a relationship between '<oii>ServiceSessions</oii>'[<oii>ServiceId</oii>] and '<oii>Services</oii>'[<oii>Id</oii>], which does not hold any data because it needs to be recalculated.
Please check the technical details for more information. If you contact support, please provide these details.

💡The Process Recalc will resolve this situation.
Steps within MS SQL Server Management Studio:
- Right click on the Database name itself from the list of Databases.
-
Select “Process Database”.

- In the window that pops up choose “Process Recalc”.

-
Let this process run. Note that this…
⮑… will simply update and recalculate hierarchies, relationships, and calculated columns without querying any additional data.
⮑ … may take a while depending on model size.
- Click close when finished and successful.
💡After this you can refresh your report and each time it will incrementally refresh the data according to the policy you set.
💡You may need to refresh the report once manually in Power BI online, to ensure all the dimensions are also refreshed.
✅ Tip: You can also set up a recurring automatic refresh: Configure scheduled refresh - Power BI | Microsoft Learn
Useful Links and Resources
| Microsoft | Official Power BI documentation:
Setting up XMLA:
|
| Other Sources | YouTube video tutorial on Incremental Refresh |