Using the Nimbus Power Automate Connector, you can retrieve caller data to fill in a call list for your team. This can be useful for your team to coordinate callbacks and other actions on missed calls.
PRECONDITIONS
- At least one productive Nimbus team must be in place.
- You must at least be the Nimbus team owner, as you need access to the team's data with your credentials / access permissions.
- Your account must be properly licensed in Power Automate to be able to create and manage flows for your team.
- SharePoint must be connected to your service team in order to create a new tab with shared data.
Create a new list as tab in your team
Within teams, locate your Nimbus service team and perform the following steps to create a new list:
- Click on "Add a Tab"
- Search for and select "Lists"
- Click in "Create a new List"
- Select "Blank List"
- Give the list a name (which will also appear as your tab title)
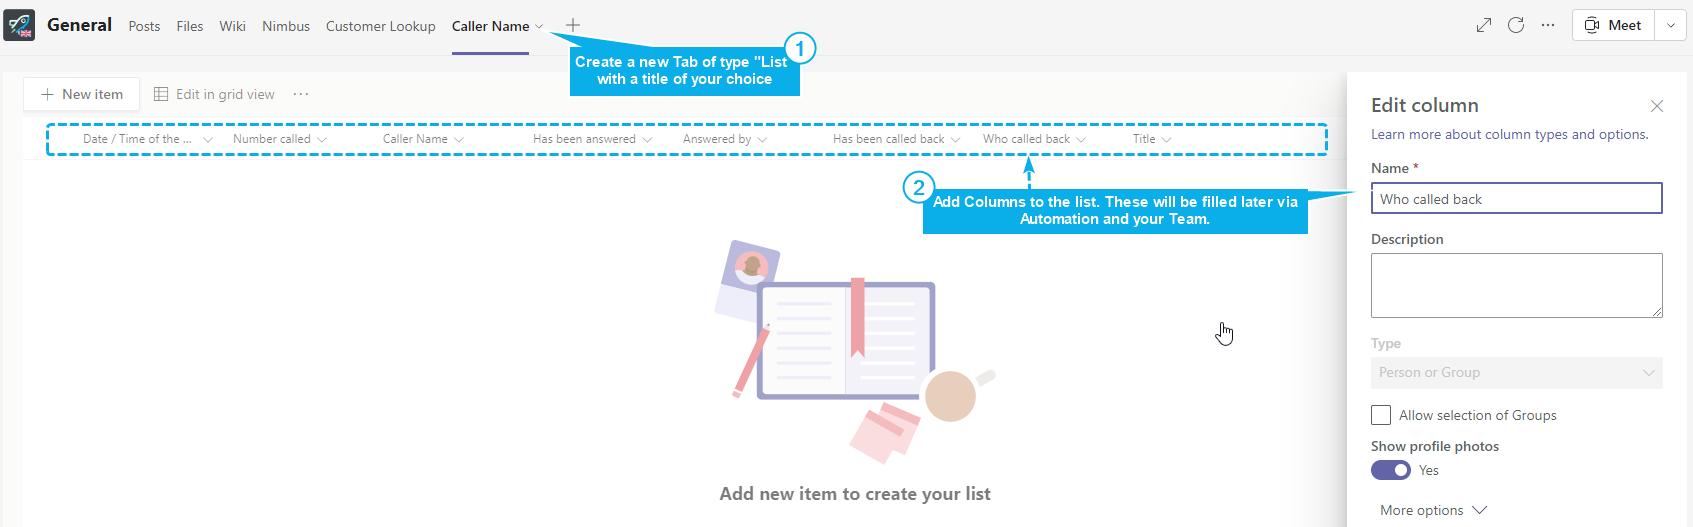
Prepare your list
Now it's time to prepare your list to hold the necessary data. In this example we add the following columns:
| Column* | Type | Purpose | Update via Flow |
|---|---|---|---|
| Date / Time of Call |
Date and time Include time: Yes |
The time when the new call started. | ✅ Yes |
| Number called | Single line of text | Stores the number of the caller. | ✅ Yes |
| Caller name | Single line of text | Stores the name of the caller. | ✅ Yes |
| Has been answered |
Yes/No Default: No |
Acts as the default for missed call entries in your list. Will be set to "Yes" if a call was answered. |
✅ Yes |
| Answered by |
Person or Group Show profile photo: Yes |
Will be filled by the flow to automatically provide user details. | ✅ Yes |
| Has been called back | Choice |
Manually filled by your team. 💡 You can have any selection, e.g. Yes, No, Didn't Pick Up, etc. |
❌ Done manually |
| Who called back |
Person or Group Show profile photo: Yes |
❌ Done manually | |
| Call_ID | Single line of text |
☝ Important for reference in the Flow so the correct line is filled. You can hide this column later. |
✅ Yes |
| Title | Default | Default column that gets automatically added by SharePoint when the list is created. You can hide this column later. | ✅ Yes |
*This is just an example; column names are completely your choice.
Create new flows
Now it's time to update your list with a new Flow which is triggered during an incoming Nimbus call.
- Visit the Flow landing page: https://make.powerautomate.com/
- Head to "My Flows"
- Click on "+ New Flow" and create a blank "Automated Cloud Flow"
- Give your new flow a speaking name, e.g. "Create entry in list"
- In the text box underneath, search for “Nimbus” and choose the "When a task changes state" trigger
- Click the "Create" button
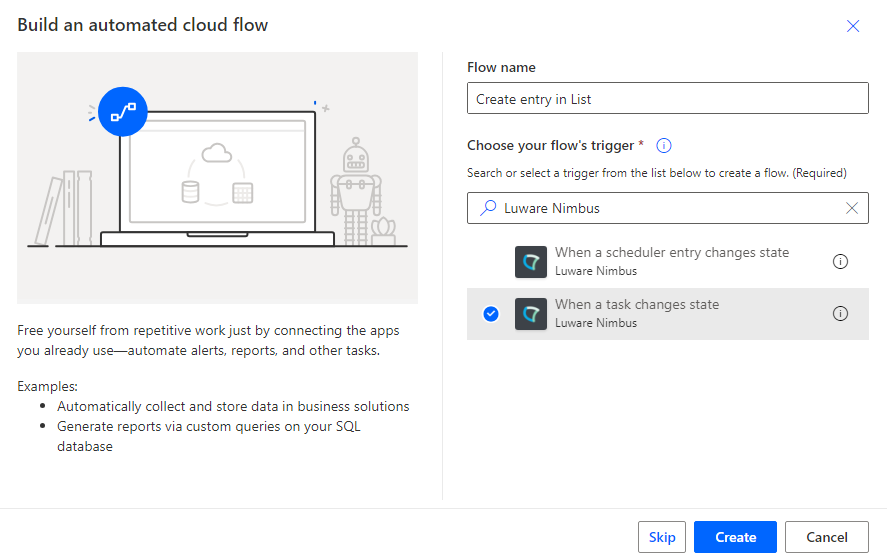
You might be required to authenticate with the connector. Use the credentials of the user that is the owner of the Nimbus team(s) of which you are accessing data off.
Remember this procedure and refer back to it later. We will describe multiple flows to be created separately below.
Flow A: Create new entries with caller data
- Select the “When a task changes state” trigger.
- In the “Services Item” dropdown select the Nimbus service's UPN.
💡 You can also get the data of multiple services at this point, but for the sake of simplicity we keep it to one service in this example. - In the “Task Events” dropdown select “System Accepted”.
- In the “Advanced parameters” dropdown enable “Modalities” and "Directions".
- In the “Modalities Item” dropdown select “Audio”.
- In the “Directions Item” dropdown select “Inbound”.
- In the editing area click
 to add a new action.
 - Search for "Create item" under the “SharePoint” section and select it.
- Configure the SharePoint Item as follows:
| Field | Value to fill in / 🌟 = Nimbus dynamic content | |
|---|---|---|
| Site Address | The Service you want to retrieve data from | |
| List Name | The list / tab created previously in → Step 1 | |
| Title | Required, but will be hidden later - use "🌟 Task ID" to fill with a unique value. | |
| Date / Time of Call | 🌟 Created | |
| Number called | 🌟 Microsoft Caller ID | |
| Caller Name | 🌟 Task Information Customer Display Name | |
| Has been answered | No | |
| Call_ID | 🌟 Task ID | |
| All other fields | <leave empty, as is> |
Flow B: Add employee data to existing entries
✅ Now we'll create a separate flow with a connector to add employee data and update your existing entries. For that we connect to the O365 User Directory and fill in the employee data in to our existing entries, identified with "Call_ID".
- Create a new flow (same as → Step 4) but enter a new name for it like “Add employee info to list”.
- In the “Services Item” dropdown select the Nimbus service's UPN.
- In the “Task Events” dropdown select “Connected To User”.
- In the “Advanced parameters” dropdown enable “Modalities” and "Directions".
- In the “Modalities Item” dropdown select “Audio”.
- In the “Directions Item” dropdown select “Inbound”.
- In the editing area click to add a new action.
- Search for "Get user profile" and select “Get user profile (V2)” under the “Office 365 Users” section.
- Configure the “Get user profile (V2)” action as follows:
Field |
Fill in / 🌟 = Nimbus dynamic content |
|---|---|
| User (UPN) | 🌟 UPN of last connected user |
- Add a SharePoint "Get Items" action to your flow.
- Configure the action as follows:
| Field | Fill in / 🌟 = Nimbus dynamic content | |
|---|---|---|
| Site Address | The Service you want to retrieve data from | 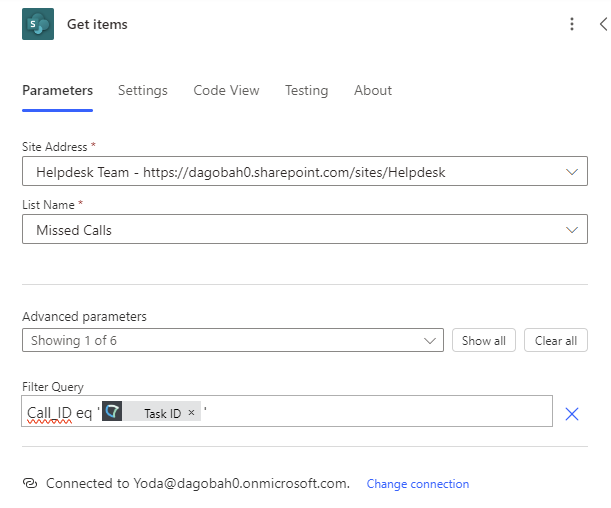 |
| List Name | The list / tab created previously in → see Step 1 | |
| Filter query | Uses the Column to hold your Caller ID, in this case: Use the dynamic content 🌟 Task ID ☝ Note that the dynamic Id needs to be put in single quotation marks e.g. 'Task ID' or the formula will throw an expression error. |
|
| All other fields | <leave empty, as is> | |
☝ Be aware that SharePoint will limit searches via the Get Items action to only the first 5,000 entries by default. You can enable searching additional entries by going to the Settings of the Get Items action and enabling Pagination.
- In the editing area click to add a new action below your SharePoint "Get Items" action.
- Select the SharePoint "Update Item" action.
- Configure the action as follows:
| Field | Fill in / 🌟 SharePoint or 🌟 O365 dynamic content | |
|---|---|---|
| Site Address | The Service you want to retrieve data from | 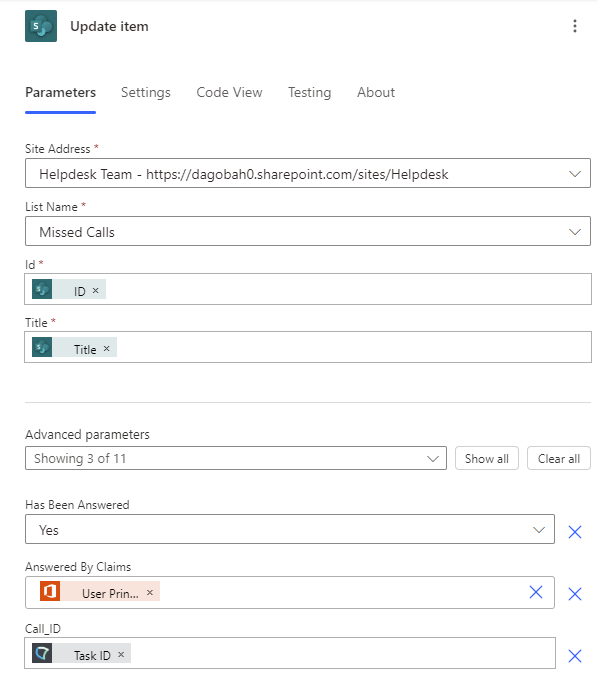
|
| List Name | The list / tab created previously in → see Step 1 | |
| ID |
The SharePoint 🌟 ID of the list item.
→ Selecting the ID will wrap the step into a "For each" loop. You can leave this and move on. |
|
| Title | 🌟 Title | |
| Has been answered | Select "Yes" 💡 Don't forget to fill the next "Answered by Claims" entry with the user that answered. |
|
| Answered by Claims | → Select Custom Value, then pick 🌟 "User Principal Name" from the previous "Get User Profile" step. |
|
| Call_ID | 🌟 ID | |
| All other fields | <leave empty, as is> | |
Check and adjust your output
✅ Now everything should be set up as required. You can test your flow by making a call to your service (e.g. via the Service Settings > Test Call).
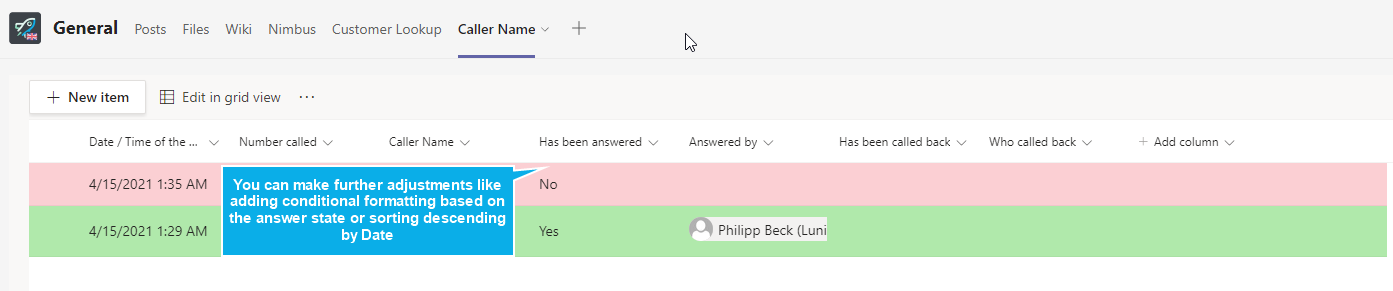
Optionally we recommend the following tweaks:
- Hide unneeded columns from view such as "Title" or "Call_ID"
- Add conditional formatting to your list to make unanswered calls clearly visible
- Adjust the sorting of entries by Date / Time to make new calls appear on top