Good to know
Service settings are available Nimbus service / team owners. You can access them via Nimbus Portal:
 |
 |
Also Note:
- Tenant administrators can also adjust service settings via Administration UI, with additional related options such as Service Permissions and License Management.
- Regular Nimbus users (read: Team Members / Agents) cannot access Settings at all.
🔎First time to Nimbus - Read this?
Being new to Nimbus and its many settings can be daunting. For this reason we set up a series of Administration Use Cases for a convenient step by step introduction.
As a first entry we recommend:
- Use Case - Setting Up a Basic IVR Service
- Use Case - Setting Up a Contact Center
- Use Case - Setting Up a Federation IT Helpdesk
More Advanced:
- Learning about Supported Modalities
- Best Practices - Omni Channel Contact Center
- A checklist: Modalities & Features Requirements and Configuration Steps
🔎 Shared Concepts:
- Nimbus Settings rely on shared entities (e.g. Workflows, Playlists, Opening Hours) - all managed via Configuration. We highly recommend checking there first before adjusting your settings to avoid having go back-and-forth.
- Visibility of options available in your settings is determined by Organization Units (OU).
- Access to Nimbus Features may be hidden from your view based on your Role and the assigned License Management
- To reduce complexity, settings may be hidden as licensing or Nimbus Features must be enabled first.
Service Settings Tabs
🔍 The tab contents below reflect the service settings available in the Nimbus UI. Please note that some tabs are restricted to certain Service types and show when related Nimbus Features are enabled.
General
General Service Settings
Contains general service settings such as the Service name, PSTN number, Opening Hours, and Reporting settings.
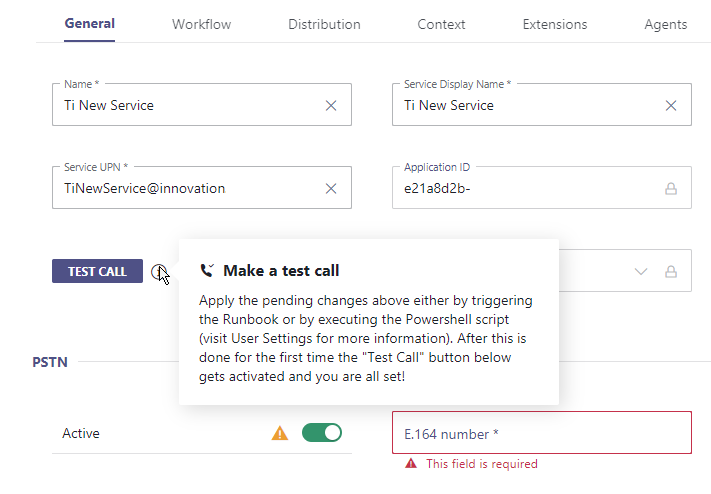
The "General" tab provides options that relate to Nimbus provisioning. Here you can also initiate "Test Calls" via MS Teams, which is particularly useful when you want to test changes to your Workflows. As a Service / Team Owner you can see the following details.
🔍Note: Entries marked with ☝ require a (re)execution of a Provisioning Script. → See Note below on "Triggering Changes / Admin Consent".
| Name | - | Name of the Team as it is defined in Microsoft Teams client. Nimbus |
|---|---|---|
| Service Display Name | ☝ |
Outwards facing Clear Name of the Service as Callers / Customers will see it in their Client. 💡 By default equal to the "Team" Name as it is shown in Microsoft Teams. Can be overridden if needed. |
| Service UPN | ☝ | The UPN (User Principal Name) under which the Service can be reached via user directory. |
| Application ID | - | The Application ID is provided during initial setup and cannot be changed. Used only for reference, e.g. during support cases or when adjusting Required App Permissions |
| Test Call | - |
A test call will directly call the Nimbus call-bot and establish a connection to your service. You can use this feature to test your workflows and/or distribution settings. 💡 Please note that this feature will not test any PSTN numbers assigned to your service. To test a PSTN you need to call via cell phone or landline. |
CHANGING A SERVICE DISPLAY NAME
- Nimbus bot operation is not affected by service name changes. Calls will continue to be distributed.
- A service name change will also not impact the (search-discoverable) service UPN name specified.
- Nimbus users will see team name changes reflected in their "My Teams" listing immediately.
💡 As team owner you can change your team name directly within Microsoft Teams (native, non-Nimbus functionality):
- Within MS Teams, locate your team
- Click on the "..." icon or right click the team name
- Select "Edit Team" → A dialog will open
- Change the team name (and optionally the description) to any desired content. → The Nimbus "settings" tab will reflect the new team name upon next load.
TRIGGERING CHANGES / ADMIN CONSENT
UPN and Service Display name changes are tied to Tenant Admin Consent and provisioning script rerun which can take several minutes to take effect. Any change is therefore marked with a ☝ Warning in the UI.
🔍 I'm a Service Owner - why are certain Service settings still locked against change?
- The full amount of settings is accessible only to Tenant / Partner administrators. Certain features are part of the Nimbus installation procedure and cannot be changed past deployment without provisioning a new service again.
- Certain changes are bound to the Service type or License applied. A downgrade may be prevented until you disable certain Nimbus Features or delete involved data entities.
🤔 I'm having technical questions before changing my service settings. Where can I find help?
- Check the FAQ and Troubleshooting section for our most common questions, technical use cases and support details.
- Many technical configuration details are explained on our Nimbus Installation and Service Provisioning pages. If you have further questions, our success team will gladly support you.
PSTN
Allows to assign a public telephone number (Public Switched Telephone Network) to your service.
☝ This setting should not be enabled without subject-matter knowledge or prior Tenant Admin / Nimbus support contact consultation.
🤔 Refer to the Installation Prerequisites for further info on PSTN / Number requirements.
🤔 Why is this necessary? Administration and licensing of PSTN numbers is outside of Luware control. Erroneous Number and License assignment may result in additional set-up efforts and running costs. Get in touch with your Nimbus support representative if you need help with this setting anytime after your initial Nimbus deployment. Our FAQ and Troubleshooting section is also updated frequently.
Opening Hours
Allows you to apply Opening Hours for your service team. Handling and routing based on opening hours is part of your Workflows e.g. by routing the call according to the "Check Opening Hours" Workflow Activity.
✅To be selectable in this Opening Hours entry (data entity) must be created first - and made available within the same Organization Units of the service or Tenant-wide.
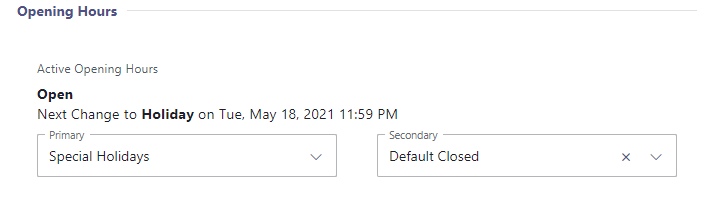
Define primary and secondary opening hours
Each team may decide if the opening hours are defined as primary or secondary. This is determined via service-individual Service Settings > "General" Tab.
RULESET: PRIMARY AND SECONDARY OPENING HOURS
|
Opening Hours Period Ruleset:
🔍 Rule of thumb: Primary Defined? > Secondary Defined? > Both no? > Use Primary Default! 💡 An example of how this rule is applied can be found below. |
Service Settings with applied opening hours. The current applicable status is shown under "Active Opening Hours". 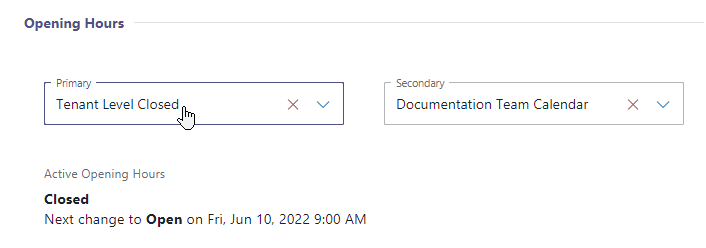
|
||||
Show me an example
| |||||
Reporting
🔍These values are mandatory Service Level Agreements (SLA) to specify as they are integral part of your team's Reporting and the Nimbus Reporting Model KPI calculation.
| SLA Acceptance Time in Seconds |
Maximum allowed time in queue before a task (read: incoming call) in the Dashboard is flagged as outside of SLA. 🔍 Shows as "Acceptance SLA" in both Reporting and historic Power BI reporting. Directly relates to Nimbus KPI Calculations. |
|---|---|
| SLA Hangup Time in Seconds |
Maximum allowed time in which the caller can hang up in a queue without the call being flagged as outside of SLA. 🔍 Shows as " Hangup SLA " in both Reporting and historic Power BI reporting. Directly relates to Nimbus KPI Calculations. 💡 Hung-up calls will still be considered as failed and thus show up as "Hangup in Queue" (red) in Reporting. |
| Short Abandons Threshold in Seconds |
Maximum allowed time (queue time) until the call is marked as “Abandoned” in the Nimbus Reporting Model. 💡 Default: 5s, min 1s, max 30s. |
| Show on Historical Sessions Page |
Default: enabled. GRPR - When disabled, the service and its related task results will not appear in the Historical Sessions view. |
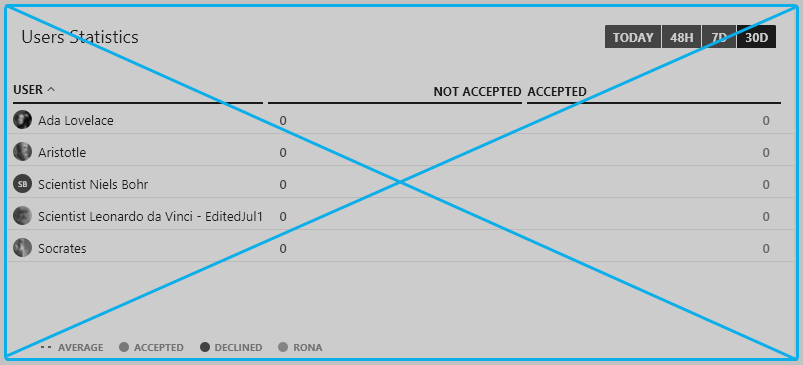
GDPR - HIDE USER STATISTICS FROM REPORTING
Tenant Administrator Privacy setting - To be compliant with GDPR regulations and respect Nimbus user privacy, you can hide the "User Statistics" widget from the Service's respective Reporting view.
Team Owner As a service/team owner, you may check on this setting but not change it.
When enabled:
→ All Nimbus users of this service will not be able to inspect the "User Statistics " > (not) accepted tasks" anymore. This also includes team owners and service administrators.
→ The "Task Heatmap" widget will utilize the remaining space within the Reporting view.
💡 Note that this setting is only affecting frontend reporting and not the actual Nimbus Reporting Model backend data. You can still evaluate/anonymize call data within Power BI Paginated Reports.
Licenses & Addons
In these sections, you can assign licenses and addons to the service. Available tabs and settings depend on the assigned licenses/addons, as explained under License Management and the related Nimbus Features pages.
Modalities
Modalities Service Settings
The Modalities tab controls Task Distribution settings per modality. Currently supported are:
- Audio/Video (AV) - UI interactions for users described on Call Handling.
- Instant Messaging (IM) - UI interactions for users described on Instant Message Handling.
- External Task (ET) - UI interactions for users described on External Task Handling.
- Email (EM) - UI interactions for users described on Email Handling.
✅License dependency: Available modalities on this tab depend on the licenses enabled via Service Administration > General Tab > Licenses. While unlicensed (or disabled on your Tenant), you may see fewer options to configure.
Configurable Options
Depending on your enabled modalities, you can configure the following options:
Audio / Video
|
to configure |
Service Type / License | Detail description | ||
AR |
ER |
CC |
AR = Advanced Routing, ER = Enterprise Routing, CC = Contact Center. |
|
Inbound | ||||
Inbound Conversations |
✅ |
✅ |
✅ |
Enables this Service for the corresponding inbound modality allows you to select an Audio / Video Workflow, which handles incoming calls and video telephony.
|
► Voicemails Channel |
✅ |
✅ |
See |
✅Condition: Only applies to Services with “MS Teams-based” User assignment and an Audio / Video workflow applied. 🔍Learn more…🤔Why is this feature not available for Skill-based (CC) services? Access to Voicemails requires a Teams channel that users have equal access to. Contact Center services however do not have such a “shared” MS Teams channel. Providing such a channel for Voicemails would pose a data access risk, as Nimbus itself cannot control access permissions on MS Teams itself. 🤔What about other services AR & CC ? Any “MS Teams-based” Nimbus service can also access to a channel for Voicemails. Workflows can use Activities such as "Voicemail" which will show Adaptive Cards in your MS Teams channel. Any member of that service will automatically be able to see and interact with those cards. 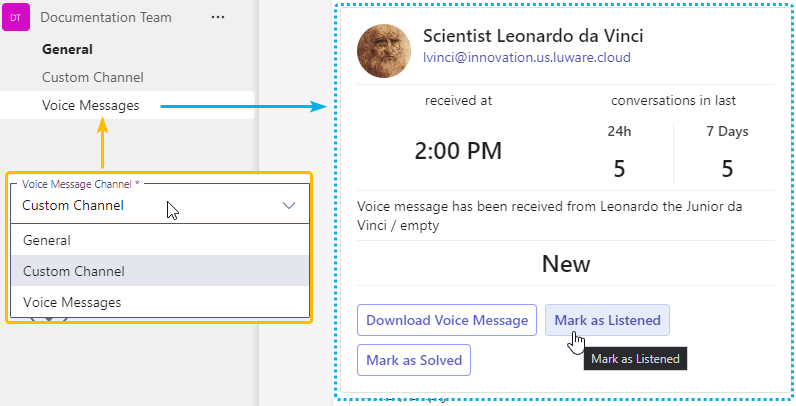 ☝ Please note: When changing your “Voicemails” channel:
→ Before changing to a new channel we recommend to “download Voicemails” and/or "solve" your pending Adaptive Cards from the previous channel. |
►Transfer on User Exit |
✅ |
✅ |
✅ |
Enables Transfer on User Exit for this service. When toggled on, an additional Service field appears, allowing you to select the target Audio/Video service to which the customer will be automatically transferred once the last Nimbus user ends the call.
|
► DTMF-supported Transfer |
- |
✅ |
✅ |
Visible once a target service is selected. Behavior depends on the PSTN configuration of the selected service. Enables DTMF support for the Transfer on User Exit by routing the customer via the target service's configured PSTN number instead of Nimbus internal routing. Only visible when the selected target service has a valid E.164 PSTN number and the required PSTN licenses configured.
💡If the PSTN license is removed after setup, the toggle becomes locked and a warning is displayed. The transfer will fail and is reported as Failed Service Transfer to External. |
Voicemail Transcription |
- |
✅ |
See |
✅Requires the → Voicemails Channel above to be configured. Service requirements1 apply. Additionally:
⮑ Once enabled Adaptive Cards and the Voicemails page will also include a voice-to-text Transcription of the Voicemail.  |
Outbound | ||||
Outbound1 Conversations |
- |
✅ |
✅ |
When enabled, the Outbound Call feature allows …
💡 A scheduled Outbound Task (Call) will show up in Supervision Personal Dashboards and within “Service Outbound Tasks” style Dashboard Widgets. |
| Outbound1 with Workflow | - | ✅ | ✅ |
✅Precondition: Service Owners must use the “Schedule an Outbound Call with Workflow” Flow Action to schedule the call. Enables this Service for Outbound Call with Workflow. Switching the toggle on allows you to select an Audio/Video workflow. |
► Transfer on User Exit |
✅ |
✅ |
✅ |
Enables Transfer on User Exit for this service. When toggled on, an additional Service field appears, allowing you to select the target Audio/Video service to which the customer will be automatically transferred once the last Nimbus user ends the call.
|
► DTMF-supported Transfer |
- |
✅ |
✅ |
Visible once a target service is selected. Behavior depends on the PSTN configuration of the selected service. Enables DTMF support for the Transfer on User Exit by routing the customer via the target service's configured PSTN number instead of Nimbus internal routing. Only visible when the selected target service has a valid E.164 PSTN number and the required PSTN licenses configured.
💡If the PSTN license is removed after setup, the toggle becomes locked and a warning is displayed. The transfer will fail and is reported as Failed Service Transfer to External. |
| Waiting Music | ✅ | ✅ | ✅ |
You can select a Playlist to play for callers while they are waiting in queue. 💡The service falls back to the OU Favorite or the Luware Standard playlist when:
💡A hint below the dropdown shows which playlist is currently in effect and where it comes from. Favorites are defined in the Playlist UI. |
1 Outbound Call preconditions and technical limitations apply for both users and services accessing this feature.
Instant Messaging
|
to configure |
Service Type / License | Detail description | ||
AR |
ER |
CC |
AR = Advanced Routing, ER = Enterprise Routing, CC = Contact Center. |
|
Inbound | ||||
Instant Messaging |
- |
- |
✅ |
Allows services to handle the Instant Messaging modality, using any combination of the integration channels listed below (Interact, WhatsApp, SMS). 💡For more details on how this modality is handled by your users, visit Instant Message Handling. ✅Precondition: At least one integration with the corresponding Instant Messaging compatible Workflow1 needs to be set up. Consult Use Case - Setting Up Instant Messaging for a detailed introduction and walkthrough. |
► Interact |
- |
- |
✅ |
✅Precondition: Requires implementation of Use Case - Setting Up Interact. 💡Optionally, you may specify:
|
- |
- |
✅ |
✅Precondition: Requires implementation of Use Case - Setting Up a WhatsApp Integration in Twilio. 💡Optionally, you may specify:
|
|
► SMS/RCS
|
- |
- |
✅ |
✅Precondition: Requires implementation of Use Case - Setting Up a SMS Integration in Twilio. 💡Optionally, you may specify:
|
🔎Footnotes
1 Workflow activity compatibility: Note that your selected workflows may show a warning due to having incompatible activities. In such a case you need to either edit that workflow or change to a compatible one. → Also refer to chapter “Workflows” below for more details
Show Supported IM Activities
INC Instant Messaging supported WF activities
Currently the following Workflow activities are supported for Instant Messaging workflows:
▼Workflow Activity | Chat Integration path via ► |
Interact |
SMS |
|
|---|---|---|---|
Conversation Handling | |||
Accept |
✅ |
✅ |
✅ |
Announcement |
❌ |
❌ |
❌ |
Collect Information |
✅ |
✅ |
✅ |
Delay |
✅ |
✅ |
✅ |
Disconnect |
✅ |
✅ |
✅ |
Disconnect as Handled |
❌ |
❌ |
❌ |
Forward |
❌ |
❌ |
❌ |
Input Customer |
✅ |
✅ |
✅ |
Input Customer (Advanced) |
❌ |
❌ |
❌ |
Mark as Handled |
❌ |
❌ |
❌ |
Message |
✅ |
✅ |
✅ |
Play Music |
❌ |
❌ |
❌ |
Reply |
❌ |
❌ |
❌ |
Save to Parameter |
✅ |
✅ |
✅ |
Standby Duty |
❌ |
❌ |
❌ |
Transfer |
✅ (to service only) |
✅ (to service only) |
✅ (to service only) |
Virtual User |
❌ |
❌ |
❌ |
Voice Message |
❌ |
❌ |
❌ |
Web Request |
✅ |
✅ |
✅ |
Check | |||
Availability-based Routing |
✅ |
✅ |
✅ |
Check Opening Hours |
✅ |
✅ |
✅ |
Check Parameter |
✅ |
✅ |
✅ |
Get Available Users |
✅ |
✅ |
✅ |
Get Queue Position |
✅ |
✅ |
✅ |
Wait for Parameter |
❌ |
❌ |
❌ |
Queue | |||
Cancel Task |
✅ |
✅ |
✅ |
Check Task |
✅ |
✅ |
✅ |
Distribution Priority |
✅ |
✅ |
✅ |
Queue |
❌ |
❌ |
❌ |
Queue Task |
✅ |
✅ |
✅ |
💡General Note: If a workflow is edited in post using unsupported activities, the Nimbus Reporting session will terminate with a “failed” outcome.
2 Messaging Entry configuration on Service Transfer: Messaging Entries specify how Nimbus connects with outside services to provide functionality (e.g. SMS chat with an outwards facing phone number). You may leave this field blank, in which case Nimbus will refer to the configuration specified in the previous (e.g. front desk) service, that transferred the chat session to your service.
3 System Message re-use: Service System Messages can be re-used across all channels and, however you should consider using shorter or specific messages for certain channels (e.g. SMS causing cost per message).
External Task
|
to configure |
Service Type / License | Detail description | ||
AR |
ER |
CC |
AR = Advanced Routing, ER = Enterprise Routing, CC = Contact Center. |
|
Inbound | ||||
External Task |
- |
- |
✅ |
Allows services to handle the External Tasks modality. ✅Related action: External tasks require a working Nimbus Power Automate Connector which handles the creation of such tasks, e.g. triggered by or involving 3rd party systems. 💡For more details on how this looks for Nimbus users, visit External Task Handling. |
|
to configure |
Service Type / License | Detail description | ||
AR |
ER |
CC |
AR = Advanced Routing, ER = Enterprise Routing, CC = Contact Center. |
|
Inbound | ||||
| - | - | ✅ |
Allows services to handle the Email modality. 💡For more details on how this looks for Nimbus users, visit Email Handling. |
|
► Mailbox |
- | - | ✅ | ✅Precondition: Allows to set a previously configured Mailbox. The mailbox is mandatory to allow Nimbus to sort in handled Email tasks into mailbox folders accordingly. |
Workflows
💡All Workflows are shown as previews only. To edit the source workflow, head over to the Configuration and create / edit a workflow in the corresponding modality.
General Notes
🔍Note that each modality has a separate workflow selection pulldown. The availability of workflow entries depends on the following factors:
- Workflows available for that modality: For example, if no “Instant Messaging” workflow has been created in the Nimbus Configuration before, the selection box will be empty.
- Organization Unit visibility rules: The respective Organization Unit of your service determines which workflow entries are visible. If an administrator moves a workflow entity away from your service's “visibility” to another Organization Unit, that workflow cannot be selected anymore.
- Compatibility checks: When a workflow has unsupported / licensed or other other technical dependencies, it will be marked with a warning in the selection dropdown.

Switching between Workflows
Note: Workflows are IMMEDAITELY effective as your changes are saved.
- Before switching between your workflow → please carefully read the advice below.
- Particularly for Workflows on productive Services we strongly advise to work with a copy and switch over when you are done.
- To apply a new workflow, select the new entry and click “Save & Apply”.
As you confirm a workflow change:
⮑ … Task Distribution in Nimbus starts at the moment a task was originally created with, using the workflow applicable at that time.
⮑ …. already queued tasks will not be affected by a workflow change.
☝WORKFLOW CHANGES DURING SERVICE HOURS MAY RESULT IN LOST TASKS
Beware of lost tasks: Clicking "Save and Apply" on Workflow changes has an an IMMEDIATE effect for all future incoming tasks on your service. An incomplete or erroneous edited workflow may cause interruptions to your daily operations, including lost tasks.
🤔 How can I minimize disruptions to my Services?
Avoid changes to shared workflows during busy daily hours!
✅ Head to the Configuration > Workflows list and check if workflows are shown as "Used in Service". Note that multiple Services can use the same workflow.

✅ Plan changes with a workflow copy: You can rename the copy, do your testing first, e.g. on a small backup service, then switch over once satisfied.
✅ Additional precautionary steps:
→ Plan workflow switches outside your productive business hours. Especially on productive Services with a high volume of tasks we recommend this to minimize any potential impacts.
→ Remember that workflows may be shared. Any experimental / work-in-progress workflows should be moved into Organization Units where productive Services cannot opt into them. Think of this as a protected "OU-folder" that is out of sight of any Service owner. In the same fashion you can also place other configuration items and Services under that OU until they are ready.
→ Monitor changes: You can also check Statistics and ask your administrator to monitor Service Operations after a larger workflow change.
Distribution
Distribution Service Settings
Contains settings related to Task Queue and Distribution, affecting factors like User States, Task Priority, and additional blocking status effects like After-Call Work and RONA.
☝ Note that confirming changes on these settings immediately affects all Users and future incoming tasks of any modality.
✅You may want to adjust General Service Settings > Reporting > SLA timings alongside, depending on how you expect your shown Reporting metrics to be affected by stricter or more lenient distribution settings.
Users
Allows to configure settings that affect Nimbus User States handling and task distribution.
| User Assignment Type |
INC User Assignment TypesEach Nimbus Service can be of a different User Assignment Type that determines how Users are associated to this Service:
☝ Important to know: The User Assignment Type setting is fixated when a Service was either provisioned via MS Teams or manually created via Service Administration, e.g. either for Customer IVR or User skill-based task distribution purposes. A switch between MS Teams-based and Skill-based Services is not possible due to how individual Users are configured and how related Nimbus Features operate. 🤔 Why is this setting locked for me? The User assignment type of a Service gets determined when a Service gets created (e.g. within MS Teams or manually in the Service Administration. Changing this setting is only is allowed for Services that are not MS-Teams based. |
|---|---|
| Distribution Policy | Contact Center license Nimbus Feature. Distribution Policies determines which Skills and Responsibilities apply to Contact Center Users (Agents) in order to meet selection criteria for your Service. ✅Related configuration steps:
|
| New Users immediately active | 💡Applies to MS Teams-based Service Types only. The "Active" toggle determines if Microsoft Team "Members" are considered as Service Users for Nimbus call distribution. ☝Enabling this feature will automatically add new MS Teams members to your Nimbus Service team. 💡An "Active" state has the following effects:
GOOD TO KNOW: Active UI toggleAt any time both Team Owners and Team Members can toggle their "Active" state within either the Services Overview tab of the personal Nimbus app or the Team Dashboard >"My State" widget.  Toggling this state acts as a quick "gate" to opt-in and -out of multiple Nimbus Services in case you want to balance your personal customer interaction as user and Nimbus capacity per Service team. 🔎Related Setting - Distribution: In addition to an "Active" state the MS Teams Presence Status also needs to match the criteria of the “Conversations Distribution” section below. Otherwise Users will not get Nimbus tasks. |
Conversations Distribution
These Settings determines call distribution based on MS Teams presence set in the user's MS Teams client.
✅ Precondition: Regardless of Microsoft Teams IM presence, a user always needs to be "Active" in the Service to receive Nimbus distributed calls. Further User State factors may also result in the user being shown as “Not available” → 🔎 More on this below in the Notes.
MS Teams presence states considered by Nimbus are as follows:
| MS Teams Presence | Nimbus distribution behavior |
| Available | The default task distribution behavior for Nimbus. Users need to be Signed-in and Available to receive tasks. |
| Offline (and “Appear offline”) | No tasks are distributed to Offline Users. |
| Do not Disturb (DND) | No tasks are distributed to DND Users. |
| Busy (in a call / meeting) |
Optionally configurable: Allows Nimbus to distribute tasks to Users even while Busy. ✅ Tip: By default Nimbus can only detect a high level “Busy” status. When Use Case - Tracking Extended User Presence via Application Permission is implemented, a more distinguished presence tracking is possible, for example allowing to still distribute calls when “Busy - In a Meeting” instead of just being shown “Busy”. |
| Away | Optionally configurable: Allows Nimbus to distribute tasks to Users even while Away. |
🔎Good to know: Preferred / Lasts User Routing
Contact Center Services may enforce Distribution Policies that allow them to have Users defined as “Preferred User Routing” and “Last User Routing” targets. As these Users do not need to be part of the Service, Distribution Settings above will be ignored.
How it looks in the UI
As an example on the Services Overview a user will be shown in state: "(Not) Available" according to the configuration above. This User State is a result of:
- The user being “Available" in MS Teams
- The user set to “Active” in Nimbus

🔎User States and Multi-Service participation
Being “Selectable” for tasks depends on the existing User State, which is considered by all Services that may target the same user. The User State includes MS Teams presence, but also other factors.
💡Here are example scenarios:
- When a user is part of multiple Services and already taking a task, the user is also marked as “Not Available” in all other Nimbus services.
- However, when the user has Task Parallelization enabled, they can park their current task, which in turn sets them “Available” for the next Audio/Video task, to be distributed by any other service.
- Aside from MS Teams Presence blocking new tasks, additional Nimbus status flags can also prevent task distribution. Examples are RONA status flagged on the user when not responding to a previously assigned task, or the user still being busy in ACW from the previous task.
✅ Related Workflow-settings to check
Whenever you make adjustments to your Distribution settings we also recommend checking your Workflows – or more specifically Activities such as "Availability-based Routing" or "Queue" – as they will directly affect how Nimbus checks for available users and distributes tasks among them.
Check Activities
Workflows - Check Activities
Used to “check ahead” on the queue, allowing you to reroute a task, change the priority, or just add extra announcements in case the expected waiting time is a bit longer due to all users being unavailable.
|
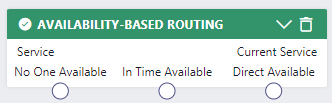
Check Activities “Availability-based Routing” |
Availability exit | Activity exit behavior |
|---|---|---|
|
No One Available | Currently all Users are inactive (or active but set "offline" in MS Teams) |
| In Time Available |
Currently active Users are not immediately available when:
|
|
| Direct Available |
Currently at least 1 active user is available and meets all of the following criteria:
|
1🔎Applies only when Task Parallelization is enabled. Note that the Activity “In time available / direct available” exit behavior differs per modality. Refer to the Check Activities > “Availability-based Routing” documentation for details
Queue Activities
Workflows - Queue Activities
Used to “steer” how the task is distributed among available Nimbus users. This setting has a direct impact on the Nimbus UI and how many of your users are simultaneously offered a Nimbus task.
|
“Queue” Activities (Queue / Queue Task) |
Distribution Type setting | Task queue distribution behavior |
|---|---|---|
|
Broadcast | To all "Available" Users, the task is in the queue is broadcasted simultaneously. |
| Direct | To the longest idle "Available " user, whenever a direct distribution task is in the queue. | |
| Pickup |
Shows conditional “Pickup” buttons, e.g. on My Overview, Services Overview, Live View, Attendant Console). The behavior depends if the service is MS Teams-based or Skill-based:
|

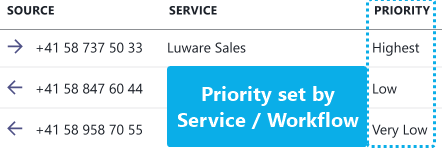
Task Priority
Contact Center Service Type feature. The Task Priority determines how incoming calls from this Service are handled in sequential order.
INC Distribution Priority
| Configurable Property | Task Priority | Behavior |
| Priority | |
|
💡 When to select "Strict" or "Nothing Else" as priority?
Set "Strict" when tasks need to be put on top of your queue.
|
Set "Nothing Else" when tasks should only get distributed when your service queue is empty.
|
| ✅ Use this for emergency services and important VIP hotlines that always should get precedence over anything else in the task queue. | ✅ Use this for non-time-sensitive tasks in when your maximum queue time is long enough for them to get handled eventually. |
| ☝Other tasks can get lost due to potentially long queue times as new incoming “Strict” tasks always take precedence. | ☝ These tasks can get lost due to all other tasks taking precedence. |
🔎 Notes: Priority in other Nimbus areas
-
Nimbus Power Automate Connector: Whenever workflow-related Trigger Event criteria are met, Flow Actions can also be used to set a task priority dynamically.
☝️ This new value will override the default priority set in the Distribution Service Settings. -
Distribution Priority steers “WHEN" a task enters a queue, not the target itself. A service's Distribution Policy steers “WHO”. (e.g. among "Longest Idle" or "Most qualified") Nimbus users gets the task.
💡 In a skill-based service distribution this can mean that even high or strict priority tasks may not get handled, if there is no Agent available to handle this task. -
Task widgets (e.g. My Overview or Personal Dashboards) have a "Priority" column which indicates how high this task is ranked in the overall queue.
💡 A priority change may "displace" existing tasks to a new rank.
Task Priority in Workflow Queues
In a multi-Service environment, the "Priority" setting effects your "Distribution Type" setting within a Queue Workflow Activity. Let's explore this with an example configuration of two services A and B:
Scenario |
Setup |
Outcome |
|---|---|---|
2 Services A&B are using a Queue Activity "Broadcast" setting in their Workflows.
|
Service A : Broadcast, Calling Timeout - 30, priority “Low” |
|
|
Service B: Broadcast, Calling Timeout - 30, priority “High” | ||
| Both Services pool the same 10 Users, which are Active and Available |

💡 Learning: The "Broadcast" Queue setting is fixed to a 10-user batch. In a priority scenario the first call entering – even if lower priority – may block higher priority tasks.
After-Call Work (ACW)
Contact Center Service Type feature. After-Call Work time - or in short ACW time (in seconds) - is added to the end of a call session until the user is considered available again to take the next task.

| Option | Description |
|---|---|
| Enable ACW Time |
When enabled, shows ACW in both My Sessions and Assistant in the Nimbus portal. 💡 Once enabled the default ACW time (default 20s) is granted. Can optionally be extended or stopped with the additional options below. |
| Allow Early End |
Enables all Nimbus Users of that Service to stop the ACW counter at any time. → Stopping ACW will free up the user to become "Available" within Nimbus and receive the next task / call. |
| Allow Time Extension |
Enables all Nimbus Users of that Service to extend ACW by the amount specified in the " Maximum ACW Extension Time ". 💡 This time is granted as flat "new" value to the user, not added to any remaining ACW time. |
| Allow Call on Behalf during ACW | When enabled, users can start a Call On Behalf during After-Call Work. ACW continues until the outbound call is accepted. |
| ACW for Unsuccessful Outbound |
When enabled, ACW to still be granted to users during the following outcomes:
1 💡Design Note: because of a (potentially very long) MS Teams outbound ring time, ACW will also be granted during dialout and ringing phase. This allows users to leverage ACW early, e.g. for taking notes quickly during high volume outbound call campaign scenarios. |
🔎ACW Design Notes:
- During ACW, Nimbus users are blocked from all other Nimbus Service calls.
- When a user goes offline in Microsoft Teams, it will terminate the remaining ACW time for that user.
- Changing the ACW Toggle / Time in settings during productive hours will have an impact on new (incoming) Tasks only.
- ACW is also tracked in Power BI for reporting purposes. Reports ACW time in seconds or "Null" if disabled. Total ACW time in a single Service session is summed up from all involved user sessions.
☝Note that ACW will not apply…
- … for Outbound Calls via Workflow, as the destination is first pre-dialed out to, and – once successfully connected – the user needs to accept.
- … for users with Task Parallelization enabled in their General User Settings.
RONA
RONA
Contact Center Service Type feature. RONA (Redirect On No Answer) is a "not selectable / available" User State for all type of services. A Nimbus user in MS Teams is given RONA state if they ignore a Nimbus task or do not answer it within a set period of time.
💡Tasks resulting in a RONA status are returned to the queue. The RONA status ensures that the task doesn't get lost and is instead redirected back to the queue (or handled otherwise via the Workflow).

RONA Settings
Within the Distribution Service Settings you can configure RONA as follows:
| Element | Description |
|---|---|
|
Persistent RONA (toggle, default: disabled) |
Adds a persistent RONA state1 to any Contact Center licensed users of that service when they fulfill either of the following criteria:
1 While in RONA status the user is considered as "Not selectable / Available" by Nimbus and will not receive further task invitations. → Also see User States. |
| RONA Reset Time |
RONA Reset Time (must to be specified)
RONA reset conditionsAn already active RONA state can be reset as follows:
|
💡Good to know
- RONA changed settings are not retroactive: Changing either “Persistent RONA” or “RONA Reset time” in your service settings will have no impact on already set RONA states on users.
- RONA is also tracked in the Nimbus Reporting Model, and can be evaluated via Power BI OData interface.
- RONA is a part of the User States that prevent further tasks to be distributed in parallel, flagging them as “not selectable”.
RONA in other Nimbus Areas
The RONA status is affected by a variety of other configuration areas in Nimbus, such as Workflows or User specific settings. Whenever you make adjustments to the RONA timeout, it makes sense to also have a look at the related configuration items below.
Workflows: Queue and Transfer
✅Precondition: Workflows use either “Queue” or “Transfer” activities with configurable RONA parameters.
- RONA in Broadcast Queues: RONA status does not apply when the Distribution Type in your "Queue" Workflow Activity is set to "Broadcast", as it would otherwise flag entire batches of users with RONA status simultaneously when a task doesn't reach them.
-
RONA Timeout "(Max. Ring Time)” is configured in Workflow Activities, such as Queue, Queue Task and Transfer (to User).
☝A very low-configured ringing timeout may not give Users enough headroom to react to an incoming task before the RONA flag is set.
User Settings: Task Parallelization
✅Precondition: Task Parallelization is enabled for a user.
Emergency Routing
Emergency Routing allows to forward calls when they can not be distributed anymore due to technical reasons.
☝️ Note: This feature is meant as a fallback during technical analysis of Service degradation/downtime to allow to route incoming calls to a temporary (emergency) number. Calls will be blocked from being handled in regular workflows and distribution, allowing Luware technicians to perform maintenance and analysis.
💡Note that an “Emergency Case” is engaged and managed by Luware System Administrators. When it applies, Luware support blocks the calls on cluster level. In such case, you will find more information on https://status.luware.cloud/.
| Auto Redirect in Emergency Case | When enabled, calls will be forwarded to the defined destination for as long as the call-blocking case applies. |
|---|---|
| Redirect Destination |
The destination where calls will be forwarded to in case of call blocking. Currently, there are three options for redirecting calls:
💡Note the following limitations:
|
Extensions
Extension Service Settings
In Extensions Service Settings, you can manage extension Nimbus Features such as Codes and Conversation Context displayed on the My Sessions overview. Enabled features are immediately available to all Nimbus service team members.
Preconditions
Note that some extensions described below are only visible when you have the according license applied via the Service Administration. Refer to Nimbus Features for an overview and get in contact with Nimbus customer success if you require a demonstration.
💡 For Enterprise and Advanced Routing services, you need to have a Microsoft Teams team defined in order to see the Extensions tab.
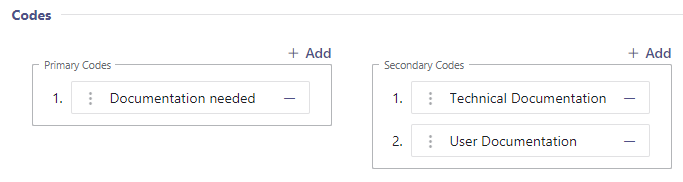
Codes
Enterprise Routing Contact Center This Feature requires either an Enterprise Routing or Contact Center license on the service. Codes are selectable entries can be defined by service owners to appear in My Sessions or Nimbus Assistant to help users specify the contents or task conclusion during and after a call (After-Call Work).
Good to know
- Codes selected by users after completing task will be stored as part of historic reporting and made visible via BI Template.
- Unlike Tags a code must be predefined via this list to appear for users of the service. This also means that users of multiple services will see different codes for selection, depending on the service that was handling the task.
- The usage of codes as either “Secondary” or “Primary” is purely cosmetic, without system-relevant differences.
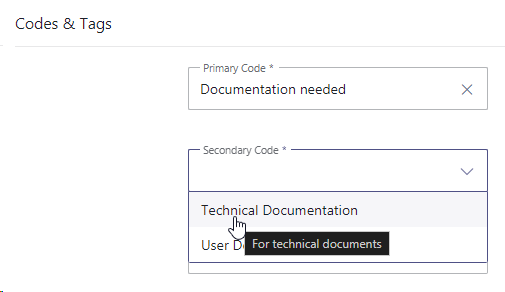
✅ Preconditions: Primary and Secondary Codes must be defined via Configuration beforehand and made available on the service's respective Organization Unit (or higher) before they appear in this list.
Learn more…
Once Codes are configured, click “Add” to add any available code to either the Primary or Secondary list. You can also sort the entries via drag-and-drop to change their order of appearance for users.
Nimbus Assistant
Nimbus Assistant Service Context
✅Precondition: All features described in the following requires Assistant to be installed and running on the user's PC.
Automatically open tabs
💡 Good to know: With Assistant, opening Nimbus in a browser (e.g. My Sessions) is not required anymore to get Conversation Context.
Assistant works standalone App and can also provide Conversation Context to users. As Administrator you can define multiple items Context items can be specified and applied in the Extensions Service Settings > Assistant section. These context items will open for all service users that have Assistant installed.

Service & User Templates as (dynamic) Context
In combination with opening regular “Conversation Context”, Assistant can run Service and/or User-specific Templates which trigger data requests or run local apps, web requests or scripts before or during an incoming call.
For Assistant this configuration is done as follows:
| Context target | Configuration items | How to Configure |
|---|---|---|
|
Single Users (Agents) (With Assistant License) |
Direct Templates are assigned and triggered by Assistant for an individual user, opened in their system-default browser during an incoming direct call. | ✅ Assistant Configuration. Once created, User Templates can be added via Assistant User Settings. |
|
All Service Users (Enterprise and Contact Center Licensed Services)
|
Service Templates are assigned and triggered by Assistant during an incoming Service call. | ✅ Assistant Configuration. Once created, Service Templates can be added via Extension Service Settings.1 |
| The regular Conversation Context (e.g. Websites) can also be opened in the default browser of your Service Users during an incoming Service call. | ✅ Configuration. Once created, Context Items can be added to the via Extension Service Settings > Assistant.2 |
Attendant Console
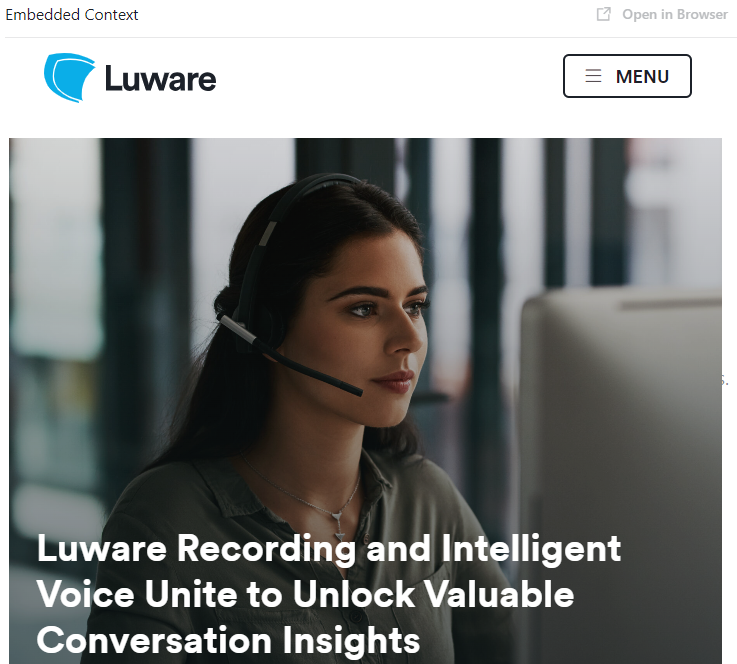
A single Conversation Context item may be added to show within Attendant Console. Note that you cannot add more than one Context item at a time, as it wouldn't fit into the sidebar.

Once you select an active session (card) in Attendant, the globe icon appears right-hand side. Clicking it will show conversation Conversation Context within the sidebar. ☝Note that general Website embedding limitations apply (see bottom of this page).

My Sessions
🔎 This section controls Widgets, Parameters and other information shown in My Sessions. We also offer a related Context Handover concept page for more detailed considerations on handling, displaying and transferring context in Nimbus.
Conversation Context
Context Preconditions
✅ Enterprise Routing Contact Center This Feature requires an Enterprise Routing or Contact Center license.
- Conversation Context items must be defined via Configuration beforehand and made available on the service's respective Organization Unit (or higher) before they appear in this list.
- Context can consist of static URLs, but also use dynamic Custom Parameters or System Fields and Parameters. If you want to learn more, visit Use Case - Defining and Using Conversation Context.
- Context can either be opened a extra browser tabs or embedded in My Sessions via the “Embedded Context” → Widget described further below on this page.
- Note that the extra browser tabs only open when you have Nimbus open in the browser OR the Nimbus Assistant app installed.
This section steers which (previously defined) Conversation Context should be shown on My Sessions during an incoming task, in the order specified. The usual business case are additional websites opening alongside with a new task, to assist the user their daily work (e.g. a CRM system, Search, Ticketing systems, Glossaries)

☝Please keep in mind that this setting applies service-wide. In high-frequency task scenarios, your users might get spammed with “Context” tabs.
- Context applied opens equally for all service users. For a more fine-tuned experience, consider using Service Templates in combination with Nimbus Assistant.
- Context will always (re)open on each incoming task, regardless if the user's browser window already had the same tabs open. If you want a more fine-tuned user experience, consider using Direct Templates in combination with Nimbus Assistant.
- Conversation Context opens task-agnostic, equally for any modality. When your service handles multiple modalities, keep the opened Context “baselevel” for either scenario.
Store Conversation Context Data
INC Store Context Data
GDPR After a service task has concluded, any historic session and customer context data – e.g. as shown in the My Sessions widgets – will by default not be stored by Nimbus.
While disabled:
⮑ the "Session Details" of any historic task records will show “Not Available” instead within My Sessions and Historical Sessions.
⮑ Previous custom Parameters / and Conversation Context items (e.g. Customer details or URLs dynamically retrieved and formed via Nimbus Power Automate Connector) will not resolve or open correctly anymore.
This storage behavior can be changed by enabling the “Store Conversation Context Data” in Extensions Service Settings:

☝ Note that the “Store Conversation Context Data” option is disabled by default as potentially sensitive caller data can appear in historical records and seen by Administrators (e.g. via Sessions List). Therefore…
- … read the consideration below to understand its effects.
- … note that this setting has no retroactive effect, so only the data collected after enabling the feature will get stored for the retention period.
- … note that the setting must be enabled individually per service (OPT-IN).
🤔What happens when I enable this?
☝Task information / Session detail data is stored per service session on call termination (either transfer by workflow or user).
- Within the UI of My Sessions and Historical Sessions
- Custom (user created) Parameters
- System Fields and Parameters (both “Custom” and "System" parameters like Call ID, Service UPN, etc.)
☝ Restrictions on concluded sessions (e.g. within My Sessions) apply as follows:
- ... the "Embedded Context widget" will resolve with the currently configured URL with a previously saved call information. This means that also historic sessions will use the link currently configured in the Extensions Service Settings .
- ... the separate "Open Context" link remains clickable if at least one Conversation Context URL is currently configured.
- ... the "Session Details" widget will still show Custom and Customer parameters if available.
☝ Not stored (regardless of setting) are:
- Default "My Session Parameters" user data is not stored as it is always retrieved dynamically from the internal user directly of your Tenant.

🤔What happens in service transfer scenarios?
Nimbus always stores live context on transfer to services (either initiated by workflow or user). The "Store Conversation Context Data" option will have no impact there.
☝ However, enabling the "Store Conversation Context Data" setting will cause such live context data to be stored as historical record after call termination. This also applies on each transfer between services, creating a historical record entry for each service that has the setting enabled.
In an example transfer scenario this may cause historical data to “accumulate” between services, as data gets updated and appended.
Example - Transfer from Service A to B to C:
| Parameter | Service A ► transfer to | Service B ► transfer to | Service C |
|---|---|---|---|
| Customer Name | John Doe | John Doe | John Doe |
| Spoken Language | German | <Not Relevant> | <Not Relevant> |
| Gender | <Not Relevant> | Male | <Not Relevant> |
| Ticket ID | #1111 | #3151 (overwritten Ticket Parameter) | <Not Relevant> |
| “Store Conversation Context Data” enabled | ✅ | ⬜ | ✅ |
| Stored Historical Sessions data shown | John Doe (1) German Not used #1111 |
John Doe (1) Not available (not stored) Not available (not stored) |
John Doe (1) German (from Service A) Male (from Service B) #3151 (from Service B) |
(1) The user name will always be resolved from a UPN / PSTN when it was found within the existing O365 user directory.
🤔How long is data being stored?
Caller info is updated on a “terminated” workflow Trigger Events and stored for a maximum of 30 days for the last available service session (in case of transfers). Conversation Context data will also be stored for failed, aborted or “killed” calls.
☝ Note: After 30 days the data is cleared. This also happens when either the Service or Tenant is being unprovisioned (removed from Nimbus Clusters) while Uninstalling Nimbus.
🔍 Whitepapers: You can also learn more about the data retention policy in our whitepapers, available in the Documents section.
⮑ Customer-Side Backup responsibility: If you wish to store mission-critical or personal session data permanently, you need to do so during an active session and within a system of your choice (e.g. a CRM or Database).
Keep Custom Context Parameters on transfer
INC Context Settings
As a Nimbus session gets transferred between multiple Services and Users, related System Fields and Parameters automatically carry over. In addition to this, a separate Setting allows to steer if additional Custom Context Parameters should be kept during a transfer from this Service to Users as well.

☝Note that the “Keep Custom Context Parameters on transfer” option is enabled by default for both Services (currently fixed) and Users (optional).
🔎 Custom Context Parameter Transfer Settings
The following Diagram is meant to illustrate the effects of context-related Service settings.
- Each Service can steer these settings individually. This means that Session Data storage and handover settings from a Service A are in effect until a new (receiving) Service B decides to handle the (received and potentially updated) data differently.
- Assuming your starting point is a Service A:
- Call Data & System Data will always transfer to Services and User.
- Custom Context Parameters will always transfer to Services.
- Custom Context Parameters will only transfer to Users if enabled on the originating Service. If toggled off, they will be nulled/reset to defaults.
-
The Nimbus Power Automate Connector can react to various Trigger Events (e.g. Workflow Started, Parameter Updated, Connected to User).
- By doing so, parameters within a specific scope (Service Session or User Session) can be updated, anonymized, or cleared.
- In the Sessions List this may result in different parameter values being shown for each interaction, as each session can have their context updated via separate Flow Actions.

INC Context Handover Limitations
The transfer of Custom Context Parameters and System Fields (Custom Fields) works under the following scenarios:
| Transfer FROM… | …TO User | …TO Service |
|
… User on |
✅ Call Data + Customer.Custom Fields ⬜/✅ Custom Context Parameters only if enabled in respective Extensions Service Settings > “Conversation Context”. |
✅All Call Data + Custom Fields, System Data and |
| … User, during ongoing Consultation | ❌ No Context gets transferred.2 |
✅All Call Data + Custom Fields, System Data and |
| … Service via Workflow “Transfer" activity. | ❌ No Context gets transferred.1,2 |
✅All Call Data + Custom Fields, System Data and |
CONTEXT TRANSFER LIMITATIONS
The following Context Transfer limitations are known. We are actively working to improve this in a future update.
1 Context Handover via ”Transfer" Workflow Activity": A Custom Context Handover from within a Service workflow to any target will not work.
2 Context Handover via UI buttons to Users during consultation calls is currently not supported, partially due to MS Teams conference limitations.
→ If you require Context to be transferred, use Blind Transfer or Safe Transfer scenarios respectively.
Widgets
Widgets extend the My Sessions UI with additional functionality.
✅ Individual Preconditions: Note that widgets rely to features which are separately licensed. The widget toggles may not show in your UI if preconditions are not met.
The following widget settings can be configured:
| Setting | Description |
|---|---|
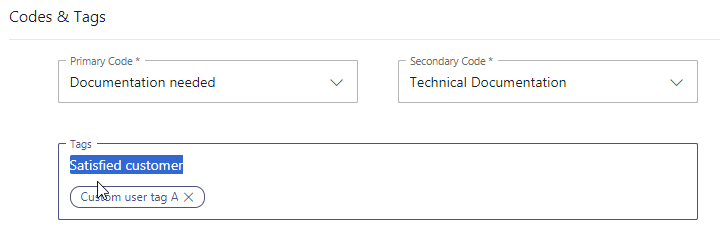
Codes and Tags |
✅ Preconditions:
💡 Tags can be freely defined by users during incoming calls. Suggestions will be auto-completed based on previously provided tags.
 |
Embedded Context |
✅ Preconditions:
 ☝Please note:
|
Companion |
Displays a widget to show various Companion related features, further configured in Companion Service Settings: TranscriptionThe Transcription feature transcribes call contents using Voice-to-Text capabilities. ✅ Preconditions:
Transcription processing in ACW💡If you have ACW configured in Distribution Service Settings and need it for session closure, you may need to wait for an ongoing saving process of your session's transcription to finish.  Live CaptionThe Live Caption feature converts ongoing call participant voices directly into text, using Voice-to-Text capabilities. ✅ Preconditions:
SummarizationSummarization processes the transcript to generate a summary containing the most important aspects of a session. ✅ Preconditions:
💡Hiding features in the backgroundIf you want to process these features in the background (e.g. via Power Automate Use Cases), you can toggle it off My Sessions, effectively hiding it from the Nimbus User Portal. |
Session Details |
✅ Preconditions: Basic session details can be shown for any service, but extended license features (→ see below) are available. 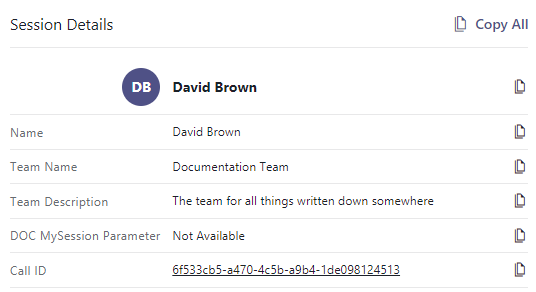
✅ Extended License Features: The amount of available Custom Parameters is greatly extended with higher Nimbus Feature license tiers. Advanced Routing✅ Advanced Routing My Session Parameters:
 💡Good to Know: If you remove any of the existing entries, they will re-appear in the "My Session Parameters" list and can be re-added. Enterprise Routing / Contact CenterEnterprise Routing Contact Center Additional System Fields and Custom Parameters for your "Session Details" become available with an Enterprise Routing or Contact Center license on your service:
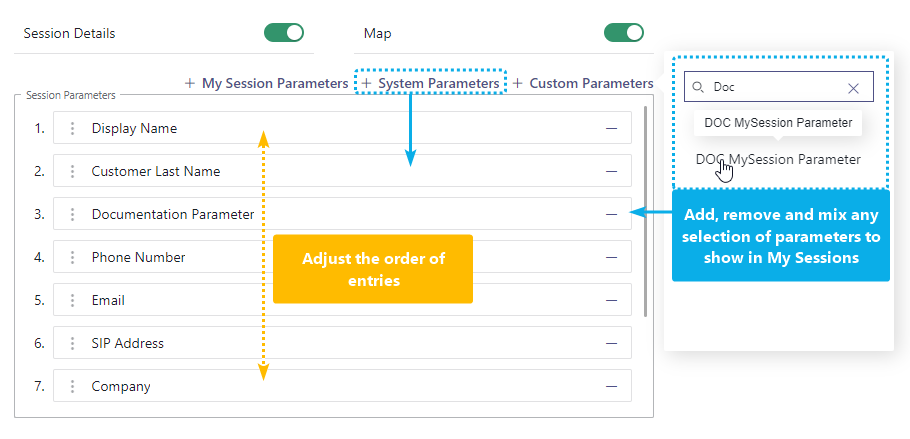 🔎Notes on Parameters in Session DetailsAny custom/writable Custom Parameter data is retrieved using the Microsoft Power Automate Connector.
🔎 Example - Original Called NumberThe Original Called Number and Original Called Target Type system parameters can be added to your My Sessions view to give agents immediate context about where a call originated.
Typical use cases:
🔍 Both parameters are read-only and set once when the call enters Nimbus. See System Fields and Parameters for more information. License Downgrade: Note that a service License downgrade is being prevented when you still have custom or system parameters in use. Before attempting to downgrade your service license, remove additional parameters first and return the view to "My Session" defaults. |
Map |
✅Preconditions: Map locations are only shown when previously retrieved from an external directory, e.g. by using the Microsoft Power Automate Connector to look up caller data.
⮑ When successfully retrieved, an available a google-maps location will be shown based on either the address or IP information of the caller. Depending on the available info this map will provide more specific or general details. |
General Limitations
INC Website Embed Limitations
WEBSITE EMBEDDING LIMITATIONS
Some websites prevent IFrame embeds on remote sites, which cannot be circumvented. When you try to embed such protected URLs, errors like 401 (unauthorized) or a "Refused to Connect" message will be shown instead of your desired output.
✅ Possible Workarounds:
- If available, consult your external source website support to check if any iframe-referrals are allowed. Some services offer specialized data widgets for that purpose or provide authorized token-URLs that you can use.
- If you have access to whitelists on your source website, try to allow the *.luware.cloud domain for external embedding / referencing.
Show more technical information...
There are two types of HTTP headers in websites that control iframe loading:
X-Frame-Options: DENY
Content-Security-Policy: frame-ancestors 'none'
The HTTP Content-Security-Policy specifies valid parents that may embed a page using <frame>, <iframe>, <object>, or <embed>.
A website header called x-frame-options specifies the access prevention, determined via the following values:
- if set to DENY the site isn't allowed to be loaded in iframe
- if set to SAMEORIGIN the page can only be embedded in a frame on a page with the same origin as itself.
- if set to ALLOW-FROM the page can only be displayed in a frame on the specified origin. This only works in browsers that support this header.
🔍 Related Sources:
Users
Users Service Settings
🔍Note: This page covers User settings of “MS Teams-based” services. Users in a “Skill-based” service are configured via "Agents" tab instead.
PRECONDITIONS
All Nimbus services allow User Management, however Advanced Routing or Enterprise Routing primarily operate in sync with MS-Teams. In a Contact Center service, users can be managed manually. More info on this can be found under User Assignment Types.
For Tenant Admins:
- Nimbus Service Provisioning needs to be concluded for at least one MS Teams Team,
⮑ Within the Service Administration the service will shows as “MS Teams-based” User Assignment Type. This will signal that the Nimbus users are in sync with the corresponding MS-Teams Team. - A “Users” tab within the Service Administration allows to configure further roles. Refer to Service Permissions for more details.
For Team Owners:
- Within your MS Team Team you need to invite additional members and owners to participate in the Nimbus service.
- In the “Users” Tab described on this page you can manage the "Active" state of your service members and fellow owners.
💡Good to know: Team Members will not see this tab within the Nimbus Portal.

Common Settings
| Setting | Description |
|---|---|
| Default Team Owner Role |
Determines which Nimbus User Role a new MS Teams Channel Owner is granted once he joins the team.
💡This field is read-only in Portal. To change this an Administrator needs to access Service Administration > Your Service > "Users" Tab. Read more about this on Service Permissions. |
| Users can change the active state | Allows or disallows users to change their active state. 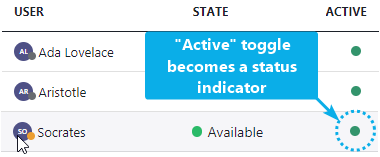 ☝Make sure to coordinate this setting: Other team owners and users with the "Workflow Admin Limited" Portal Role assigned can also change the “Active” state of all team members. → This setting always stays in sync between all users of that service, so make sure to inform your service-management colleagues when you change this behavior. |
Users Table
| Table Row | Description |
|---|---|
| Name / UPN |
💡 Fields are read-only. Users are auto-synced via MS-Teams. Name and UPN are both fixed and in sync with your local Tenant user directory. To change or correct any of these fields you need contact your Tenant Administrator. |
| Role |
Determines which Nimbus Portal Roles a new MS Teams “Team Owner” is granted once he joins the team.
💡This field is read-only in Portal. To change this an Administrator needs to access Service Administration > Your Service > "Users" Tab. Read more about this on Service Permissions. 💡Note: These Portal Roles are only for Nimbus functional and service data access purposes only. Changing them does not change any functionality within the native MS Teams client itself. |
| Active |
Steers the user's availability to take tasks within Nimbus.
|
Agents/Permissions
Agent Service Settings
🔍Note: This page covers Agent settings of “Skill-based” services. Users in a “MS Teams-based ” service are configured via “Users” tab instead.
PRECONDITIONS
Contact Center licenses are required both on the Service Administration and User Administration. This enables the management of users as “Agents” of one or several services, as well as the related Nimbus Features.
For Tenant Admins:
- A “Permissions” tab within the Service Administration allows to assign further Agents or Owners manually.
- Also within the Service Administration, User Skills and Levels need to be created first before they can be assigned to Agents in the Portal. 🔎 Refer to our Use Case - Setting up a Contact Center for a full walkthrough.
- Note that any Team Owners can assign Skills and Responsibilities levels to any Agents you (or other Admins) have assigned. → This is described below on this page.
For Team Owners:
- Once the Contact Center License is enabled, the “Agents” tab becomes available in Nimbus Portal Service Settings.
- On the “Agents" tab you can manage Skills and Responsibilities of your assigned service-assigned Agents. → See below on this page.
💡Note that no Agents will show until a Tenant admin has (manually) assigned users to this service. → See “For Tenant Admins” steps above.
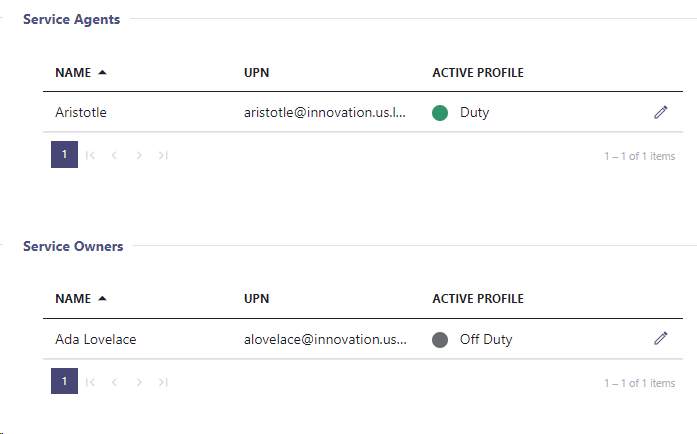
Editing Agents
Any service owner can access the Agents tab to adjust the levels of Skills and Responsibilities of Agents assigned to that service.
| Active Profile | Acts as the equivalent to the toggle, available in the Assistant app. 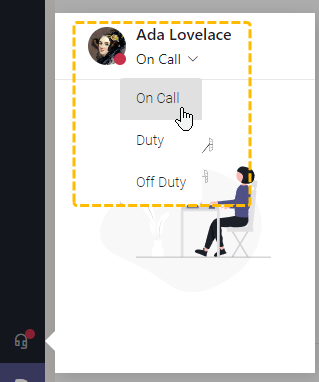
|
|---|---|
| Edit (Skills / Responsibilities) |
NOTE: EFFECTS OF EDITING AGENT SKILLS AND RESPONSIBILITIES
Please be aware that profile edits on users have potential widespread effects:
-
Responsibility Profiles of Agents are considered by any skill-based service for the distribution:
- If no skills are assigned or responsibilities change, the user may not be selectable for calls at all.
- Changes immediately affect all services that the Agent is assigned to (via Nimbus Admin > Service Permissions).
- Skill and duty changes are made and stored on the user itself. They are als immediately visible to service owners with view / edit permissions on this Agent.
- Distribution Policies set in each service's Settings > Distribution tab will reflect Agent skill and responsibility changes immediately as the next call arrives.
💡 An example:
- An Agent is part of 3 services A, B and C but their skill levels currently allows distribution only according to the Distribution Policy set in service A.
- You decide to raise that Agent's language proficiency level. → Service B requires that level and will now consider the Agent as well.
- You do not need the responsibility and decide to deactivate it. → Service C's distribution policy however relies on it and will still not consider the Agent despite the higher skill level.
- The owner of service C will add a completely new skill to this Agent and reactivates responsibility at the same time. The next time you edit this Agent, can see this change reflected.
☝ Important Learning: When you share Agents between multiple team owners and services, coordinate your changes to their skillsets and responsibilities and agree on common standards in your service Distribution Policies. → Refer to the Distribution Order page for more details and examples.
Interact
Interact Service Settings
💡 Interact allows customers to directly communicate with your service agents via website either via Audio/Video or Instant Messaging (chat), without the need to install or run a any client on their side.
PRECONDITIONS
- TENANT ADMIN Interact is a feature enabled on tenant level.
- Enterprise Contact Center An Enterprise or Contact Center license needs to be assigned to a service for the Interact settings to become visible. See Service Administration > General Tab > Licenses.
- Once configured, Interact allows customers to reach a service directly from external URLs (websites) via small chat or audio/video widgets.
- 💡Note that the service needs to have a Contact Center license assigned in order to use Instant Messaging with Interact.
Editing Interact Service Details
After an Interact license has been assigned to the service, the Interact tab will become visible for further configuration.
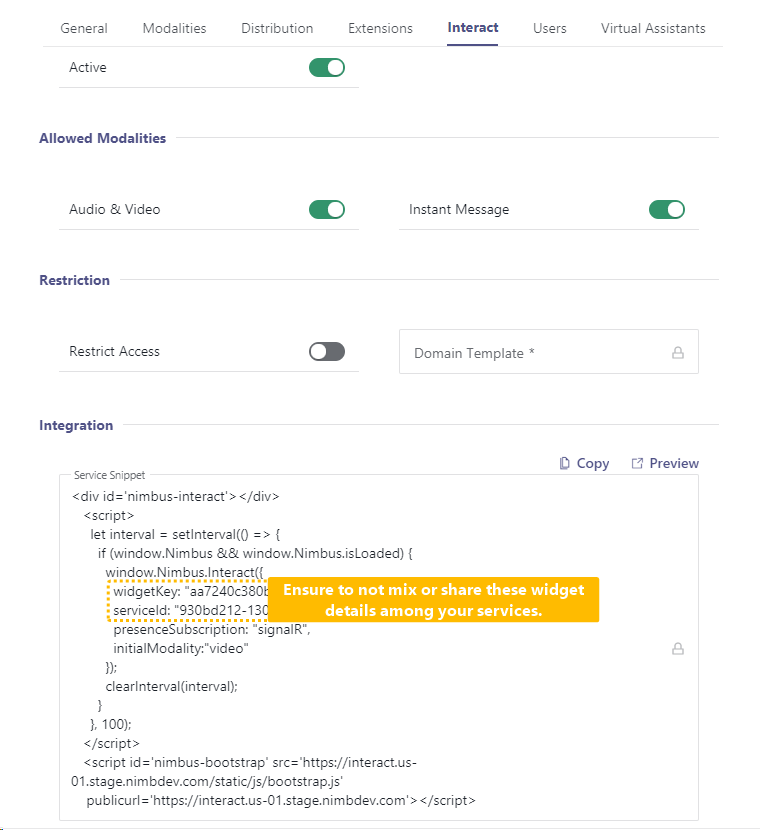
The following options can be configured:
Element |
Description |
|---|---|
| Active |
✅ This feature needs to be enabled for your Tenant, see prerequirements above. 💡 Note that Interact licenses (granted via "General" Tab) remain active for this user. |
| Audio & Video |
When enabled the service can be contacted via call modality using Interact. Also refer to Instant Message Handling. 💡 Regular Nimbus distributed service calls will still reach this user despite of this setting. |
| Instant Message |
When enabled, the service can be contacted via chat modality using Interact. Also refer to Instant Message Handling. 💡 Regular Nimbus distributed service calls will still reach this user despite of this setting. 💡 Note that the service needs to have a Contact Center license assigned, Instant Messaging enabled, and an Instant Messaging workflow defined in tab Modalities in order to use Interact with Instant Messaging. |
| Restrict Access |
Toggle that applies Interact Domain Templates (CORS) as “whitelists”.
|
| Domain Template | Lists Interact Domain Templates (CORS) available under the same Organization Units as the current service. |
| Service Snippet |
Default script with settings of the current Service, which later can be inserted into a the web page and used as a contact widget. ☝ Note that "serviceId" and "widgetKey" are unique to the current service and should not be mixed. 💡 Use the "Copy" button for easy Snippet Code retrieval. |
- Learn more about the configuration in our Use Case - Setting up Interact.
- Interact can also be enabled per user, see Interact User Settings.
Companion
Companion Service Settings
Nimbus allows for AI-driven features that help improve your overall service performance. Scenarios and features involve:
-
Companion:
- AI-driven Transcription on customer-service user interactions and post-call Summarization functions.
- Automated Tags and Codes suggestions based on the context detected during the call.
- Virtual Assistants: Live Captioning of spoken dialogue.
-
Virtual Users:
- AI-driven Transcription of customer-AI user interactions.
- For both inbound and outbound audio calls, including Call On Behalf and Scheduled Outbound Calls.
PRECONDITIONS: TENANT ADMIN CONSENT
✅Companion, Virtual Users and related Transcription features each require individual Tenant Administrator consent. This consent needs to be granted once in the Data Privacy Tenant Settings > Artificial Intelligence section by individually enabling the use of AI-driven features.
☝️Without the consent given, AI features described below will be inactive for all services. A warning will inform about

🔎DATA STORAGE SETTINGS
Note that there are data storage toggles in the features below.
- While enabled (Default): Data is stored or 30 days1. Power Automate Connector > Trigger Events and Flow Actions for Companion and Virtual User can be leveraged to retrieve the data.
- While disabled: Data will be cached and (when optionally enabled) shown in the Nimbus UI for 1 hour1. Caching is done to allow retrieval and storage of the transcription data via Nimbus Power Automate Connector.

1🔎Any data not stored into external systems will be discarded after the retention period and will not show in historical listings anymore (e.g. Sessions List, My Sessions). Data storage retention settings apply equally to inbound and outbound calls. For more details on data storage and retention, refer to the Nimbus Security Whitepapers in the Documents section
Companion Features
Precondition: Speech Recognizer
✅ All Transcription or Live Captioning features described on this page requires prior setup of a Speech Recognizer in the Nimbus Configuration.

Speech recognizers are preconfigured Nimbus (Administration) items that point to a 3rd party service for voice processing. A Speech Recognizer is required to specify the language and engine used by any transcription features mentioned below.
Please use the tabs below to navigate:
Transcription
Transcription
INC Transcription Preconditions
PRECONDITIONS
✅Related Admin Use Case: Refer to Use Case - Setting Up Transcription for detailed step-by-step instructions.
Audio / Video Modality: AI driven Transcription, Summarization, Live captioning, Codes & Tags suggestions are available for both inbound and outbound audio calls.
Nimbus service and user licensing
🔎Transcription features have service and user requirements. These requirements apply for either mid-session Live Caption or post-session Transcription / Summarization features.
|
Service requirements Enterprise Routing Contact Center |
|
|
Service User requirements Companion |
✅ The service requirements needs to be met. ✅ Additional steps are as follows:
|
|
Virtual User transcription Virtual Users |
✅ The service requirements needs to be met. ✅ Additional steps are as follows:
|
Speech Services (Speech Recognizer)
🔎Features described in the following use “Speech Services” (in Nimbus configured as Speech Recognizers) provided by 3rd party vendors. To offer our customers both convenience and flexibility, you may pick between a Nimbus-native implementation and Azure speech services. Differences are explained in the following:
INC Speech Recognizer service comparison
| Nimbus AI Services | Azure AI Services | |
|---|---|---|
| Benefits |
|
|
| Challenges |
|
|
| Setup |
|
|
Power Automate Connector
🔎Conditional step: The Nimbus Power Automate Connector can extract Transcription/Summarization data from customer sessions. There are separate Trigger Events and Flow Actions for Virtual User (automated AI Agents) and Companion (while assisting human Nimbus users).
To retrieve and handle the data, the following steps need to be performed by an administrator
| Transcription setup for ► |
Companion (Human) Service Agents |
Virtual Users (AI) Service Agents |
|---|---|---|
| Mandatory steps |
|
|
| Optional steps |
|
|
| Related pages |
INC Azure Billing Transcription
AZURE BILLING
The usage of the Transcription feature will cause additional monthly ACS costs. The costs are determined by Microsoft. Also see https://azure.microsoft.com/en-us/pricing/details/cognitive-services/speech-services/.
- Before enabling the Transcription feature, get in touch with your Luware Customer Success specialist to discuss terms, usage scenarios and necessary setup procedures.
- Please note that Nimbus and Transcription support does not cover pricing discussions or make recommendations based on Microsoft Azure infrastructure.
When active, the Transcription feature transcribes call contents between customer and Nimbus users (Agents) using Voice-to-Text capabilities. It improves quality assurance and increases the efficiency of call processing, for example making it easier to summarize past customer interactions and possibly transfer them to a CRM system for easier search and later analysis. Transcription is available for both inbound and outbound audio calls.
Once a call has ended, a Voice Transcription is generated in the background, by leveraging the Nimbus Power Automate Connector > "Companion" Trigger Events and Flow Actions. You can then forward the generated transcription to any target, e.g. by wrapping it into an Adaptive Card as Teams chat message or via Email.

|
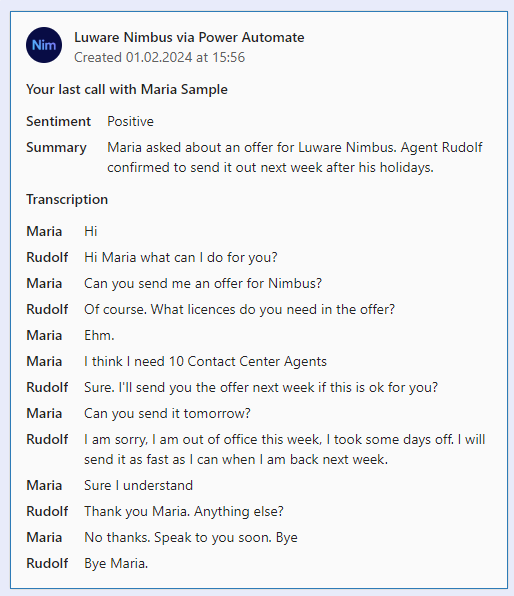 |
Optionally you can also show the transcription in My Sessions, allowing users to have a direct written record of previous conversations with customers. Transcriptions for concluded outbound calls are also available in the historical sessions view in My Sessions.

Summarization
Summarization
Summarization
✅ PRECONDITIONS
Companion - Summarization is an optional feature as part of Transcription:
- The Transcription feature must be enabled on the Companion Service Settings, as the Summarization is generated from it.
- Companion Service Settings also steer the individual feature availability to users, as well as the data storage retention time.
- Each user accessing the feature requires a Companion License, applied via General User Settings.
The Nimbus Companion integrates AI summarization as part of a broader suite of Transcription features, aimed at improving service performance and agent efficiency. During a call - when Live Captioning is enabled - Nimbus transcribes the conversation in real time. After the call, the transcript is processed by an AI service to generate a summary with the following aspects:
| Aspect | Description |
|---|---|
| Title | A title generated from Call Direction, Service, and User that accepted the task. |
| Issue | Shortened problem description by the Customer. |
| Resolution | Summary of how the issue was resolved. |
| Recap | A brief paragraph summarizing the interaction. |
| Narrative | Detailed call notes or chat summary of the entire Customer/User Interaction. |
Summarization Outputs
Via My Sessions: Summarization outputs can be presented to the agent via My Sessions > Companion widget.
💡All aspects shown within the Companion Widget > Summarization can be hovered over and copied.
✅ Precondition: The “Companion” widget itself needs to be enabled in the Extensions Service Settings in order to be shown to users.
Via Nimbus Power Automate Connector: Administrators also have the possibility to flexibly retrieve and store Summarization outputs using Companion Flow Actions and the User/Service SessionID. This can be useful to keep a record of calls, e.g. within a CRM or long-term data storage and evaluation platform.

Known Limitations
Summarization relies on the Transcription feature and therefore shares the same design limitations.
INC Transcription Limitations
☝️ KNOWN TRANSCRIPTION & SUMMARIZATION LIMITATIONS
💡We are actively working on further improvements to the following limitations:
- Transcription data is not part of service/user transfers. Data is kept within the current customer/user session. This capability will be provided with an upcoming release.
- Virtual User Reporting: Virtual User sessions and their transcripts will be included in Virtual User session reporting as part of a separate, upcoming capability. This is not available yet.
- Power Automate Connector: New “Virtual User” data fields in the Trigger Events / Flow Action may still be erroneously labeled as “Companion”. The terminology will be corrected in a separate update. The Virtual User / Companion connectors separate their data as intended.
Troubleshooting FAQ
INC Transcription Troubleshooting
Not seeing any transcripts in the Transcript widget can have several causes. The following table lists error messages and explains why they are shown.
| Message shown | 🤔 Why do I see the message? |
|---|---|
| No transcription is available for this interaction. |
There was no transcription generated for the selected conversation. This could happen …
|
|
No transcription is available for this interaction OR Task was not accepted. |
|
| Transcription not available for this session. No consent granted. |
|
| User Transcription License is missing. |
|
🔎 BY DESIGN
💡The following points are not limitations, but important to note:
-
Transcription Feature availability:
- Transcription is a prerequisite to Live Captioning, Summarization, AI suggested Codes & Tags
- Not for Copilot / Direct Line 3.0 Virtual Users. Transcription features apply Virtual Users built on GPT Realtime bots only.
- Transcription relies on external services and APIs. When the feature is disabled or unavailable (e.g. throttling or service impediments) info messages are shown in the frontend UI widget. Nimbus task handling and user-customer interactions themselves are not affected by this and will continue normally.
-
Virtual Users:
- Not for Copilot / Direct Line 3.0. Transcription features apply Virtual Users built on GPT Realtime bots only.
- Post-session only. The transcript is produced after the session ends; there is no live/real-time transcription during a call.
- No (default) My Sessions view. Virtual User transcriptions do not appear on the Nimbus UI — they are consumed through Power Automate.
- No audio storage. Only the generated transcription data is processed in Power Automate. Audio recordings are discarded after automated processing.
-
Transcription scope:
- 3rd-party participants: Third parties, consultants and call conference attendees are not part of the transcribed content. Only the transcription data between Nimbus users / AI agents and the calling customer is kept.
- Supervision - As long as Supervisors remain in Listen or Whisper mode during a conversation, their voice is not being transcribed. Only during ”Barge In" they are part of the conversation and transcription is active.
- Summarization items generated from the Transcription might be missing when there is not enough data to draw from.
Codes Suggestion
Codes Suggestion
✅ Precondition: Transcription is required to be enabled and a Transcriber set in order to use Codes Suggestion.
The Codes Suggestion feature provides you suggestions in My Sessions after a call is finished. If you haven't added codes to the session yet, Companion automatically suggests them. In case you have already added your codes, you need to click on the suggest icon to see and apply code suggestions. Code suggestions are also available for concluded outbound calls in the historical sessions view.

💡When configuring Codes in your Configuration, you can add the context related to this code in the field to support Nimbus Companion in suggesting codes.
Tags Suggestion
Tags Suggestion
✅ Precondition: Transcription is required to be enabled and a Transcriber set in order to use Tags Suggestion.
The Tags Suggestion feature provides you up to 5 tag suggestions in My Sessions from the list of already assigned tags (to service sessions). After a call is finished and you haven't added tags to the session yet, tags suggestions are shown. You can either select specific tags or apply them all. If you have already selected your own tags before, they don't get overwritten – in this case, you need to click on the suggest icon to see and apply tags suggestions. Tag suggestions are also available for concluded outbound calls in the historical sessions view.

Companion Follow-Up Actions
For Service Owners
✅Enabling the feature visibility:
- For Companion Transcription and Summarization features to be visible to your users, the "Companion" widget must be enabled via Extensions Service Settings > Widgets. Of course you can opt to not show these features, while Companion features still run in the background.
💡Workflows can be set up for customers to opt out of transcription via the Record Consent workflow activity. When a customer opts out, transcription will not be generated for that session..
💡Please note that Transcription-related features only apply for new sessions, not retroactively on past sessions. - Once enabled, you can inform your Service team, so they can pay attention in their My Sessions view accordingly.
For Administrators
✅Power Automate alternative for Companion data: You can also leverage the Nimbus Power Automate Connector by using "Companion" related Trigger Events and Flow Actions, as described in our example Use Case - Analyzing a Transcript. While adding complexity in configuration, the advantage is that you have more fine-tuned control over the transcription data, allowing you to process or store it externally, or opt to showcase it to additional users via the use of Adaptive Cards. The Power Automate triggers and actions also fire for outbound conversations.
Virtual Assistants
Live Captioning
Live Captioning
✅ Precondition: Transcription is required to be enabled in order to use Live Caption.
INC Public Preview Beta Feature

This feature is in PREVIEW and may not yet be available to all customers. Functionality, scope and design may change considerably.
The Live Caption feature converts ongoing call participant voices directly into text, using Voice-to-Text capabilities. Contents are displayed live on the My Sessions page. Live Captioning is also available for outbound audio calls.

Virtual Users
Transcription
Transcription
INC Transcription Preconditions
PRECONDITIONS
✅Related Admin Use Case: Refer to Use Case - Setting Up Transcription for detailed step-by-step instructions.
Audio / Video Modality: AI driven Transcription, Summarization, Live captioning, Codes & Tags suggestions are available for both inbound and outbound audio calls.
Nimbus service and user licensing
🔎Transcription features have service and user requirements. These requirements apply for either mid-session Live Caption or post-session Transcription / Summarization features.
|
Service requirements Enterprise Routing Contact Center |
|
|
Service User requirements Companion |
✅ The service requirements needs to be met. ✅ Additional steps are as follows:
|
|
Virtual User transcription Virtual Users |
✅ The service requirements needs to be met. ✅ Additional steps are as follows:
|
Speech Services (Speech Recognizer)
🔎Features described in the following use “Speech Services” (in Nimbus configured as Speech Recognizers) provided by 3rd party vendors. To offer our customers both convenience and flexibility, you may pick between a Nimbus-native implementation and Azure speech services. Differences are explained in the following:
INC Speech Recognizer service comparison
| Nimbus AI Services | Azure AI Services | |
|---|---|---|
| Benefits |
|
|
| Challenges |
|
|
| Setup |
|
|
Power Automate Connector
🔎Conditional step: The Nimbus Power Automate Connector can extract Transcription/Summarization data from customer sessions. There are separate Trigger Events and Flow Actions for Virtual User (automated AI Agents) and Companion (while assisting human Nimbus users).
To retrieve and handle the data, the following steps need to be performed by an administrator
| Transcription setup for ► |
Companion (Human) Service Agents |
Virtual Users (AI) Service Agents |
|---|---|---|
| Mandatory steps |
|
|
| Optional steps |
|
|
| Related pages |
INC Azure Billing Transcription
AZURE BILLING
The usage of the Transcription feature will cause additional monthly ACS costs. The costs are determined by Microsoft. Also see https://azure.microsoft.com/en-us/pricing/details/cognitive-services/speech-services/.
- Before enabling the Transcription feature, get in touch with your Luware Customer Success specialist to discuss terms, usage scenarios and necessary setup procedures.
- Please note that Nimbus and Transcription support does not cover pricing discussions or make recommendations based on Microsoft Azure infrastructure.
When active, the Transcription feature transcribes call contents between customer and Virtual Users using Voice-to-Text capabilities. It improves quality assurance and increases the efficiency of call processing, for example making it easier to summarize past customer interactions and possibly transfer them to a CRM system for easier search and later analysis. Transcription is available for both inbound and outbound audio calls.
Once a call has ended, a Voice Transcription is generated in the background, by leveraging the Nimbus Power Automate Connector > "Virtual User" Trigger Events and Flow Actions. You can use them to retrieve the transcription data from each Virtual User Interaction, e.g. to store within an external CRM, database or chat message for later quality assurance.
 |
 |
Known Limitations
INC Transcription Limitations
☝️ KNOWN TRANSCRIPTION & SUMMARIZATION LIMITATIONS
💡We are actively working on further improvements to the following limitations:
- Transcription data is not part of service/user transfers. Data is kept within the current customer/user session. This capability will be provided with an upcoming release.
- Virtual User Reporting: Virtual User sessions and their transcripts will be included in Virtual User session reporting as part of a separate, upcoming capability. This is not available yet.
- Power Automate Connector: New “Virtual User” data fields in the Trigger Events / Flow Action may still be erroneously labeled as “Companion”. The terminology will be corrected in a separate update. The Virtual User / Companion connectors separate their data as intended.
Troubleshooting FAQ
INC Transcription Troubleshooting
Not seeing any transcripts in the Transcript widget can have several causes. The following table lists error messages and explains why they are shown.
| Message shown | 🤔 Why do I see the message? |
|---|---|
| No transcription is available for this interaction. |
There was no transcription generated for the selected conversation. This could happen …
|
|
No transcription is available for this interaction OR Task was not accepted. |
|
| Transcription not available for this session. No consent granted. |
|
| User Transcription License is missing. |
|
🔎 BY DESIGN
💡The following points are not limitations, but important to note:
-
Transcription Feature availability:
- Transcription is a prerequisite to Live Captioning, Summarization, AI suggested Codes & Tags
- Not for Copilot / Direct Line 3.0 Virtual Users. Transcription features apply Virtual Users built on GPT Realtime bots only.
- Transcription relies on external services and APIs. When the feature is disabled or unavailable (e.g. throttling or service impediments) info messages are shown in the frontend UI widget. Nimbus task handling and user-customer interactions themselves are not affected by this and will continue normally.
-
Virtual Users:
- Not for Copilot / Direct Line 3.0. Transcription features apply Virtual Users built on GPT Realtime bots only.
- Post-session only. The transcript is produced after the session ends; there is no live/real-time transcription during a call.
- No (default) My Sessions view. Virtual User transcriptions do not appear on the Nimbus UI — they are consumed through Power Automate.
- No audio storage. Only the generated transcription data is processed in Power Automate. Audio recordings are discarded after automated processing.
-
Transcription scope:
- 3rd-party participants: Third parties, consultants and call conference attendees are not part of the transcribed content. Only the transcription data between Nimbus users / AI agents and the calling customer is kept.
- Supervision - As long as Supervisors remain in Listen or Whisper mode during a conversation, their voice is not being transcribed. Only during ”Barge In" they are part of the conversation and transcription is active.
- Summarization items generated from the Transcription might be missing when there is not enough data to draw from.
Data Privacy
Data Privacy Service Settings
The Data Privacy tab controls anonymization of caller information shown on the Nimbus UI after a call (session) has concluded — for example in My Sessions, Assistant, or Attendant Console. Typical reasons to enable it are country-dependent or internal compliance requirements, or simply keeping personal customer details separate from the service.

☝ Before enabling this feature
- The Data Privacy > Anonymization settings are off by default. Read the “Anonymization Scope” chapter below in full before turning anything on — it lists every field that is, and is not, covered.
- Once enabled, anonymization cannot be reversed: sessions that ran while the feature was on stay anonymized forever, and sessions that ran while it was off stay un-anonymized.
- The settings change is not retroactive. Sessions that ran while the feature was on stay anonymized forever, and sessions that ran while it was off stay un-anonymized.
✅ Configuration and integration setup
If you intend to narrow anonymization to specific number patterns, prepare the regex rules first via Caller Anonymization configuration items on the same or a parent Organization Unit. Configuration items defined there become selectable in the rules table on this tab.
Learn more…
Steps in a nutshell (for service owners and administrators):
- Decide your default: anonymize every caller, or only callers matching specific patterns.
- (Only for the "specific patterns" case) On the relevant Organization Unit, create the required Caller Anonymization configuration items (name + regex).
- Open Service Settings → Data Privacy and turn on Anonymize Caller Information.
- (Optional) Turn on Anonymize Specific Callers Only and add at least one rule.
- Save the service.
💡 Always review Extensions Service Settings afterwards — Parameters and Custom Context shown in the UI or carried across transfers are not in scope of Caller Anonymization. See Anonymization Scope below.
Configurable Options
| Area | Description |
|---|---|
|
Anonymize Caller Information (master toggle) |
✅ Default off. No anonymization happens.
⮑ Turning this on also unlocks the Anonymize Specific Callers Only toggle below. 💡 GDPR — anonymization is not retroactive. Sessions are only anonymized while the toggle is enabled. |
|
Anonymize Specific Callers Only (secondary toggle) |
✅ Default off. Visible regardless of the master toggle, but only interactive when the master toggle is ON.
|
|
Caller Anonymization Rules (rules table) |
Lists the Caller Anonymization configuration items that should narrow anonymization scope. Each entry is a Name + a Regular Expression evaluated against the caller's PSTN number.
💡 Calls matching any rule in the table are anonymized according to the Anonymization Scope chapter below. Calls that do not match remain visible in full. |

Anonymization Scope
🔎The following System Fields and Parameters are subject to Caller Anonymization.
INC Caller Anonymization Scope
| Type of Data in Scope | Field Names affected by Caller Anonymization (System Fields and Parameters) |
Content DURING live session (My Sessions / Attendant Console / Assistant) |
Content AFTER session in short-term storage (Sessions List / My Sessions) |
Content in LONG-TERM storage (Nimbus Reporting) |
|---|---|---|---|---|
|
Nimbus |
|
Shown (required to support operational handling (e.g. Power Automate) |
Shown as “Not Available” | N/A - Not stored |
|
Shown as “Not Available” because Customer Identifier is “Anonymized on Request”
|
Shown as “Not Available” | N/A - Not stored | |
|
Shown as “Anonymized on Request” | Shown as “Anonymized on Request” | N/A - Not stored | |
|
|
Shown as “Anonymized on Request” | Shown as “Anonymized on Request” | Shown as “Anonymized on Request” | |
|
Nimbus |
|
Shown as “Anonymized on Request”
|
Shown as “Anonymized on Request” | Shown as “Anonymized on Request” |
|
N/A | N/A |
Is set to true when Caller Anonymization is enabled. |
|
|
Nimbus (Custom Context) Parameters Nimbus |
☝Custom Data and Address Books are NOT in scope of Caller AnonymizationThe following data might still be visible during a call and needs to be handled accordingly:
✅Related action: Extension Service Settings
|
|||
Known Limitations
INC Caller Anonymization limitations
🔎BY DESIGN: CALLER ANONYMIZATION
💡The following design notes are not considered issues:
- In any transfer scenario, the first service settings apply - including Caller Anonymization. Transfer to other services will inherit this setting from the original service session. This also works in the inverse case, meaning that transfers received from a service with anonymization disabled will NOT appear anonymized on a service that has the feature enabled.
-
Power Automate Connector: Any externally retrieved Parameters and other Customer-identifying context are not included in Caller Anonymization.
→ Nimbus cannot identify which parameters count as sensitive. If you need to anonymize this information, adjust your Power Automate flows accordingly. - Extensions Service Settings: While having “Store Conversation Context Data” toggle enabled, Custom Context Parameters may persist through anonymization. → We recommend to have this toggle disabled to ensure that sensitive parameters are not stored after a session.
- Scheduling a Callback (see Use Case - Schedule Automatic Callbacks from a Nimbus Queue) will not work on anonymized services, as the Workflow Activity “Save to Parameter” will not have a Parameter with a usable customer PSTN to operate with.
- The “Callback” Workflow Activity will not work on anonymized services.
- The caller PSTN (phone number) will still be shown in Microsoft Teams UI, as Nimbus cannot control this part.
KNOWN LIMITATIONS: CALLER ANONYMIZATION
💡Currently out of scope, please refer to the available → workarounds:
-
“Announcement” Workflow Activity (with “Add Parameter” toggled on): Customer-identifying Call Data – such as
$(Caller.TelNumber)–will be visible in the active session database.
→ We recommend to avoid usingcalleridentifying parameters and System Fields in workflows. -
Transcription (with Caller Anonymization enabled) will contain names of participants.
→ We recommend to store the transcribed data exclusively within in “Nimbus Companion” Flow Actions while leaving transcription widgets on My Sessions disabled. -
Custom Roles or Bulk Editing currently don't include “Data Privacy / Anonymization”.
→ Please adjust settings with Admin / Service Owner accounts individually.