In this Use Case, we describe how to securely run Power Automate flows from anywhere. Whether it is a custom CRM suite which is only available in your local environment, or a web app with a restricted URL - it is very simple to run a flow from an external application and thus integrate even your on-premise applications with Nimbus.
💡 This approach is also useful if your organization is large and your team does not have the license for Power Automate but you would like to use the Nimbus Power Automate Connector to create External Tasks or scheduled Outbound Call.
Precondition
- Enterprise Routing Contact Center - Note that the Nimbus Power Automate Connector requires services either licensed for Enterprise Routing or Contact Center.
- In this Use Case we assume that we have a custom on-premise ticketing system which communicates over REST APIs with other systems. We want to route the tickets from that system to Nimbus. Let's do it!

Create a Triggerable Power Automate Flow
- To start your flow, add the “When an HTTP request is received” trigger in order to add security to the flow.
- As to trigger this flow from within your custom ticketing system, define the fields you want to post to the flow in the body schema. You can generate it using your custom payload. We used this:
{
 "serviceupn": "This will be the Nimbus service upn@tenant.com",
 "ticketId": "3",
 "ticketTitle": "My ticket title",
 "ticketStatus": "Open",
 "ticketDescription": "My ticket description",
 "ticketLink": "A deeplink to our on prem solution",
 "customerDisplayname": "Client Name",
 "customerEmail": "client@hello.com",
 "customerCompany": "Hello Inc",
 "customerPhone": "+44999999999"
}
- Add “Add a new external task” from the Luware Nimbus connector to the flow.
- Add the values from the triggers body to the external task fields.

- Save the flow and copy the generated HTTP POST URL for later steps.
Add an Application Registration to Your Tenant
- Create an app registration in your tenant for the sole purpose of running the PA flows.
-
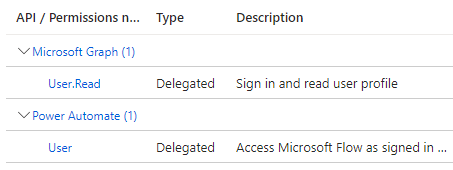
Add the following application permissions:
- Create a client secret and copy the generated secret, client id and tenant id for later steps.
Run the Power Automate Flows
-
Authenticate on the Azure Cloud with your new app registration with your favorite REST client or in JavaScript, using the URL https://login.microsoftonline.com/${your-tenant-id}/oauth2/v2.0/token and the previously saved values.
Here is an example in JavaScript:
const tenantId = "your-tenant-id"
const clientId = 'your-client-id';
const clientSecret = 'your-client-secret';
const scope = `https://service.flow.microsoft.com//.default`;

export async function authenticate(){
      const tokenResponse = await fetch(`https://login.microsoftonline.com/${tenantId}/oauth2/v2.0/token`, {
      method: 'POST',
      body: new URLSearchParams({
        grant_type: 'client_credentials',
        client_id: clientId,
        client_secret: clientSecret,
        scope: scope,
      }),
      headers: {
        'Content-Type': 'application/x-www-form-urlencoded',
 });
	const tokenData = await tokenResponse.json();
    return tokenData.access_token;
}
- With the access Bearer token, you can now call your Power Automate flow using the HTTP POST URL you saved previously:
const triggerUrl="https://xxxxxx.azure.com:443/workflows/xxxxxxxxxxxxxxxxxxxxxxxx/triggers/manual/paths/invoke?api-version=2016-06-01";
const payload = {
		serviceupn: "This will be the Nimbus service upn@tenant.com",
 		ticketId: "3",
 		ticketTitle: "My ticket title",
 		ticketStatus: "Open",
 		ticketDescription: "My ticket description",
 		ticketLink: "A deeplink to our on prem solution",
 		customerDisplayname: "Client Name",
 		customerEmail: "client@hello.com",
 		customerCompany: "Hello Inc",
 		customerPhone: "+44999999999"
 };

 const response = await fetch(
      `${triggerUrl}`,
      {
        method: 'POST',
        headers: {
          Authorization: `Bearer ${accessToken}`,
          'Content-Type': 'application/json'
        },
        body: JSON.stringify(payload),
      }
);
⮑ In Nimbus, you will see the task coming in, e.g. in My Sessions or My Overview:

Applying your knowledge
The same technique can also be used for:
- Creating Nimbus Outbound Calls.
- Use Case - Posting Interactive Custom Adaptive Cards to Agents with your system links.
- Forwarding a message as an email to Nimbus (if Email modality is enabled).
- Forwarding a message as an External Task to Nimbus.
- Forwarding WhatsApp or SMS messages as an External Task to Nimbus.