Using the Nimbus Power Automate Connector, you can retrieve customer input, look up data (e.g. in an internal CRM) and store the output in a custom parameter. This can be useful in a variety of ways, e.g. to check the output from your CRM and route a call accordingly.
PRECONDITIONS
- At least one productive Nimbus team must be in place so you can configure the necessary parts and retrieve team data for this use case.
- You need to have Nimbus team owner role to access the team's Flow connector retrieve team data with your credentials / access permissions.
- You need a "Power Automate for Office 365" License on the same team owner account that will create/manage flows for your team.
- Ensure that the data flow to your CRM or data storage system is unhindered (sufficient permissions on your user to use a connector, API call, etc.).
How-to Steps
🔍 Please note that the steps below are generic examples. You can adjust each step, parameters, external connectors and Power Automate Flows according to your own design.
Create your Custom Parameters
✅ Before we can do anything automated, we need to have our parameters set up as placeholders for content input and output.
- Head to Parameters by opening "Configuration" > "Service" > "Parameters".
- Click on “Create”
- Specify details for your parameter,
- Store the parameter either on tenant-wide or service a specific Organization Units (your service)
Notes on tenant-wide parameters
When using your own parameters for routing, consider if you want to share them on tenant-level Organization Unit. While separate call sessions - also accross multiple services - allow usage of the same parameter without data storage "interference", a user with same or higher access permissions (e.g. a Tenant Admin) might unknowingly rename, move delete a parameter.
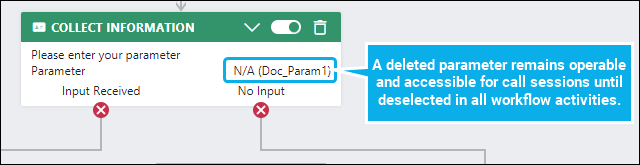
What happens when a "used" parameter is deleted?
|
Deleting a parameter will have the following effects:
→ In order to avoid future issues in your workflows:
|
 |
- Repeat the steps for both an input and output (value) parameter.
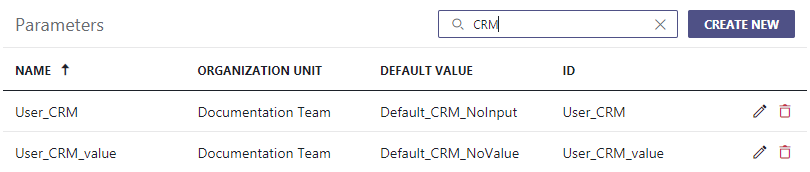
💡 Keep their ID in mind for later usage in Microsoft Power Automate flows.
Adapt your workflow
✅ With our in- and output parameters defined it's time to create a workflow that uses these parameters.
- Head to Workflows by opening "Configuration" > "Workflows".
- Create or adapt an existing workflow to include a "Collect Information" step.

GOOD TO KNOW WHEN INVOLVING EXTERNAL SYSTEMS
Ensure to handle both exit nodes, e.g. with an announcement. This is recommended in both activity exit cases because we're using the Microsoft Power Automate Connector to connect to external systems in the next steps.
The Trigger Events caused by the "Collect Information" activity will start this external flow, which will require some time to process. Since Nimbus has no way of "checking" on that flow's status, time-contingencies or workflow steps to handle "no valid / timeout results" should be considered.
In case you do not fully trust the output of your CRM, you can perform a → RegEX safety check of your (un)expected flow output. Add a "Check Parameter" activity after your "Collect Information" to ensure that potentially erroneous outputs are handled.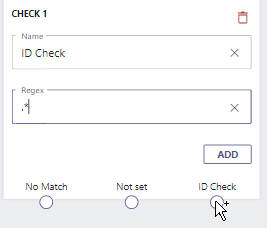
- At the end your workflow could look like this:
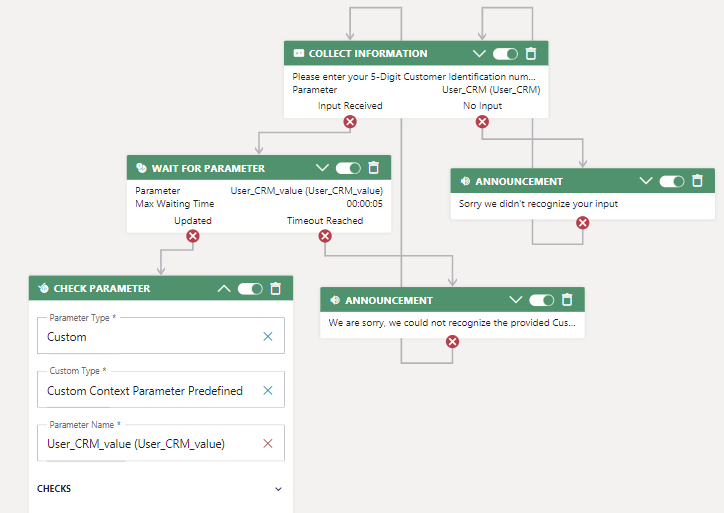
- Collect Information > Input Received - This point will start an external flow trigger.
- Announcement: The announcement generates an artificial “delay” for the external flow to process. Add further steps as needed if your flow is time-intensive.
- Check Parameter > Parameter Name - Here, the flow output value is checked.
- ✅ At this point you can continue building your workflow as you need. We will handle the external flow in the next step.
Create your Flow and Trigger
✅ With your workflow in place, it's now time to connect to your own databases and look up the information, then store the output back into the custom Nimbus parameter you created earlier.
- Visit the Flow landing page: https://make.powerautomate.com/
- Log in with an account that has both access to your Nimbus services and the external system you want to connect to. 💡 For brevity we just refer to this external system as "CRM" from here on out.
- Head to "My Flows"
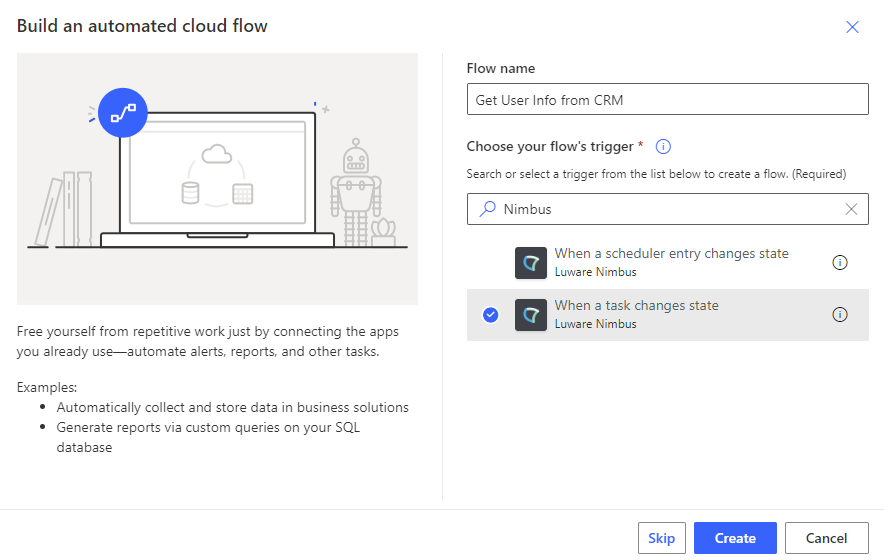
- Click on "+ New Flow" and create a blank "Automated Cloud Flow"
- Give your new flow a speaking name, e.g. "Get User Info from CRM"
- In the text box underneath, search for “Nimbus” and choose the “When a task changes state” trigger
- Click the Create button
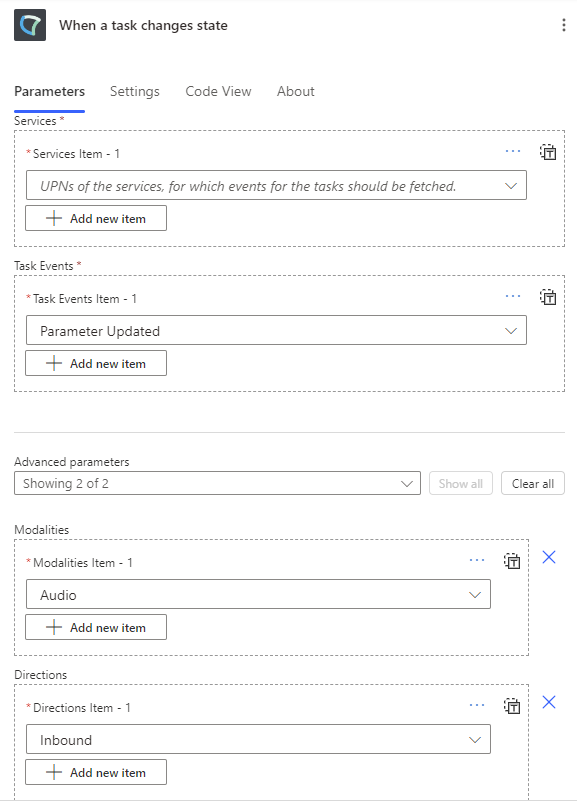
- Select the “When a task changes state” trigger.
- In the “Services Item” dropdown select the Nimbus service's UPN.
💡 You can also get the data of multiple services at this point, but for the sake of simplicity we keep it to one service in this example. - In the “Task Events” dropdown select “Parameter Updated”.
- In the “Advanced parameters” dropdown enable “Modalities” and "Directions".
- In the “Modalities Item” dropdown select “Audio”.
- In the “Directions Item” dropdown select “Inbound”.
-
Recommended Step: Initialize two variables in your flow right after the trigger and map them to the parameters you created in step 1 above.
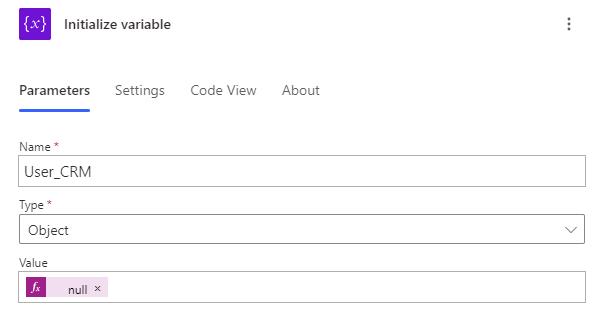
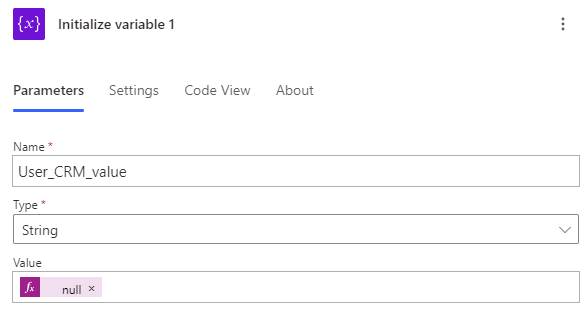
🤔 Why is this necessary? A variable init ensures that the variables (living only inside the Flow) have the right data storage format for your flow output in the later steps.
Parse Data
✅ The next step highly depends on your external system of choice, so we just show some general pointers:
- Chances are that your CRM might not deliver a granular enough output or the format is not fitting for your scenario. We therefore recommend to do some test and data validation runs with your flow to see which kind of output you get so you can grab the values you need:
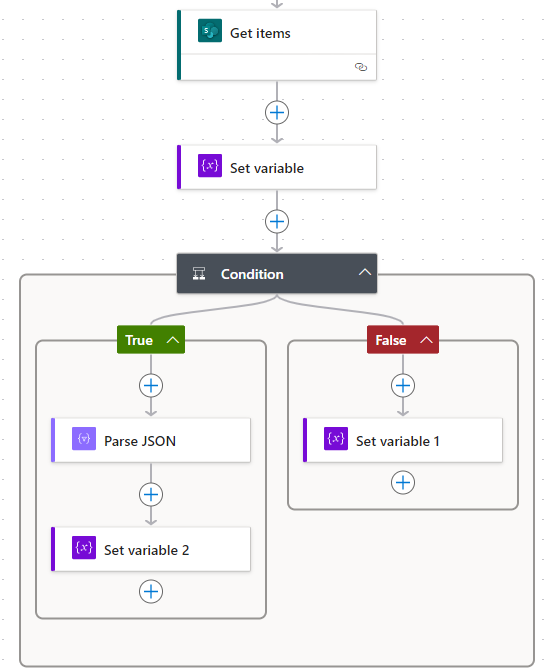
- Replace the Get items action with the action of the CRM of your choice.
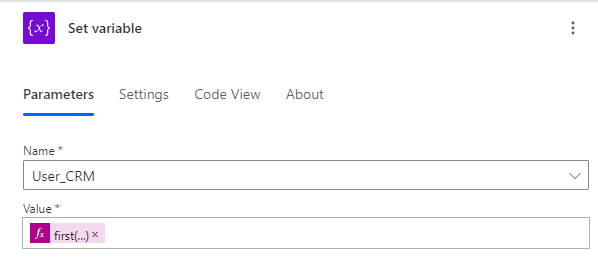
- With Set variable then you can store the first object returned by the previous step in your User_CRM variable.
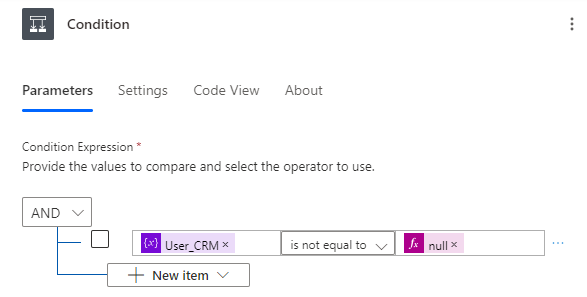
- With the Condition then you can check if the User_CRM variable contains an object.
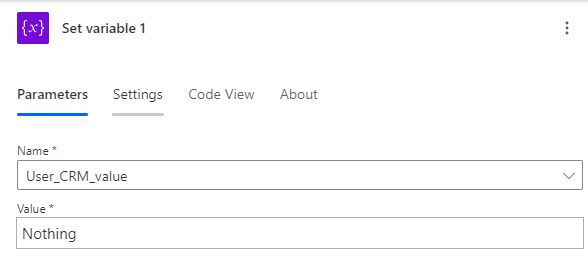
- If the User_CRM variable is null (because your CRM did not return any objects), then you simply writhe “Nothing” into the User_CRM_value variable to indicate that nothing was found.
- If the User_CRM variable is not null (because your CRM did return an object), then you can parse the object to get its fields.
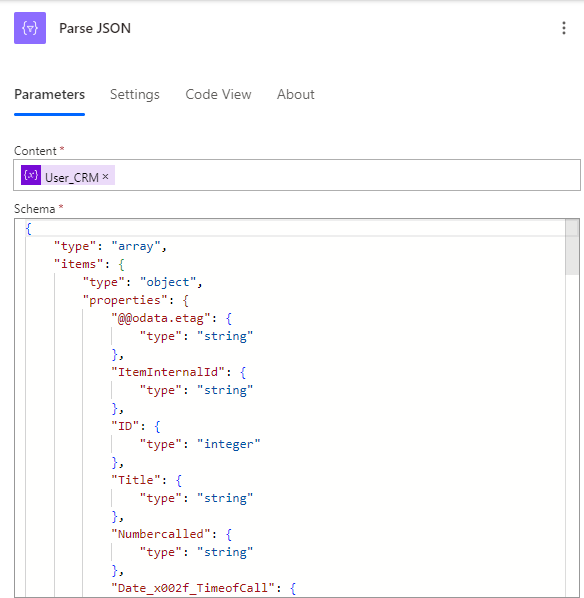
- Once satisfied with your output, you can store it in output variable.

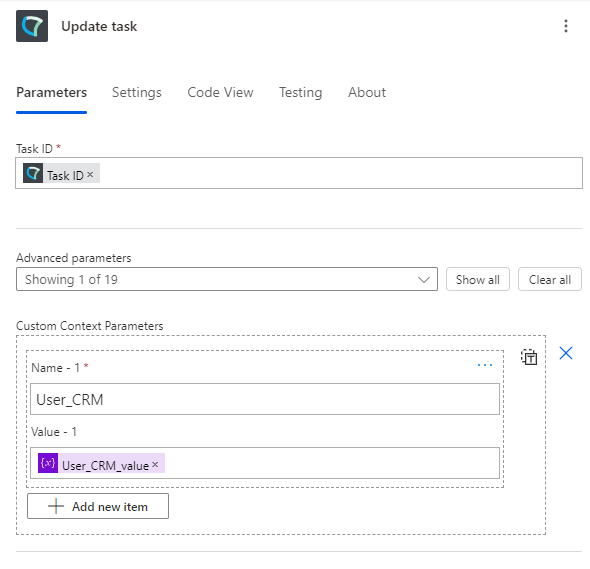
Return Value
✅ Once the data from your CRM is satisfactory, it's time to return the output back to your Nimbus custom parameter used within your workflow in the Adapt your workflow section:
- At the end of your Flow, add the "Update task" action of the “Luware Nimbus” connector.
- Ensure that "Task ID" is filled in so it's correctly matched to your current call.
- In the “Advanced parameters” dropdown enable “Custom Context Parameters”.
- In the “Custom Context Parameters” section click “Add new item” and add the following information:
- Name: User_CRM
- Value: User_CRM_value variable
- Save your flow.
🌟 Congratulations, you are now done with the CRM integration.
✅ Make further adjustments to your Nimbus workflow (→ Step 2) to parse the output and route the caller accordingly.
✅ Ensure to test your flow thoroughly with test calls to account for potential CRM or Power Automate flow delays.