Email In order to use the Email modality you need to set up an Microsoft Exchange Mailbox with unique UPN on your tenant. Nimbus will subscribe to this mailbox, listening for new incoming mails to distribute as described in Email Handling.
Mailbox creation in Nimbus
To create a new Mailbox in Nimbus, head to the Admin Portal > Configuration > Service > Mailboxes. In here you can create a new mailbox with the following settings:
| Area | Description |
|---|---|
| Name |
Name of your Mailbox, as it will appear in lists and configuration dialogues. 💡Does not need to match with your Exchange Mailbox name. |
| Organization Unit | The Organization Unit under which this Mailbox will be visible for selection in services Modalities Service Settings and in respective Email Workflows. |
| Mailbox UPN |
✅You need to create an Exchange Mailbox UPN to put in here. → See Prerequirements above. Requires a valid and unique UPN format to work.
💡Uniqueness of the mailbox will be validated across the tenant.
|
Managing Mailbox access for Nimbus
Required Nimbus App Permissions for reading Mailboxes are requested when the first service that applies a mailbox in its Modalities Service Settings and thus starts an Exchange inbox subscription. Afterwards the permissions are already granted for all further services. While convenient for scaling large amounts of mailboxes quickly, this may not be desiderable from a security point of view
☝Once a Tenant Admin has run the Provisioning PowerShell script, permissions are by default granted for all mailboxes on your tenant.
Learn here how to apply access restriction policies to (select) mailboxes
INC Mailbox Access Restriction
Why enforce mailbox access policies?
When you run the Provisioning via Microsoft PowerShell , the script tries to get the consent for 2 additional Mail-related Nimbus App Permissions on the Luware Nimbus Application:
Mail.ReadWrite
Mail.Send
☝This grants Nimbus access on ALL mailboxes (currently available) which may be desirable if you want to still set-up and test the feature. After that however you may want to restrict the access only to selected Mailboxes by creating an Application Access Policy.
🔎 You can find further information on this Microsoft Website.
✅ Detail steps to follow will be described in the following.
Create a MailUniversalSecurity Group
💡Tip: A MailUniversalSecurityGroup makes managing additional Mailboxes easier in future. In the following example we're using a group for the access policy.
As a Exchange Admin:
- Go to your Exchange Admin Center.
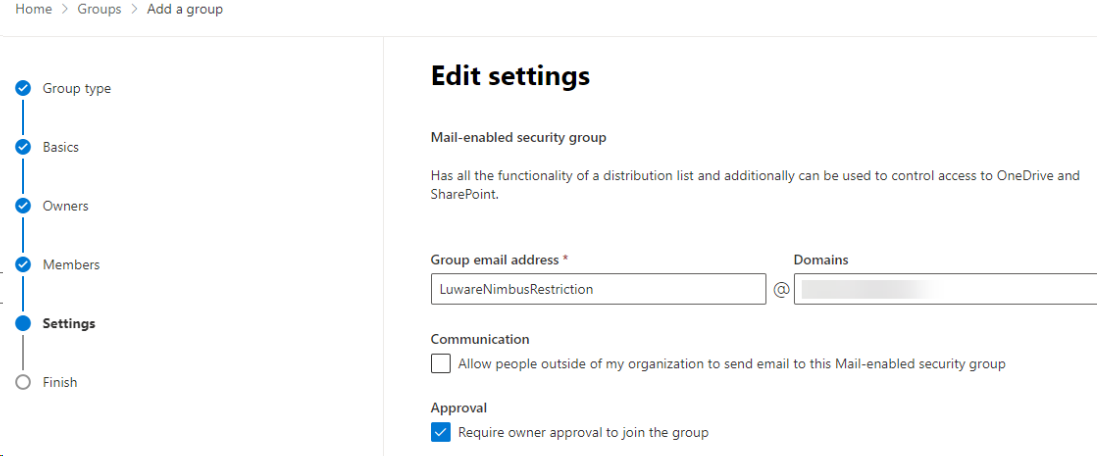
- Go to the Recipients section and select Groups. Click on Add a new group.
- On the Choose group type page select “Mail-enabled security”
- Fill in Name (e.g "Luware Nimbus Service Mailboxes) and add a description of your choice.
- Select the Group Owners.
- Select the Mailboxes, which should be part of this restriction.
- Select an Email address and select the settings you would like to enforce.
Connect via PowerShell to Exchange Online
✅To connect to Exchange Online using PowerShell you need to install the module “Exchange Online Management”. If the module is already installed, you can typically skip this step and run Connect-ExchangeOnline (Step 4) without manually loading the module first.
- Open Powershell as Admin mode.
- You will have to run the Install and Import commandlet:
install-module ExchangeOnlineManagement - As the next step, you have to connect with Exchange Online.

- Enter:
Connect-ExchangeOnline -UserPrincipalName <UPN>
☝ Replace “<UPN>” by the UPN of an Exchange administrator.
⮑ You are now connected to Exchange Online
ApplicationAccessPolicy Restriction Steps
In order to restrict the Luware Nimbus App access only to selected Mailboxes perform the following steps:
- Ensure you are connected to Exchange Online via PowerShell.
- Identify a Mail-enabled security group to restrict the app's access to.
- Depending on the Cluster you test this on, retrieve the Nimbus App ID from the reference below.
Nimbus ACS / APP ID
Click to show…
INC Nimbus ACS App ID
Cluster Unique ID Innovator Cluster Luware Nimbus Innovator APP ID 953900f0-0e95-4116-80bf-de894301fa29 Luware Nimbus Innovator ACS ID fa5a344d-cfe3-4765-b478-dc6551f153e2 Production Cluster Luware Nimbus Production APP ID af85ba37-5817-43d6-82e7-09004f08664e Luware Nimbus Production ACS ID 0ec02475-4b29-4cb5-8338-aa5623d301a2 Nimbus ACS / APP IDs - Run
New-ApplicationAccessPolicywith the following parameters:
| -AccessRight |
The AccessRight parameter specifies the restriction type that you want to assign in the application access policy. Valid values are:
|
|---|---|
| -AppId |
The Identity parameter specifies the GUID of the apps to include in the policy. To find the GUID value of an app, run the command: |
| -PolicyScopeGroupID |
The PolicyScopeGroupID parameter specifies the recipient to define in the policy. Valid recipient types are security principals in Exchange Online (users or groups that can have permissions assigned to them).
For example:
💡Tip: We recommend the MailUniversalSecurityGroup option in order to add additional Mailboxes in future. See above how to create this group, if you haven't done so already. |
Full command:
Once your parameters are set, run the New-ApplicationAccessPolicy as follows:
New-ApplicationAccessPolicy -AccessRight RestrictAccess -AppId "<Luware Nimbus AppId>" -PolicyScopeGroupId “<your MailUniversalSecurityGroup>” -Description "<your Description>"
You can test your ApplicationAccessPolicy with the following commandlet:
test-ApplicationAccessPolicy -AppID <NimbusAppID>
Note: Policy Limitation
☝ You can only create a limited number of policies in your organization, based on a fixed amount of space. If your organization runs out of space for these policies, you'll see the error: "The total size of App Access Policies exceeded the limit."
Starting Mailbox Subscription
Once assigned to a service (when applying in Modalities Service Settings), Nimbus immediately subscribes to changes in the mailbox in the following way:
- Will create any missing folders (Inbox, Handled, WF Ended, Failed) which Nimbus will use for task-sorting.
- Will start checking for incoming new mails in Folder “Inbox” , only considering mails after the subscription was enabled.
- Will not start service sessions for automatic replies (these can be detected). Such ⮑ mails will be moved to a “Failed” folder.
- Will not detect automatic distribution Emails (like weekly summaries sent by Microsoft) or advertisements.
Cancelling a Mailbox Subscription
A subscription to a mailbox gets cancelled under the following conditions:
- The mailbox is unassigned from the service via Modalities Service Settings.
- The related service is suspended/deleted.
- The entire tenant is suspended (as seen on the License Management tab).
-
When the mailbox UPN changes on Microsoft side.
⮑ Nimbus will lose the subscription and the service cannot accept Email tasks anymore. - Any “in progress” Email tasks prior to cancellation will be completed.
Restoring a Mailbox Subscription
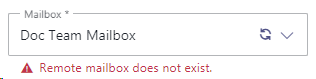
Whenever the the “Modalities” tab on a service is re-opened Nimbus will try to resubscribe. An error message below the mailbox field will inform when a problem persists, e.g. on a changed or missing address a warning message would be shown.
While an active subscription is already ongoing, Nimbus will attempt to resume from any error, picking up Emails for the task queue where left of.
Manually removing or changing subscriptions
☝ Nimbus is not using a polling subscription/change notifications functionality, meaning that Nimbus will process only those Emails, that appeared in Inbox folder after the mailbox was (re)assigned to a service.
☝ When a mailbox is removed or otherwise re-applied the same service, it will treated the same as a newly subscribed mailbox. Existing mails will not be processed retroactively.
☝The same rule applies for a tenant resumed from suspension. Any mails that were received outside of a subscription period will not be processed retroactively.
Follow-up steps
- In order for your Mailbox to take effect you need to ensure it is applied in the Modalities Service Settings of your service.
- An according Email Workflow is also necessary to distribute mails. The workflow is also applied in your Modalities Service Settings.
- Service users that want to participate in Email Handling need to have the Email modality enabled in their General User Settings.