On this page the following topics are covered:
- How to get access to licensing options and how to get your required Tenant Administrator access configured. This will enable your technical teams to manage the Nimbus deployment without being members of the Teams themselves.
- How to manage your available licenses and perform upgrades or downgrades.
The Licensing view allows Administrators to check on and redistribute available licenses and addons in bulk. License management is done either here as described below, or via the Administration pages of Users and Services respectively.

About the Tenant State widget
INC Tenant State widget
💡The Tenant State summarizes availability of Nimbus Features and Licenses at a glance. Your status can only be changed by a Luware System Administrator and is indicated as follows:
- Active - your Nimbus subscription is active and valid.
- Trial - your Nimbus subscription is in trial mode. You can try out Nimbus Features within the trial period.
- Suspended - your Nimbus subscription has been suspended.
- Expired - your Nimbus subscription has expired. Get in contact with Luware Support if you need to renew it.
- Canceled - your Nimbus subscription is cancelled.
- Lab - a Nimbus lab subscription for test purposes.
🤔What happens on Tenant suspension?
- All Users will not be able to login to Nimbus and related apps anymore.
- Inbound / Outbound tasks will be rejected and incoming calls will be redirected to a default announcement workflow.
💡This state can only be resolved by a Luware Administrator.
🤔What if my (productive) Tenant is not shown "Active" yet?
💡Your Customer Success specialist will reach out to you with further details on your license usage and the course of action.
For any immediate questions on your License Management you can always contact Luware support.
Luware Support Address
| Luware Website | https://luware.com/support/ |
|---|---|
| Luware Helpdesk | https://helpdesk.luware.cloud |
| Cloud Service Status | https://status.luware.com/ |
🔎 Good to know: Your available license contingency can also be inspected via Admin Portal > Tenant > Licenses tab. To change the available license contingency, get in touch with your Customer Success partner.
Access to Licensing
Preconditions
Licenses can only be managed by Users in Admin Roles → see table below the most important details.
- To manage User licenses, your account must be a Tenant Admin or Organization Unit Admin.
- To manage Service licenses, your account must be a Tenant Admin.
💡 Reminder: Higher-tier licenses and addons will enable Nimbus Features at additional cost. Please get in touch with your Customer Success partner to discuss your use cases and determine the best licensing scenario for your needs.
Roles with Licensing Access
There are different Roles and Permissions in Nimbus that relate to, use or enact licensing. The following table is an excerpt:
| Role | Purpose |
|---|---|
Tenant Administrator |
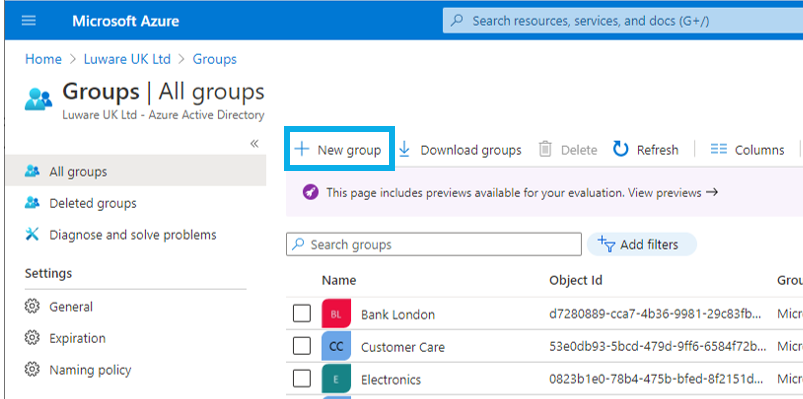
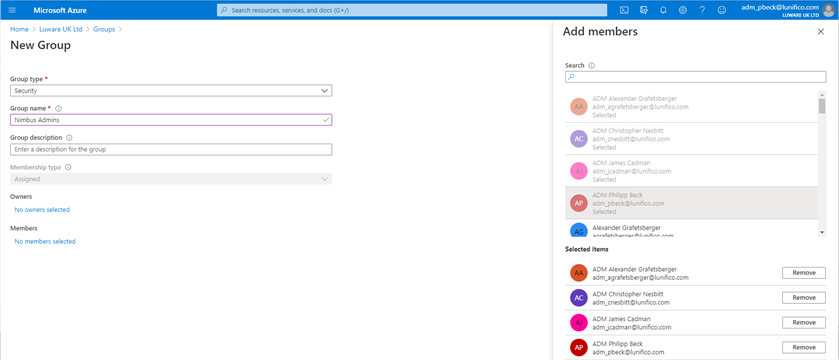
A Tenant Administrator has access to all Services and User Administration at your organization. 🤔 How can I get Tenant Administrator rights?Create a new security group in Microsoft Entra ID (or choose an existing one) and send us its Object ID. INC Create a Security GroupHow to create a Security Group in AzureCreate New Security Group
 Define Group Details
 Tenant Name and Object ID
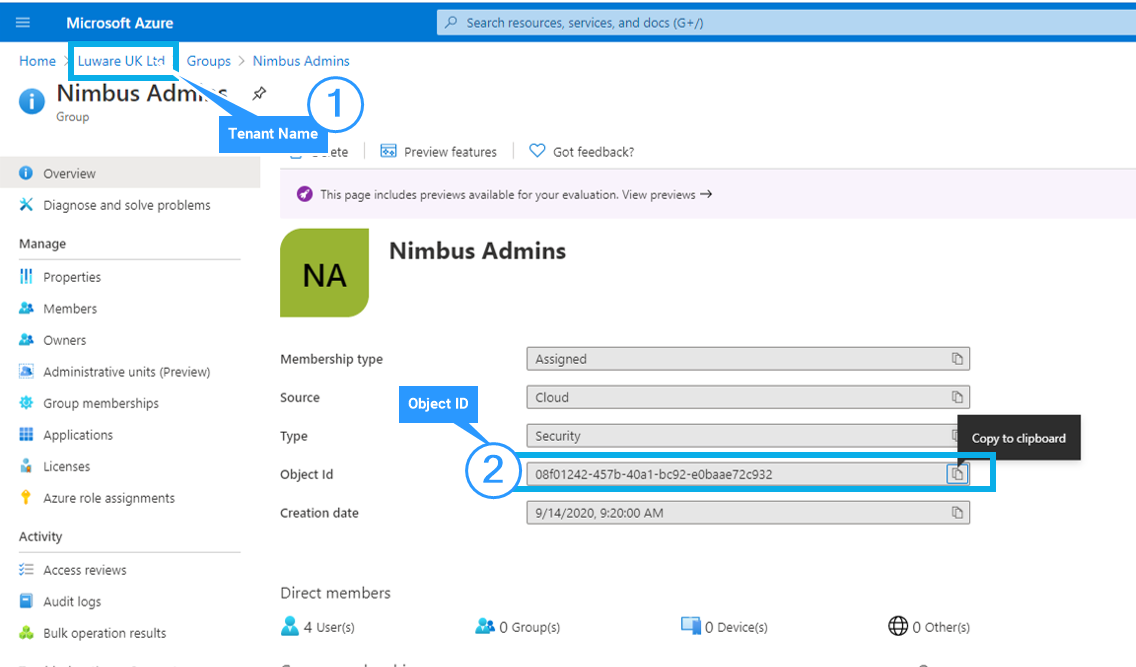
🤔Where to send the Object ID? Contact your assigned Customer Success partner or create a request ticket via our helpdesk. We will then register the group's Object ID for your Nimbus tenant. 🤔 What about Partners?It is possible to give both you and your partner Tenant Administration rights. In this case your partner can follow the same steps as above in their own Microsoft Entra ID and provide us with their Object ID. 🤔 Can I further delegate tasks?Yes, by assigning → Organization Unit Administrator (OU Admin) rights to additional Users on your Tenant. As a Tenant Administrator you can do this via User Administration. This User acts within Services, resources and Users already assigned to Organization Units. 🤔 Where can I check on my current License status?Your available license contingency can be inspected via Admin Portal > Tenant > Licenses tab. To change the available license contingency, get in touch with your Customer Success partner. |
Organization Unit Administrator |
Organization Unit Administrators (or short: OU Admins) delegates with nearly identical privileges as the Tenant Admin. However, their scope is limited to the configuration, Service and User entities within their assigned Organization Units. 💡Good to know: OU Admins are restricted to managing User licenses only. You can view their full permission set for Services / User Administration on the Admin Roles page. |
Managing Licenses
In the Licenses section lists available and remaining licenses across all Users and Services on your Tenant and includes all available Addons.

License Types
Licenses are distinguished by types: Service (Addons) and User Licenses. Changes to licensing directly affect the available Nimbus Features to the individual Service / User (e.g. tabs, options and UI elements).
💡Licensing changes are also possible via the Service and User administration pages.
✅ Click on each tab below to learn more.
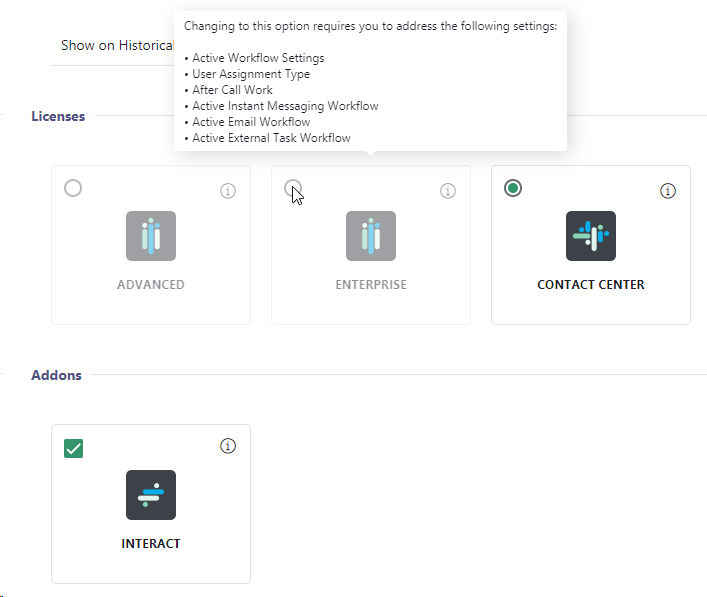
Service Licenses
Reviewing and applying Service license changes
To change licenses on your Services:
-
Click “Edit” on the Service License Type you want to distribute: Advanced Routing, Enterprise Routing, Contact Center.
⮑ The view lists available Services, distinguished by Service types. -
Assign your available Licenses via the pulldown menu. Note that:
- … for downgrades of existing Services, additional steps may apply. → See License Downgrade chapter below.
- …you can review and "Undo" your license changes before confirming the change via "Save".

User Assignment Type
☝Note: The User assignment type of a Service is determined during provisioning via MS-Teams or while creating a Service manually. Changing this setting is limited by technical constraints.
INC User Assignment Types
Each Nimbus Service can be of a different User Assignment Type that determines how Users are associated to this Service:
- MS Teams-based: Directly tied to the Team itself in MS Teams, determined during Service Provisioning. Users get automatically added and synced to a Nimbus Service.
- Skill-based: Applies for manually created Services via Nimbus Service Administration. Requires skill-assignment to Users you manually assign to the Service from within your Tenant directory.
- None: Primarily used for IVR or first-level redirection Services. This Service has no Users and is therefore primarily configured by any Administrator.
☝ Important to know: The User Assignment Type setting is fixated when a Service was either provisioned via MS Teams or manually created via Service Administration, e.g. either for Customer IVR or User skill-based task distribution purposes. A switch between MS Teams-based and Skill-based Services is not possible due to how individual Users are configured and how related Nimbus Features operate.
🤔 Which User-assignment direction changes are allowed?
| Switching from … | … to | Notes on licensing |
| Skill-based | None | ✅ Allowed - Prerequisite to downgrade to Enterprise Routing license. |
| MS-Teams based | None | ❌ Not allowed - the User rights and Service are directly tied to the MS-Teams channel. If you remove the channel, the related Nimbus Service needs to be removed as well. |
| None | Skill-based | ✅ Allowed - Requires a Contact Center license to upgrade. |
| MS-Teams based | Skill-based |
❌ Not possible due to User Assignment Type and design approach differences. → We recommend to configure a new Service according to your Features needed, then switch over from your previous Service. While this creates a temporary "license overhead" it also guarantees near-uninterrupted Service to your customers. An additional benefit is also clean Nimbus Reporting transition while minimizing the disruption until production-ready. |
🤔 Why are license migration options restricted?
Depending on the Service Provisioning approach, the underlying Role Access Concept is either inherited from MS Teams or managed by Nimbus itself. Changes on your Service structure therefore requires close consideration before taking action.
For example:
-
Service Ownership - Which (future) MS Teams channels to use – or remove – along with a changed Service / team owner structure?
An example could be your Users shifting to separate department structures, but the requirement to stay reachable and organized via one central Service remains. -
Role Management - How to manage Service Permissions among (new or future) Users with different technical expertise?
An example would be a split of Service ownership and additional BI reporting / supervision User Roles in scenarios where Users have multiple roles in different teams. -
Incoming Task management - Which Distribution Policies and future Skills and Responsibilities must be considered for call distribution?
An example would be the need for more specialized Services that can (spontaneously) onboard Users with the right expertise without the need to fill your MS Teams client with extra channels.
✅Service license change: Follow-Up Steps
Once license changes are applied, any administrator (and Service owner) can immediately configure new features within the Service Settings and define related Configuration items.
🔎Refer to Nimbus Features > Service Features which contains follow-up links. You can also follow our Use Cases for first basic setup steps:
- Enterprise - Use Case - Building a Priority Service in Enterprise Routing
- Contact Center - Use Case - Setting up a Contact Center.
User Licenses
Reviewing and applying User license changes
To change licenses on your Users:
-
Click “Edit” on the User License Type you want to distribute: Attendant Console, Interact, Contact Center, Assistant, Instant Messaging, External Task, Email.
⮑ The view shows your contingency of available User licenses. In this example below Attendant Console licenses are distributed. -
Assign your available Licenses via the pulldown menu. Note that:
- … for downgrades of existing Services, additional steps may apply. → See License Downgrade chapter below.
- …you can review and "Undo" your license changes before confirming the change via "Save".
- You will see all Users already having this license. Either remove it or add new Users according to your license pool.
- You can review your license changes before confirming the change via "Save".

✅Service license change: Follow-Up Steps
Once a license was applied, any administrator can start to set up the additional User details via the User Administration tabs and define necessary Configuration items such as User Skills and Responsibilities.
🔎Refer to Nimbus Features > User Features which contains follow-up links. You can also follow our Use Cases for first basic setup steps:
- Contact Center - Use Case - Setting up a Contact Center.
- Interact - Use Case - Setting up Interact.
-
Attendant Console - when enabled, it is immediately visible for the User.
✅ Dependency: As administrator you may want to check on Required User Permissions and grant permissions for extended search features within Attendant Console on your entire tenant. -
Assistant - Use Case - Setting up Assistant.
✅ Dependency: This feature requires an additional Assistant App Installation. -
Companion - when enabled, Transcription features become available in My Sessions.
✅ Dependency: Must also be enabled as widget in Companion Service Settings.
Virtual Users
INC Beta Feature

This feature is in PREVIEW and may not yet be available to all customers. Functionality, scope and design may change considerably.
Virtual Users in Nimbus are AI-driven bots that can handle service tasks, but are treated like “regular” users for Nimbus distribution. Virtual Users require their own license to enable Transcription and related API access functionality. Once a Virtual User is configured to take on specific tasks, you can use it in your Workflows to handle specific customer requests.
Reviewing and applying Virtual User license changes
To apply licenses for Virtual Users:
- Ensure you have a sufficient number of licenses to distribute.
-
Head to Virtual Users and create a new Virtual User.
✅ If you are new to the procedure, follow Use Case - Setting up a Nimbus Virtual User using Copilot. - Click “Add Virtual User” to start assigning a license.
- To confirm your licensing choice, click “Save”.
🔎Related reading:
- Best Practices - Virtual Users in Nimbus - Recommended if you are new to the topic of using AI as an Agent for your services.
- Use Case - Setting up a Nimbus Virtual User using Copilot - first time setup procedure with detailed steps.
- All related Admin > Configuration items in Nimbus: Virtual Users, Bots, Bot Response Templates.
🤔 I don't see this feature. How can I enable it?
Get in touch with Luware Customer success to discuss terms and enable this feature for you.
Also, please check our Best Practices - Virtual Users in Nimbus and take note of the following:
INC Azure Billing Cognitive Services
Disclaimer: Support for Azure Billing & Cognitive Services
☝ The usage of Microsoft Azure AI Services for Speech1 and AI2 will cause additional costs outside your Nimbus subscription, which are exclusively determined by Microsoft.
Please note:
- Nimbus Support does not cover pricing discussions or make recommendations on Microsoft Azure Services. → Please inform yourself via the references below on pricing models.
- Nimbus Support can not provide any technical help, insights or solutions on Azure Cognitive Service related technical problems.
1 Azure Speech Services: https://azure.microsoft.com/en-us/pricing/details/cognitive-services/speech-services/
2 Generative AI Services (Copilot Studio):
🤔 What happens if my Virtual User is unlicensed?
☝Virtual Users can be part of (existing) Workflows when using the "Add Virtual User" Conversation Handling Activity. While no license is applied to a Virtual User, the “Failed” exit of the activity in Workflows is taken automatically.
💡You may redistribute your Virtual User licenses freely to test various bot configurations. The license application can also be done directly in the Virtual User configuration itself.
License Downgrades
License Downgrade
License downgrades can be performed from within the Licensing Management overview. When Nimbus Features are already in use, a warning will be shown:
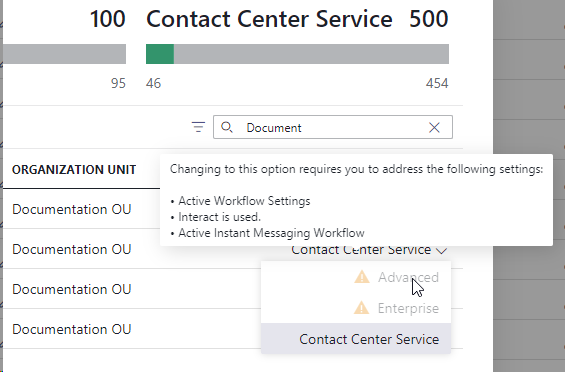
Good to know: Downgrades are prevented until the corresponding Nimbus Features features have been removed from either users or services. This check is also necessary to prevent disruptions to your daily operations caused by an (accidental) license change.
License Downgrade in User/Service Settings
As features are most-likely in use, your next step to downgrade would be to access General User Settings and General Service Settings respectively and check the tooltips on the target license you wanna downgrade towards. By doing so you can address each feature preventing a downgrade individually.
Downgrade Steps
To downgrade from a higher tier license, any related Nimbus Features and their data entities must be removed or unassigned from the user or service. This is done manually via Service Administration and User Administration respectively. Refer to the License downgrade checklist below for details.
🤔 What do I need to check?
☝ Note: Downgrades are irreversible
Removing a Contact Center license from a user or service will remove ALL associated settings and user assignments.
⮑ This action is irreversible, meaning that you must manually re-define all settings for users and services if you ever reconsider adding the license again.
✅License Downgrade Checklist
🔎For all steps below, we recommend to consult the Features matrix for items to be checked / deactivated in order to downgrade.
| Downgrading from: | Things to check |
|---|---|
Enterprise Routing |
Head to the Service Administration and locate your service to downgrade. Alternatively you can use the the License Management view to check all your services services at once. For Services: ✅ Check workflows used in your Modalities Service Settings that come with Enterprise Routing service features. You can either downgrade to simpler Workflow Templates to save yourself effort, or manually re-configure your existing workflows by removing the Workflow Activities:
✅ Check and disable Conversation Context, Codes and Tags enabled in the My Sessions view. ⮑ Related frontend features are part of Service Settings > Extensions . They will be disabled after the downgrade. ✅ Check and remove any additional custom and system Parameters from your Service Settings > "Extensions" tab.
✅ Check and disable Outbound Service Call features as part of the Service Settings > Distribution tab. ⮑ Doing so will remove the corresponding options in the My Overview or Services Overview view.
✅ Disable Interact, as it not available for Advanced Routing services. |
Contact Center |
Head to the User Administration and locate your user to downgrade. Alternatively you can use the the License Management view to check all your user licenses at once. ✅ Check everything from → Enterprise Routing above. Additionally you need to do the following: For Services: ✅ Disable After-Call Work features as part of the Distribution Service Settings.
✅ Remove Distribution Policies assigned to "Skill-based" User assignment type Contact Center services in their respective Distribution Service Settings.
✅ Check Modalities Service Settings and disable workflows that are unavailable to your downgraded license. For Users: ✅ On General User Settings, remove the “Contact Center” license from the user. ⮑ Doing so will remove all Nimbus Features for that user, e.g. Access to Roles, Skills, Responsibility Profiles, Dashboards, and Assistant App will be revoked.
|
License FAQ
🤔 Why isn't the license downgrade automated? As features such as Skills and Responsibilities and Workflows as well as Contact Center users may be used across multiple services, simply removing them could have “invisible” side effects. A manual check ensures that features are consciously removed by team owners and administrators, and communicated step-by-step as transparently as possible.
Show me an example…
A Contact Center user can have individual Skills and Responsibilities and be assigned to multiple services via Agent Service Settings. Both associations are getting removed alongside with the license, the user will not be available to any of these services. This may also include include Nimbus Power Automate Connector Use Cases where that user was specifically defined as “Preferred” target.
If you want to re-assign or reinstate that user again you will need you might check their Responsibility Profiles and re-apply all their skills to ensure they are found by any services Distribution Policies.
💡Learning: Multiple services may involve a Contact Center user and have them defined within their flows and settings. Ensure to communicate to other service owners if you remove that Contact Center user from their pool of Agents.
🤔 I have finished my checks and want to downsize my license count. What comes next? Once your downgrade steps are done, get in contact with Luware Customer Success to downgrade your licensing. If you have no existing contact to discuss licensing terms, you can reach out to Luware Support.
INC Luware Support Address
| Luware Website | https://luware.com/support/ |
|---|---|
| Luware Helpdesk | https://helpdesk.luware.cloud |
| Cloud Service Status | https://status.luware.com/ |