In this tab you can configure all additional Nimbus Features, Add-Ons, Apps, and Extensions.
✅ Related conditions: Note that certain extensions can be enabled and configured here, but will not take a visual effect in the UI until the Licenses for your users (User Administration) and services (Service Administration) are applied.
General
| Setting / Property | Description |
|---|---|
| Directly invite PSTN |
If enabled, PSTNs are directly invited to the group call (e.g. during a Consultation Call / Call On Behalf scenario). This can be enabled in case of a noticeable audio delay between agents and customers.1
🤔 Why is this toggle read-only? 1 Enabling this feature is done by Luware Support and requires testing on your tenant as Microsoft does not fully support dependent functionality globally for all MS Teams tenants. |
Outbound
| Setting / Property | Description |
|---|---|
| Max Scheduled Outbound Tasks per Service |
Limits the maximum outbound tasks per service that can be simultaneously scheduled / in progress. Default 20 / Min 1 / Max 70
🔍 Note: Outbound Tasks – same as inbound tasks – are distributed among available Nimbus users and shown in the Personal Dashboards > in the "Service Outbound Tasks Tabular" widget. Tasks are scheduled using the Microsoft Power Automate Connector > Flow Actions. Once the limit is reached, a flow error is returned and the task will be discarded. |
| Directly invite PSTN for Outbound calls |
If enabled, PSTNs are directly added to a group call in case of a scheduled outbound session or Call On Behalf, avoiding audio delay between agents and customers.1
🤔 Why is this toggle read-only? 1 Enabling this feature is done by Luware Support and requires testing on your tenant as Microsoft does not fully support dependent functionality globally for all MS Teams tenants. |
| Directly invite UPN for Outbound calls |
If enabled, UPNs are directly added to a group call in case of a scheduled outbound session or Call On Behalf, avoiding audio delay between agents and customers.1
🤔 Why is this toggle read-only? 1 Enabling this feature is done by Luware Support and requires testing on your tenant as Microsoft does not fully support dependent functionality globally for all MS Teams tenants. |
Companion Interface
| Setting / Property | Description |
|---|---|
| Admin Portal |
Enables the Nimbus Companion Interface (menu entry) in the Admin Portal main menu. 🔎 Note: Same as for the other Admin Portal pages, the UI language will remain English. Previous chat sessions are tied to the user-account, will persist between Admin and User Portal. |
| User Portal |
Enables the Nimbus Companion Interface (menu entry) in the User Portal main menu. ✅ Once enabled: 🔎 Note: The User Preferences (Portal) will take effect (UI Language and Light/Dark mode design). Previous chat sessions are tied to the user-account, will persist between Admin and User Portal. |
Interact
Configures options for Interact, an optional feature of Nimbus. If you want to learn more head over to our Luware Solutions page.
| Setting / Property | Description |
|---|---|
| Interact enabled |
The global setting which activates Interact for Nimbus
🔍 Enabling this requires you to fill in an ACS connection string. Refer to our Use Case - Setting up Interact which explains setup steps in detail. |
| Interact disabled |
If Interact is disabled, all corresponding fields are hidden in the section. 💡 Configured values are not cleaned up and can be used when enabling the functionality again. |
| ACS connection string |
Connection string for Azure Communication Services. Required to use Interact. 🔍 Learn how to generate this string via the Microsoft Documentation . ✅ "Check"- performs a check if it's possible to create a token for the user using this string. If the connection fails (with a correct string) it most likely means there are insufficient permissions. |
| O365 UserID | ID of the user on behalf of whom meetings on the backend will be created. |
| Widget Key |
Random guide generated for the Tenant. The key is sent with each request to the backend and checks the validity of the widget, depending on which it either allows or rejects the request for the backend.
|
| Session recovery timeout in seconds | Time in seconds before a closed session is ended permanently. Default: 20; Min: 5; Max: 60. KNOWN ISSUE Currently the timeout behavior is different between a direct (to Agent) conversation and a Service-distributed conversation:
|
| Authorization | Determine if a session requires further authentication:
Learn how to set up authorization...Use Case - Enabling additional authorization for InteractIn this use case, we're going to describe how you can set up an access token to be used for Interact. 🔍 This use case is optional in case you want to verify user access additionally via tokens in your Tenant Administration > Interact settings. Steps below refer directly on the Daemon application MSFT help article and the subchapters. Create an Azure Application
🔍 Refer to: https://docs.microsoft.com/en-us/azure/active-directory/develop/scenario-daemon-app-registration Generate Secret/Certificate
🔍 From https://docs.microsoft.com/en-us/azure/active-directory/develop/scenario-daemon-app-registration
Create own Daemon App with .NET/Java/Node/Python
🔍 Refer to the table on https://docs.microsoft.com/en-us/azure/active-directory/develop/scenario-daemon-app-configuration?tabs=dotnet Acquire a token and pass it to the SDK
🔍 Refer to: https://docs.microsoft.com/en-us/azure/active-directory/develop/scenario-daemon-acquire-token?tabs=dotnet |
Assistant
Configures options for Assistant, an optional feature of Nimbus.
| Setting / Property | Description |
|---|---|
| Use your own ACS Instance |
Toggle. Enable when you have your own Azure Communication Services instance. 🔍 Enabling this requires you to fill in an ACS connection string. Refer to Use Case - Setting up Assistant which explains the setup steps in detail. 💡 When this option is disabled, all corresponding fields are hidden in the section. Configured values are not cleaned up and can be used when enabling the option again. |
| ACS connection string |
Connection string for Azure Communication Services. Required to use Assistant with your own ACS instance. 🔍 Learn how to generate this string via the Microsoft Documentation . 💡 Once a string is entered a "Check" option verifies if it's possible to create a token for the user using this string. If the connection fails (with a correct string) it most likely means there are insufficient permissions. |
Dashboard Limits
Shows the maximum items (Users / Services) shown on flexible dashboards (both Personal Dashboards and Non-Personal Dashboards). Does not affect any of the static Nimbus pages.
| Setting / Property | Description |
|---|---|
| Max Users Count |
Determines the number of Users / Services in either flexible Dashboards can load on your Tenant. The cap is counted summed-up across all Dashboard Widgets used on one Dashboard, so a widget fed by a large Organization Unit can consume most of it. INC Dashboard Widget Data Size Limitations🔎 FILTER/QUERY SIZE LIMITATIONSTo keep query performance on flexible Dashboards manageable, limits of 400 Users / 400 Services apply on filtering (e.g. when selecting very large Organization Units). ☝ These limits are configured by Luware Administrators and shown read-only for transparency. They affect flexible Personal Dashboards and Non-Personal Dashboards. Static Nimbus Dashboards (pages with fixed widgets) are not affected. 💡 Please note that … 💡Good to know: On tabular widgets the Items per Page property additionally controls how many rows are rendered at once. It does not affect the query limits, but keeps large tables responsive with smaller page sizes. → See Dashboard Widget Properties. |
| Max Services Count |
Attendant Console
Allows to configure an MS Graph Filter that automatically limits the search used in Attendant Console.
| Setting / Property | Description |
|---|---|
| Overwrite User Settings | Applies the old/new Attendant Console design to all users, depending on whether “Use new Attendant Console Design” is toggled on or off. |
| Global Contact Search MS Graph Filter | Uses the MS Graph REST API to filter1 users according to your tenant admin account permissions. This filter will be applied to the O365 like Attendant Console to provide internal Nimbus users a narrowed-down pool of search results. 1 See: https://docs.microsoft.com/en-us/graph/api/overview ☝ Please note that this field requires only parameters for the "filter" field of a MS graph query, not the whole API request URL. Keep this in mind when using MS Graph Explorer to test, copy & paste your updated filter parameters. 💡 End users will not see this filter in the frontend UI, but will have search results narrowed down accordingly. 🔍 Refer to our Use Case - Filtering Attendant contact search via MS Graph. Example filter for users within domain and preferred language: NOTES AND KNOWN LIMITATIONSKNOWN LIMITATION The filter will be applied to all O365 accounts, including those of Nimbus Services! Overly strict filters may limit the Nimbus users' capability to forward calls via search.
|
| Team Visibility in Attendant Console | The Attendant Console search allows to forward calls to Nimbus teams and services. To avoid bypassing queues of services, the visibility of team members can be hidden.
|
Presence Tracking (via Application Permission)
✅ "Presence Tracking" allows Nimbus to make smarter routing decisions by determining the extended presence state, e.g. if your users are already in a Teams call (non-Nimbus). Please note that a few steps are required on your Microsoft Tenant for this feature to work. The required Nimbus App Permissions is Presence.Read.All (Application). Read the instructions below carefully and contact the support in case you need assistance.
🔎 Emergency Manual Presence Mode
If Microsoft Teams presence sync is unreliable or unavailable, Tenant Administrators can enable Emergency Manual Presence Mode below to have users set their availability directly in Nimbus instead. While this mode is enabled, Nimbus stops syncing presence from Microsoft Teams entirely, and the Application Permissions setup described further down this section is hidden, since it's not needed while presence is managed manually.
| Emergency Manual Presence Mode |
Toggle, default: false. In case of a Microsoft Teams presence issue, enable this feature to allow users to manage the presence state manually in Nimbus. 💡Note: When Emergency Manual Presence Mode is enabled, Dashboards and Live View may not immediately update to reflect the new presence source, which can show unusual combinations of states in the UI until the user manually switches their presence. When enabled:
When disabled:
💡 Changing this setting is tracked in Change History. Enabling or disabling it, or changing a manual presence state, does not affect sessions already in progress. Learn more about Emergency Manual Presence Mode…INC Emergency Manual Presence ModeEmergency Manual Presence Mode allows organizations to keep task routing working when Microsoft Teams presence information is unavailable or unreliable. When enabled on Admin > Tenant > Extensions > Presence Tracking, Nimbus stops syncing presence from Microsoft Teams for that tenant, and users manage their availability directly in Nimbus instead. ✅ Supported Presence Services: Emergency Manual Presence Mode is supported for both the legacy Presence Service and the new Presence Service, and is fully optimized for the new Presence Service. How it Works
 ☝ Note: All Nimbus users must manually set themselves to Available after enabling the mode — even if they already consider themselves ready to work. Enabling Emergency Manual Presence Mode does not carry over a user's previous availability. Until a user actively selects Available from the dropdown, they remain non-selectable for tasks, regardless of how they perceive their own status. ✅ Recommended action for Administrators:
Presence Visibility Across NimbusThe manually configured Nimbus presence is reflected in:
INC Emergency Manual Presence Mode LimitationsKNOWN EMERGENCY MANUAL PRESENCE MODE LIMITATIONS
|
||||||
|---|---|---|---|---|---|---|---|
| Extended Presence Tracking |
☝ The description below applies ONLY when Emergency Manual Presence Mode (above) is disabled. While enabled, Nimbus does not use (extended) Microsoft Teams presence for routing, but its own internal presence state instead. 🔍 Also see related Microsoft Documentation: User Presence States in Teams and Nimbus User States for more details. 🤔 When to enable this setting?
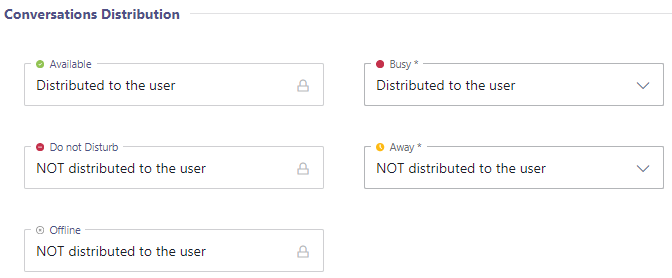
⮑ Once enabled, Nimbus task handling is done is according to the MS Teams status as follows:
|
||||||
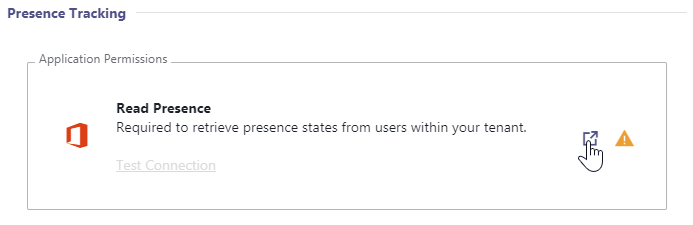
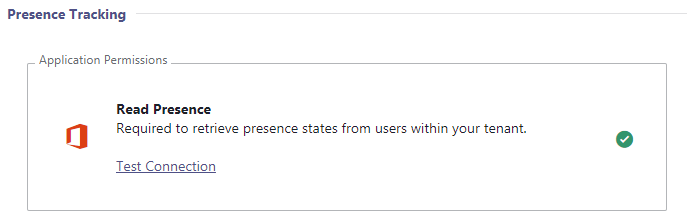
| Grant Permission with Grant Link |
☝ This is only available when Emergency Manual Presence Mode is disabled.
|
||||||
| Grant Permission via Provisioning Script |
☝ This is only available when Emergency Manual Presence Mode is disabled. ✅ Granting permission by running the provisioning script is an alternative to granting via Grant Link and also requires Tenant Administrator rights.
To grant the permission this way, run the provisioning script as a Tenant Administrator.
|
||||||
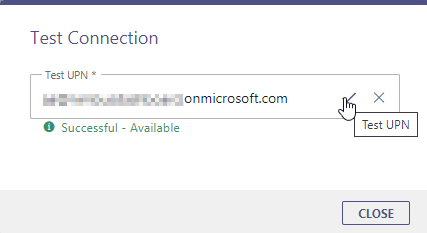
| Test UPN |
☝ This is only available when Emergency Manual Presence Mode is disabled. You can check if the permission was granted successfully:
|
||||||