The Nimbus Tenant view allows to assign security groups, change tenant details and configure various Nimbus Features and extension apps.
VIEW DIFFERENCES
The Tenant administration and related tabs may look different for single- and multi-tenant admins.
Access to configuration elements is determined by the Nimbus Role Access Concept. For instance, single tenant admin permissions may restrict you to only edit non-technical information such as: Company Name / Division, Billing Address, Technical Contact
💡 Note: Depending on Admin Roles detail permissions, certain fields described below may not be shown or protected against change. If you need to change restricted fields or have questions, get in touch with with your support partner or - in case of further issues - Luware customer support.
Luware Support Address
| Luware Website | https://luware.com/support/ |
|---|---|
| Luware Helpdesk | https://helpdesk.luware.cloud |
| Cloud Service Status | https://status.luware.com/ |
Access Tenant details
- Multi-tenant administrator you can use the Edit button for each tenant to access and change details.
- Single-Tenant administrators will not see a selection and get right into the Tenant Configuration, showing various tabs.

Tenant Settings Tabs
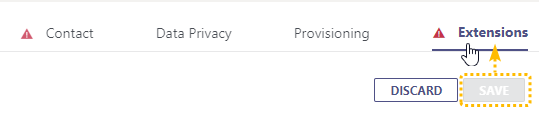
Saving changes in multiple tabs
Clicking SAVE affects changes in all tabs. For that reason, warning icons in the tabs will indicate when there is missing or wrong information that prevents saving.
General
Here you can change and enter details on your tenant, change or access the billing address and / or technical contacts.
General Tenant Settings
| Section | Option / Element | Description |
|---|---|---|
| Tenant Information | Name | Name as displayed in the tenant list |
| O365 Domain | The first or sub-level domain that the tenant is under. | |
| Tenant ID | The tenant ID of the group as defined in Microsoft Azure Portal. | |
| Company Name | Clear name field for the Company behind that tenant. | |
| Partner Administration Security Group (GUID) |
Azure Security Group GUID for which corresponds to the " Partner Admin of a Tenant " permission set. In most scenarios this group will usually have access to some tenants under that partner domain. 🔍 See info below for details |
|
| Tenant Administration Security Group (GUID) |
Azure Security Group GUID for which corresponds to the " Tenant Admin " permission set. In most scenarios this group will usually have access to one tenants under that partner domain. 🔍 See info below for details |
|
ABOUT SECURITY GROUP PERMISSIONSIf fields are greyed-out they are managed by a higher permission level. Refer to Roles and Permissions for details. 💡 You can retrieve the Security Group GUID from Microsoft Azure Portal > Groups > <Your Security Group Name> > Overview > Object ID 💡 Upon entering the ID Nimbus will check if permissions and if the ID is valid. If so, the "Details" button for the security group becomes enabled and you can inspect the group members.Helpjuice Info Callout Title Helpjuice Info Callout Body
| ||
| CRM ID | ID for your Customer Relationship Management tool. | |
| Billing Address |
Billing Address
|
Address of the partner to which the bill for this tenant should be sent to. 💡 Note that the country / address is just for billing purposes and does not reflect or change the Nimbus tenant data storage location. |
Contact
Here you can specify a technical contact to notify in case of maintenance, issues and for other technical questions:
Contact Tenant Settings
| Contact Details |
Technical Contact for this tenant
|
|---|---|
|
Partner
🔍 This section is restricted to Luware and Partner administrators. |
Assigns a Partner to this tenant. Visit our website to learn more about the → Luware Partner program. |
Data Privacy
Data Privacy Tenant Settings
In this tab you can configure Nimbus user, service and customer related data privacy settings.
On Data Privacy Settings and Restrictions
Certain Settings in this section are restricted to be changed by Customer Tenant Administrators only. Luware and delegated support partners cannot perform these changes on their own. For any questions on data privacy you can also consult the whitepapers in our Documents section, or contact Luware Support if you are uncertain about their use case.
Luware Support Address
| Luware Website | https://luware.com/support/ |
|---|---|
| Luware Helpdesk | https://helpdesk.luware.cloud |
| Cloud Service Status | https://status.luware.com/ |
| Option / Element | Description |
|---|---|
| Allow Partner to see User Identifiers |
Determines if the partner is able to see Nimbus user (team member) clear names.
|
| Allow Partner to see Customer Identifiers |
Determines if the partner is able to see Nimbus calling customer identifiers.
|
| Allow Partner to access Change History |
Determines if the partner is able to see the Change History within Admin > Operations. Also affects Change History Popups for Entities (e.g. Services, Users, ...).
💡Default: Disabled. This flag should only be enabled when the Tenant gives consent to his Partner to access the full Change History, as the Change History lists personal details of users making any (bulk) changes. GDPR Related: → "Allow Partner to see User Identifiers" Option |
| Persist User States in Reporting | Contact Center This feature can be enabled Tenant-wide, but mainly makes use of Contact Center service features for reporting. With this feature active, User States are tracked and added as part of the Nimbus Reporting Model and exposed via the Nimbus OData Feed.
🤔 When to enable this? Tracking presence states can generate considerable amounts of personal user data. Aside from Power BI query performance considerations on a large userbase you need to consider privacy and EU GDPR compliance before enabling this feature. 🤔 What data is being tracked? User, User ID, Organization Unit, Responsibility Profiles (User State), MS Teams Presence Status, and all related event changes with timestamps and durations. 🔎For details on recorded data fields, refer to Nimbus Reporting Model > Facts > User Session / User States tables respectively. |
| Persist MS Teams Direct Calls in Reporting |
🔎 Read Direct Call Reporting for hands-on instructions on how to enable Direct Call Reporting for your tenant and users. 1 Please Note: User data privacy☝GDPR As this feature can track MS Teams data outside of a Nimbus service context, make sure to properly inform all affected Users listed in the Admin UI to have their explicit consent where required. Also consult the Direct Call Reporting feature page for more details. 💡Once activated, take note that…
|
| Display User State Durations |
 |
| Data Retention Time |
The time after which historical data is purged. 💡 The purge is completed within 24 hours after the data retention time has expired. |
Data Retention
| Option / Element | Description |
|---|---|
| Data Retention Time | Time (in months), after which historical data call data is purged. |
| Change History Retention time | Time (in months), after which Change History data (e.g. settings changes) is being purged. |
| Voicemail Retention | Time (in days) after which Voicemails (e.g. generated by Nimbus during workflows) are being deleted. |
🔎Notes:
- The purge is completed within 24 hours after the data retention time has expired.
- Detailed data storage and retention policies can be found in the Nimbus Security whitepapers, available in the Documents section.
Customer Success Platform Integration
| Option / Element | Description |
|---|---|
| Allow to share Personal Identifiable Information (PII) |
💡Raise a ticket with Luware Support if you want to change this setting. 💡For more information, refer to the Nimbus Security whitepapers, available in the Documents section. |
Artificial Intelligence
Tenant Admin Consent
AI Features are default disabled. AI features in Nimbus collect and process data about session participants. Tenant Administrators therefore need to be aware that – before enabling these features on Tenant-wide level – that they are responsible for obtaining and maintaining all the required consents from the end users (data subjects).
✅To Review as a Tenant Administrator:
- Before enabling each AI feature on your Tenant, carefully read the tooltips next to each toggle.
- Ensure to take action as provided in the tooltips, e.g. by informing your end users on AI-driven features being enabled.
💡Good to know:
- While Tenant Admin consent is not (yet) granted, AI feature configuration listed below may be shown as disabled.

- If the consent has been given previously, but was taken away again, existing configured AI-features remain effective. However, the UI will be shown disabled and further changes are not possible until the consent is given again.
| Option / Element | Description |
|---|---|
| Allow to use Companion |
 💡When consent is taken away, previously existing Companion Service Settings still remain effective to ensure continued operation. |
| Allow to use Virtual user |
 💡While consent was granted, any existing configured features under Virtual Users (including Workflows configured under Modalities Service Settings) remain functional, and will not be disabled by taking consent away. |
Provisioning
Tenant Provisioning Settings
In the Provisioning tab in Tenant Administration, you can configure the Service Provisioning default settings which apply when new Nimbus services are created.
| Default OU for MS Teams creation | Sets the default Organization Unit (OU) for new services during their first provisioning. 🔍 Please Note:
|
|---|---|
| Allow service provisioning via MS Teams | Set the minimum roles required to Provision a new Nimbus team directly from the MS-Teams UI. Settings are:
💡 This setting does not prevent users from installing the Nimbus Personal App. 🔍 Non MS-Teams synched Service types can still be provisioned via the backend by any administrator, regardless of the setting made here. ☝ Users without the permission to Provision new services may still remove the Nimbus tab from MS Teams (as Nimbus cannot impact or restrict the default MS Teams interface). However, they can not trigger a removal of the service itself and its data and the Nimbus tab can be re-added.
|
| Default Team Owner Role | The default role assigned to a new user when a new Nimbus team is provisioned directly from the MS-Teams UI. Options are:
💡 Existing services are not affected by this change and changing this setting will only affect future services provisioned via MS Teams. |
| Enable Multihoming |
💡This field is read-only as Multihoming must be set up for your Tenant by a System Administrator and in cooperation with Luware Customer Success. This feature is meant for large Tenants with users working from different locations. ✅ For Tenant Administrators: Enabling Multihoming on multiple clusters has clear benefits, but also underlies strict technical limitations. Before deciding to roll out this feature:
|
Provisioning API
| Enable Provisioning API |
💡Tenant Administrators: You only have read access to this toggle. ✅ Luware System Administrator required The Provisioning API can only be enabled by a Luware System Administrator. Please get in touch with Luware Customer Success to discuss terms and conditions of using the Nimbus API. |
|---|
Application Permissions
✅Precondition: Once the "Nimbus API" is enabled (via Provisioning Tenant Settings), you can head to our Nimbus API documentation and follow the steps described therein.

💡Good to know: When the “Enable API” toggle is deactivated, the Application Permission box will not be visible to you. However, pre-existing configurations will remain, allowing for easy re-activation of the API at a later point without having to re-asses the configuration.
Extensions
Tenant Extension Settings
In this tab you can configure all additional Nimbus Features, Add-Ons, Apps and extensions.
✅ Related conditions: Note that certain extensions can be enabled and configured here, but will not take a visual effect in the UI until the Licenses for your users (User Administration) and services (Service Administration) are applied.
General
| Option / Element | Description |
|---|---|
| Directly invite PSTN |
If enabled, PSTNs are directly invited to the group call (e.g. during a Consultation Call / Call On Behalf scenario). This can be enabled in case of a noticeable audio delay between agents and customers.1
🤔 Why is this toggle read-only? 1 Enabling this feature is done by Luware Support and requires testing on your tenant as Microsoft does not fully support dependent functionality globally for all MS Teams tenants. |
Outbound
| Option / Element | Description |
|---|---|
| Max Scheduled Outbound Tasks per Service |
Limits the maximum outbound tasks per service that can be simultaneously scheduled / in progress. Default 20 / Min 1 / Max 70
🔍 Note: Outbound Tasks – same as inbound tasks – are distributed among available Nimbus users and shown in the Personal Dashboards > in the "Service Outbound Tasks Tabular" widget. Tasks are scheduled using the Microsoft Power Automate Connector > Flow Actions. Once the limit is reached, a flow error is returned and the task will be discarded. |
| Directly invite PSTN for Outbound calls |
If enabled, PSTNs are directly added to a group call in case of a scheduled outbound session or Call On Behalf, avoiding audio delay between agents and customers.1
🤔 Why is this toggle read-only? 1 Enabling this feature is done by Luware Support and requires testing on your tenant as Microsoft does not fully support dependent functionality globally for all MS Teams tenants. |
| Directly invite UPN for Outbound calls |
If enabled, UPNs are directly added to a group call in case of a scheduled outbound session or Call On Behalf, avoiding audio delay between agents and customers.1
🤔 Why is this toggle read-only? 1 Enabling this feature is done by Luware Support and requires testing on your tenant as Microsoft does not fully support dependent functionality globally for all MS Teams tenants. |
Companion Interface
| Option / Element | Description |
|---|---|
| Admin Portal |
Enables the Nimbus Companion Interface (menu entry) in the Admin Portal main menu. 🔎 Note: Same as for the other Admin Portal pages, the UI language will remain English. Previous chat sessions are tied to the user-account, will persist between Admin and User Portal. |
| User Portal |
Enables the Nimbus Companion Interface (menu entry) in the User Portal main menu. 🔎 Note: The User Preferences (Portal) will take effect (UI Language and Light/Dark mode design). Previous chat sessions are tied to the user-account, will persist between Admin and User Portal. |
Interact
Configures options for Interact, an optional feature of Nimbus. If you want to learn more head over to our Luware Solutions page.
| Option / Element | Description |
|---|---|
| Interact enabled |
The global setting which activates Interact for Nimbus
🔍 Enabling this requires you to fill in an ACS connection string. Refer to our Use Case - Setting up Interact which explains setup steps in detail. |
| Interact disabled |
If Interact is disabled, all corresponding fields are hidden in the section. 💡 Configured values are not cleaned up and can be used when enabling the functionality again. |
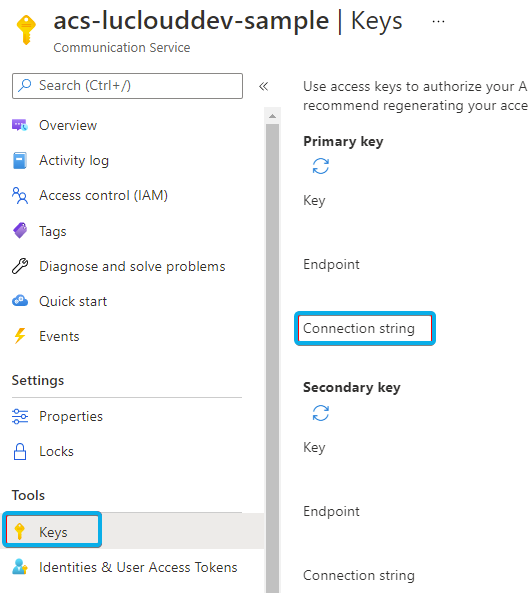
| ACS connection string |
Connection string for Azure Communication Services. Required to use Interact. 🔍 Learn how to generate this string via the Microsoft Documentation . ✅ "Check"- performs a check if it's possible to create a token for the user using this string. If the connection fails (with a correct string) it most likely means there are insufficient permissions. |
| O365 UserID | ID of the user on behalf of whom meetings on the backend will be created. |
| Widget Key |
Random guide generated for the Tenant. The key is sent with each request to the backend and checks the validity of the widget, depending on which it either allows or rejects the request for the backend.
|
| Session recovery timeout in seconds | Time in seconds before a closed session is ended permanently. Default: 20; Min: 5; Max: 60. KNOWN ISSUE Currently the timeout behavior is different between a direct (to Agent) conversation and a Service-distributed conversation:
|
| Authorization | Determine if a session requires further authentication:
Learn how to set up authorization...Use Case - Enabling additional authorization for InteractIn this use case, we're going to describe how you can set up an access token to be used for Interact. 🔍 This use case is optional in case you want to verify user access additionally via tokens in your Tenant Administration > Interact settings. Steps below refer directly on the Daemon application MSFT help article and the subchapters. Create an Azure Application
🔍 Refer to: https://docs.microsoft.com/en-us/azure/active-directory/develop/scenario-daemon-app-registration Generate Secret/Certificate
🔍 From https://docs.microsoft.com/en-us/azure/active-directory/develop/scenario-daemon-app-registration
Create own Daemon App with .NET/Java/Node/Python
🔍 Refer to the table on https://docs.microsoft.com/en-us/azure/active-directory/develop/scenario-daemon-app-configuration?tabs=dotnet Acquire a token and pass it to the SDK
🔍 Refer to: https://docs.microsoft.com/en-us/azure/active-directory/develop/scenario-daemon-acquire-token?tabs=dotnet |
Assistant
Configures options for Assistant, an optional feature of Nimbus.
| Option / Element | Description |
|---|---|
| Use your own ACS Instance |
Toggle. Enable when you have your own Azure Communication Services instance. 🔍 Enabling this requires you to fill in an ACS connection string. Refer to Use Case - Setting up Assistant which explains the setup steps in detail. 💡 When this option is disabled, all corresponding fields are hidden in the section. Configured values are not cleaned up and can be used when enabling the option again. |
| ACS connection string |
Connection string for Azure Communication Services. Required to use Assistant with your own ACS instance. 🔍 Learn how to generate this string via the Microsoft Documentation . 💡 Once a string is entered a "Check" option verifies if it's possible to create a token for the user using this string. If the connection fails (with a correct string) it most likely means there are insufficient permissions. |
Attendant Console
Allows to configure an MS Graph Filter that automatically limits the search used in Attendant Console.
| Option / Element | Description |
|---|---|
| Overwrite User Settings | Applies the old/new Attendant Console design to all users, depending on whether “Use new Attendant Console Design” is toggled on or off. |
| Global Contact Search MS Graph Filter | Uses the MS Graph REST API to filter1 users according to your tenant admin account permissions. This filter will be applied to the O365 like Attendant Console to provide internal Nimbus users a narrowed-down pool of search results. 1 See: https://docs.microsoft.com/en-us/graph/api/overview ☝ Please note that this field requires only parameters for the "filter" field of a MS graph query, not the whole API request URL. Keep this in mind when using MS Graph Explorer to test, copy & paste your updated filter parameters. 💡 End users will not see this filter in the frontend UI, but will have search results narrowed down accordingly. 🔍 Refer to our Use Case - Filtering Attendant contact search via MS Graph. Example filter for users within domain and preferred language: NOTES AND KNOWN LIMITATIONSKNOWN LIMITATION The filter will be applied to all O365 accounts, including those of Nimbus Services! Overly strict filters may limit the Nimbus users' capability to forward calls via search.
|
| Team Visibility in Attendant Console | The Attendant Console search allows to forward calls to Nimbus teams and services. To avoid bypassing queues of services, the visibility of team members can be hidden.
|
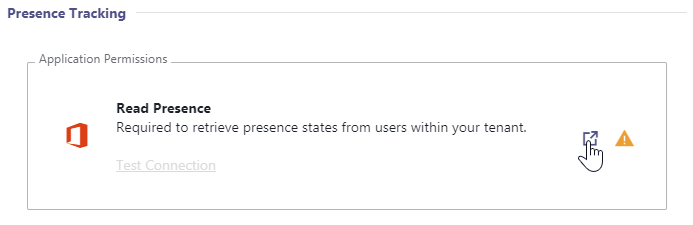
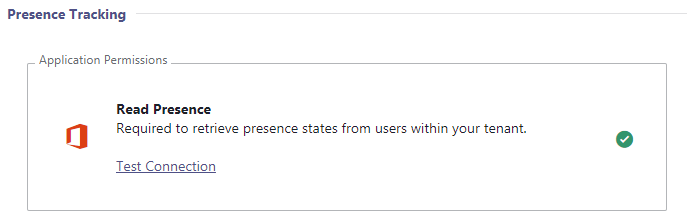
Presence Tracking (via Application Permission)
✅ "Presence Tracking" allows Nimbus to make smarter routing decisions by determining the extended presence state, e.g. if your users are already in a Teams call (non-Nimbus). Please note that a few steps are required on your Microsoft Tenant for this feature to work. Read the instructions below carefully and contact the support in case you need assistance.
Needed permission is:
- Presence.Read.All (Application)
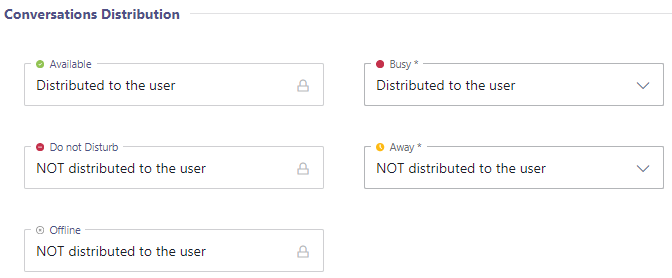
| Extended Presence Tracking |
Without the required permission for extended presence tracking, Nimbus can only retrieve a simplified presence status such as "Busy" "Away" or "Available" for your users. The permission is required for status presence such as “Busy → In a Call “ or ”Busy → In a Conference” in order to improve call routing. When activating the presence tracking feature, call handling is handled according to the MS Teams status as follows:
☝ If you want to keep using "Presence Privacy mode" on your Teams tenant, you need to allow Nimbus to track extended presence. Otherwise Nimbus cannot route anything because presence states will not be available to Nimbus. |
||||||
|---|---|---|---|---|---|---|---|
| Grant Permission with Grant Link |
|
||||||
| Grant Permission via Provisioning Script |
✅ Granting permission by running the provisioning script is an alternative to granting via Grant Link and also requires Tenant Administrator rights.
To grant the permission this way, run the provisioning script as a Tenant Administrator.
|
||||||
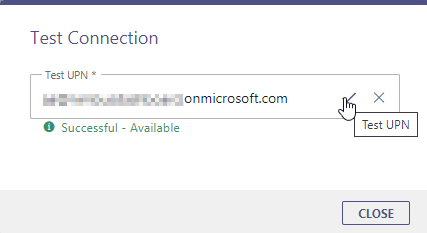
| Test UPN |
You can check if the permission was granted successfully:
|
||||||
Modalities
Modalities Tenant Settings
On the “Modalities” tab you can configure modality behavior affecting all users and services with the corresponding modalities enabled. Settings on this page are divided per modality accordingly: Instant Messaging, External Task, Email.
Modalities: Good to know
Instant Messaging External Task Email
☝ You may not see all modality-related settings on your Tenant yet. Once enabled on your tenant you will see corresponding options available in the Modalities Service Settings and General User Settings. We will inform in the Latest Release Notes about any enabled or disabled settings.
☝ All Modalities are separatedly licensed and require prior technical setup. Consult with your Customer Success partner to discuss licensing terms - and afterwards - refer to your License Management to check your available modality contingency.
☝ “Max concurrent task” parameters changed on this page immediately affect services which already make use the coresponding modality. Further incoming tasks will be blocked until the task backlog gets below the set threshold.
INC Fair Use Disclaimer
🤝 Features and functionality described in the context of this page use runtime resources under a fair use policy. Luware may change the usage limit or contact customers that exceed the general usage quota.
Audio/Video
| Area | Description |
|---|---|
| Leave Nimbus on Blind Transfer |
Default disabled. Enabling this has the following effects:
🤔What happens when this is enabled?When this option is enabled the following Nimbus Features will NOT be available to blind-transfer targets anymore:
🤔What transfer scenarios are affected by this toggle?Only Attendant - Blind Transfer. Not affected are:
|
Instant Messaging
IM Preconditions
Once enabled, this option grants your Nimbus users Chat Handling capabilities and extends related features of Nimbus.
🔎 For detailed steps, refer to Use Case - Setting up Instant Messaging.
Interact
| Area | Description |
|---|---|
| Interact | Required to enable the feature and show further options |
| Max concurrent IM Tasks per Service |
Max limit of concurrent Instant Messaging tasks per service (similar to ET)
💡If the limit is reached, the IM-contacting customers will see a message that the service is currently unavailable and should retry in a few minutes. |
| Use your own accounts | Needs to be enabled to use guest accounts. |
| Grant Permission | As Tenant Administrator you need to grant permissions once. Paste this link into your browsers address bar or pass it on to a Tenant Administrator with according privileges. |
| Primary Account / Secondary Account | Guest accounts to invite on your Tenant to enable Instant Messaging capabilities. |
| Test UPN | Use this (after the successful user invite) to send test messages to any user within your tenant. |
| Use your own ACS Instance |
Optional step. Only required when you don't want to use the default Nimbus ACS instance. Learn how to set up your own ACS InstanceINC ACS Instance SetupINC ACS Instance SetupThe following steps describe how an ACS instance can be setup. Which is required for Nimbus Assistant and/or Interact. INC Interact Azure BillingAZURE BILLINGThe usage of Interact will cause additional monthly ACS (Azure Communication Services) costs depending on modality (IM/AV) used. These cost are determined by Microsoft. Also see: https://learn.microsoft.com/en-us/azure/communication-services/concepts/pricing
Create new Azure Communication ServiceTo create a new Azure Communication Service perform the steps:
|
| Use your own ACS instance | Needs to be enabled to use your own ACS instance. |
| ACS connection string |
Connection string for Azure Communication Services. Required to use Chat Handling with your own ACS instance. 🔎 Learn how to generate this string via the Microsoft Documentation .
💡Once a string is entered a "Check" option verifies if it's possible to create a token for the user using this string. If the connection fails (with a correct string) it most likely means there are insufficient permissions. |
| ACS Resource ID | Connection ID for Azure Communication Services. Required to use Chat Handling with your own ACS instance. 🔎 Learn how to retrieve this ID via the Microsoft Documentation . |
Twilio
| Area | Description |
|---|---|
| Active (toggle) | Needs to be enabled to use Twilio, a third-party communications API service. 💡If enabled, you need to have at least one channel selected (e.g. WhatsApp / SMS). |
| Max concurrent IM Tasks per Service |
Limits the maximum Instant Messaging modality tasks per service that can be simultaneously scheduled / in progress.
🔎Why is this limit in place? As instant messages can be created in bulk (either by intention, scripts, or malicious attacks), this setting underlies a fair-use policy. The limit is also in place to ensure that potential erroneous loop conditions don't create a large amount of "stuck" tasks, blocking up service queues. Task processing resumes when the threshold drops below the limit. |
|
Enable this if you want to reach your Nimbus services through WhatsApp via the Twilio integration. 🔎Related setup: For more information, refer to Use Case - Setting Up Instant Messaging > WhatsApp Setup. |
|
| SMS/RCS |
Enable this if you want to reach your Nimbus services through SMS/RCS via the Twilio integration. 🔎Related setup: For more information, refer to Use Case - Setting Up Instant Messaging > SMS/RCS Setup. |
External Tasks
External Task Preconditions
Same as any other task, external tasks distributed via queue among available Nimbus users and shown in the Personal Dashboards > in the "External Tasks Tabular" widget.
Tasks are scheduled using the Microsoft Power Automate Connector > Flow Actions. Once the limit is reached, a flow error is returned and the task will be discarded.
🔎 Refer to Use Case - Creating an External Task and Use Case - External Task in Combination with Nimbus Assistant.
| Area | Description |
|---|---|
| Max concurrent External Tasks per Service |
Limits the maximum External Tasks per service that can be simultaneously scheduled / in progress.
🔎 Why is this limit in place? As external tasks can be created in bulk via external MS flow loop, this setting underlies a fair-use policy. This limit is also in place to ensure that potential erroneous loop conditions don't create a large amount of "stuck" tasks, blocking up service queues. Task processing resumes when the threshold drops below the limit. |
Email Tasks
Email Preconditions
Once enabled, this option grants your Nimbus users Email Handling capabilities and extends related features of Nimbus.
🔎 For detailed steps, refer to Use Case - Setting up Email.
| Area | Description |
|---|---|
| Max concurrent Email Tasks |
Limits the maximum Email tasks per service that can be simultaneously scheduled / in progress.
🔎 Why is this limit in place? As Email tasks can created in bulk - either intentional, SPAM or by misconfiguration, this setting underlies a fair-use policy. This limit is also in place to ensure that potential erroneous conditions don't create a large amount of "stuck" tasks, blocking up service queues. Task processing resumes when the threshold drops below the limit. |
Licenses
License Tenant Settings
Here you can check and distribute licenses that enable/disable Nimbus Features. The counters change when you Manage Licenses per Service and Users respectively, drawing from your current license contingency.
The different sections of this view are described in the following:
| Tenant State |
INC Tenant State widget💡The Tenant State summarizes availability of Nimbus Features and Licenses at a glance. Your status can only be changed by a Luware System Administrator and is indicated as follows:
🤔What happens on Tenant suspension?
💡This state can only be resolved by a Luware Administrator. 🤔What if my (productive) Tenant is not shown "Active" yet?💡Your Customer Success specialist will reach out to you with further details on your license usage and the course of action. For any immediate questions on your License Management you can always contact Luware support. Luware Support Address
🔎 Good to know: Your overall license contingency can be distributed in bulk using Admin Portal > License Management. To change the available license contingency, get in touch with your Customer Success partner. |
|---|
Service
| Service Licenses | Shows your usage of Nimbus licenses per Service type.1
1🔎 Refer to Nimbus Features > Service Features for a detail comparison of available Service licenses. ✅ Managing Service licenses:
|
|---|---|
| Addon Licenses |
|
User
| User Licenses | Shows your usage of Nimbus User licenses. Refer to Nimbus Features for more context.
1🔎 Refer to Nimbus Features > User Features for a detail comparison of available User licenses. ✅ Managing User licenses:
|
|---|
Modalities
| Modality Licenses | Shows the number of allowed Users per channel of communication.
1🔎 All modality-specific Workflows that distribute tasks to Users can be configured via Modalities Service Settings per Service. |
|---|
Artificial Intelligence
| Virtual User |
INC Public Preview Beta Feature
This feature is in PREVIEW and may not yet be available to all customers. Functionality, scope and design may change considerably. Shows the number of licenses allowed to be distributed to Virtual Users (configuration items). ✅ Managing Virtual User licenses:
|
|---|

Pushing Tenant updates
Pushing Tenant updates via Script
Major technical changes on a tenant-level or within service settings may require a re-execution of a downloadable Microsoft PowerShell script, using tenant admin privileges. The script will push those changes to Azure, and updates should be reflected within minutes.

Nimbus Provisioning Script URLs
🔎Note: You can also retrieve the provisioning script directly from your User Preferences (Nimbus Admin Portal).
Deleting a Tenant
Deleting a Tenant
The Provisioning PowerShell script is also used to push a pending deletion (unprovisioning) request of a whole tenant.
PLEASE READ BEFORE DECIDING TO DELETE YOUR TENANT
🔍 This setting is available to Multi-Tenant Administrators only. Deleting a tenant will also mark all Nimbus services under that tenant for deletion.
✅ Confirm Check: As this cannot be undone, you have to confirm the deletion in a separate pop-up by typing out YES and confirming this step.
After your confirmation, these effects are to be expected:
→ Underlying Nimbus teams shift to pending deletion state in the Administration Overview and individual Service Administration views respectively.
→ At this point Nimbus services will cease to operate.
→ The next run of the provisioning script (see Nimbus Installation) removes the related team entries from Azure.
→ When the provisioning script was successful, all Nimbus functionality is removed.
GOOD TO KNOW
Previously existing structures within your MS Teams instance - such as team definitions, channel names, team members / team owners - remain unaffected. Only Nimbus related tabs and functionality are removed from your tenant.