This Use Case demonstrates the capability of sending SMS to Customers using Azure Communication Services. We will set up a Service Workflow which asks Customers to opt-in for the SMS notification Service.
🔍 This Use Case is about sending SMS only, which means, it's a one-way flow of information from Nimbus to Customers. Any response to a SMS notification will be ignored.
☝Please also note, that we do not handle opt-ins and opt-outs via SMS in this Use Case. Customers can opt-out from the Service by calling a SMS notification opt-out Service number, where it is handled via an IVR.
PRECONDITIONS
You require tenant administrator rights to set up the Azure Communication Services and Service owner rights to create the Service workflow and parameters in Nimbus.
INC Icon Legend Accordion
Show Icon Legend
| 💡 = A hint to signal learnings, improvements or useful information in context. | 🔍 = Info points out essential notes or related page in context. |
| ☝ = Notifies you about fallacies and tricky parts that help avoid problems. | 🤔 = Asks and answers common questions and troubleshooting points. |
| ❌ = Warns you of actions with irreversible / data-destructive consequence. | ✅ = Intructs you to perform a certain (prerequired) action to complete a related step. |
Set-up Azure Communication Services for sending SMS
- Create an Azure Communication Services Resource as described in the official Microsoft documentation.
- Under SMS concepts in Azure Communication Services - An Azure Communication Services concept document | Microsoft Learn you can read about supported sender types. With the help of the information on that page, decide on which sender type you would like to use. Once decided, enable the selected sender type to be able to start sending SMS messages.
Prepare in Nimbus
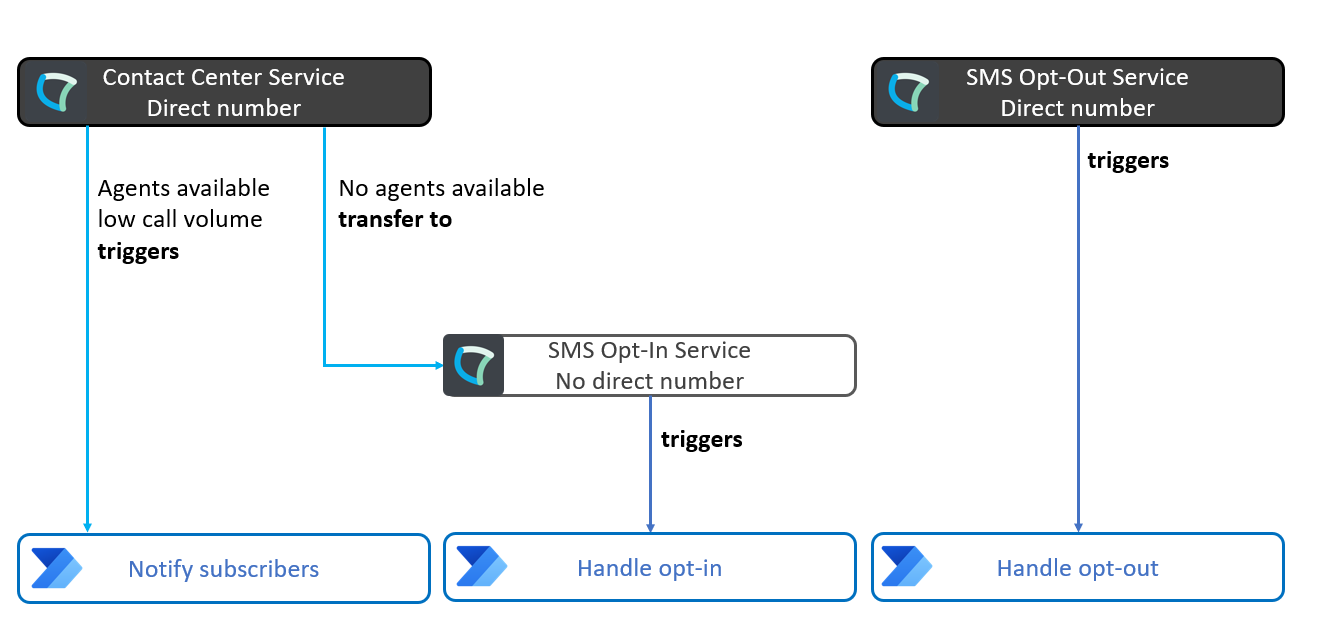
In our example, we have 3 Nimbus Services:
- a Contact Center Service which can directly be reached by Customers,
- a SMS opt-in Service which cannot be reached directly by Customers,
- … and a SMS opt-out Service which can be reached by Customers.
1. Create the parameters
In Nimbus configuration, create the following Parameters:
Name |
ID |
Default Value |
|---|---|---|
| SMSNotificationOptIn | SMSNotificationOptIn |
false |
| SMSNotificationPhoneNumber | SMSNotificationPhoneNumber |
NULL |
| NotifySubscribers | NotifySubscribers |
NULL |
| AvailableUsers | AvailableUsers |
NULL |
2. Create a SharePoint List
- Title: Text column, containing the phone numbers of the subscribed Customers.
- Subscribed at: Date column, containing the date of the subscription.
- Received Notifications: Number column, containing the number of SMS messages sent to the Customer.
- Last Notified At: Date column, containing the date of the last SMS notification sent to the Customer
3. Contact Center Service
The Contact Center Service triggers the Notify subscribers Nimbus Power Automate Connector flow if the call volume is low and thus the CC capacity is high.
💡If no Agents are available to answer a call, the Customer will be transferred to a second Service, the SMS notification opt-in Service, to get the option to subscribe to the notifications about the call center capacity. Here is the Nimbus workflow:
Overview of the workflow for the Contact Center Service

Description |
Screenshot |
|---|---|
After accepting the call, start with the Get Available Users Workflow Activity and store the number of currently available Agents in the AvailableUsers parameter. 💡This step will cause a Trigger Event to run the “Notify Subscribers” Power Automate Flow in case the number of available Users falls above a certain threshold configurable in Power Automate.
|
 |
|
Next with Check Parameter we check the value of the previously set AvailableUsers parameter. If the value of the parameter is 0, then we take the No One Available exit.
|
 |
| If the No One Available exit was taken in the previous step, then we are not queuing the call, instead we transfer the call to the SMS Opt-In Service, where the Customer can opt-in for SMS notifications in case Agents become available. |  |
|
In case the No Match or Not Set exit of the Check Parameter activity is taken (in case there is at least one available Agent) the call is sent to the Queue (Queue Task).
|
 |
4. SMS opt-in Service
The SMS notification opt-in Service handles opt-ins of Customers.
Overview of the workflow for the SMS opt-in Service

Description |
Screenshot |
|---|---|
After accepting the call, start with an Input Customer Workflow Activity to let the Customer decide whether to opt-in for SMS notifications.
|
 |
|
If the Customer selects to opt-in, then the current phone number will be announced and the Input Customer activity will ask the Customer whether to opt-in with the calling phone number or with another one.
|
 |
| If the Customer wants to opt-in with the calling phone number, then we store the E164 formatted phone number in the SMSNotificationPhoneNumber parameter. |  |
| If the Customer wants to opt-in with a different phone number, then we ask the Customer to provide the alternate phone number without the leading ‘+’ as the ‘+’ symbol cannot be entered via DTMF. Once the Customer provided the number, the Collect Information activity will save it in the SMSNotificationPhoneNumber parameter. Right after with the Save to Parameter activity, we add the leading ‘+’ to have an E164 formatted phone number in the parameter. |  |
| Finally we set the value of the SMSNotificationOptIn parameter to 1 (which will trigger the Handle opt-in Power Automate flow) and we read back the phone number that will receive the SMS messages. |  |
5. SMS opt-out Service
The SMS notification opt-out Service handles opt-outs of Customers. It needs to have an assigned phone number so that Customers can reach the Service externally to easily opt-out. Customers will be automatically opt-out when they have received 5 notifications. Depending on your country's legislation, the number might need to be toll-free. Here is an overview of the workflow:
Overview of the workflow for the SMS opt-out Service

Description |
Screenshot |
|---|---|
After accepting the call, start with a Save to Parameter Workflow Activity to set the value of the SMSNotificationOptIn parameter to 0. This action will trigger the Handle opt-out Power Automate flow.
|
 |
| At the same time with triggering the Power Automate flow, we tell the Customer that no new notifications will be sent to the calling phone number. |  |
Create the “Handle Opt-In” Power Automate Flow
This flow is triggered by a parameter update within a Nimbus workflow. If a Customer opts-in using the IVR in Nimbus, we want to create an entry in the subscribers list with the subscribers phone number.
Overview of the Power Automate flow

- Start with the When a task changes state trigger of the Nimbus Connector.
| Field | Fill in / 🌟 = Nimbus dynamic content | |
|---|---|---|
| Service Item | ||
| Task Events | ||
| Trigger conditions | ||


- Add a Data Operation "Filter array" action to your flow.
- Rename the action to SMSNotificationPhoneNumber
- Configure the action as follows:
| Field | Fill in / 🌟 = Nimbus dynamic content | |
|---|---|---|
| From | ||
| Filter Query | ||

- Add a Control "Condition" action to your flow.
- Configure the action as follows:
| Field | Description | |
|---|---|---|
| Condition expression |
|
 |
In the True branch
- Add a Azure Communication Services SMS "Send SMS" action to your flow (If you do not have a connection created yet, Power Automate will ask you to create one by providing the name and the connection string of your ACS instance).
- Configure the action as follows:
| Field | Fill in | |
|---|---|---|
| From Phone Number | Select a phone number from the dropdown box or manually enter the sender in case you would like to use another method – like Short Code, Dynamic Alphanumeric Sender ID, Preregistered Alphanumeric Sender ID, etc. – to send the SMS. |  |
| Recipients |
Click on |
|
| Message | Lunifico Call Center: You have been opt-in to the notification Service. | |
| DeliveryReport | Yes | |
 and add
- Add a SharePoint "Create Item" action to your flow.
- Configure the action as follows:
| Field | Fill in / 🌟 = Nimbus dynamic content | |
|---|---|---|
| Site Address | Either select the SharePoint site containing the SharePoint list from the dropdown box or manually enter the site URL |  |
| List Name | Select the SharePoint List created for keeping track of SMS notification opt-ins | |
| Title | @{body('SMSNotificationPhoneNumber')?[0]['Value']} |
|
| Subscribed at | @{utcNow()} |
|
| ReceivedNotifications | 1 | |
In the “False” branch
No action is required.
Create the “Notify subscribers” Power Automate Flow
This Power Automate flow is triggered, when in the Contact Center Service the Get Available Users activity saves the number of available Users into the AvailableUsers parameter and the number of available Users is above a certain threshold, which is configurable in the trigger conditions as explained below. Once the Power Automate flow is triggered, it will send an SMS to the subscribed Users letting them know that Agents are available.
Overview of the Power Automate flow

- Start with the When a task changes state trigger of the Nimbus Connector.
| Field | Fill in / 🌟 = Nimbus dynamic content | |
|---|---|---|
| Service Item | ||
| Task Events | ||
| Trigger conditions | ||

- Add a Variable "Initialize variable" action to your flow.
- Rename the action to MinTimeBetweenNotificationsInMinutes.
- Configure the action as follows:
| Field | Fill in | |
|---|---|---|
| Name | MinTimeBetweenNotificationsInMinutes |  |
| Type | Integer | |
| Value |
60 The value of this variable will control for how long Power Automate should wait at least between two SMS messages sent to the same Customer. With this parameter we can avoid spamming the Customer with SMS messages. ☝ Feel free to adjust the value of this parameter based on your needs. With a value of 60 you can make sure that Power Automate waits at least 60 minutes between two SMS messages. |
|
- Add a Variable "Initialize variable" action to your flow.
- Rename the action to NumberOfSubscribersToInform.
- Configure the action as follows:
| Field | Fill in | |
|---|---|---|
| Name | NumberOfSubscribersToInform |  |
| Type | Integer | |
| Value |
3 The value of this variable will control how many subscribed Customers maximum will be notified about Agents being available. ☝ With this setting we want to avoid sending the SMS notification to a large number of Customers at the same time, which would probably result for several Customers in not getting to an Agent again. |
|
- Add a SharePoint "Get Items" action to your flow.
- Configure the action as follows:
| Field | Fill in / 🌟 = Nimbus dynamic content | |
|---|---|---|
| Site Address | Either select the SharePoint site containing the SharePoint list from the dropdown box or manually enter the site URL |  |
| List Name | Select the SharePoint List created for keeping track of SMS notification opt-ins | |
| Filter query |
💡 With this filter we are making sure to only retrieve Customers from the SharePoint List, who did not receive any notifications in the last x minutes (x is controlled by the MinTimeBetweenNotificationsInMinutes variable) |
|
| Order By |
💡 We would like to query primarily those Customers who have not received a notification for the longest time |
|
| Top Count |
💡 We would like to get those x Customers (controlled by the NumberOfSubscribersToInform variable), who have not received a notification for the longest and at the same time who did not receive notifications within the last x minutes (x is controlled by the MinTimeBetweenNotificationsInMinutes variable). |
|
| All other fields | <leave empty, as is> | |
- Add a Azure Communication Services SMS "Send SMS" action to your flow.
- Configure the action as follows:
| Field | Fill in / 🌟 = SharePoint dynamic content | |
|---|---|---|
| From Phone Number | Select a phone number from the dropdown box or manually enter the sender in case you would like to use another method – like Short Code, Dynamic Alphanumeric Sender ID, Preregistered Alphanumeric Sender ID, etc. – to send the SMS. |  |
| Recipients | 🌟 Title | |
| Message | Lunifico Call Center: You have been opt-in to the notification Service. | |
| DeliveryReport | Yes | |
- Add a SharePoint "Update Item" action to your flow.
- Configure the action as follows:
| Field | Fill in / 🌟 = SharePoint dynamic content | |
|---|---|---|
| Site Address | Either select the SharePoint site containing the SharePoint list from the dropdown box or manually enter the site URL |  |
| List Name | Select the SharePoint List created for keeping track of SMS notification opt-ins | |
| Id | 🌟 ID | |
| ReceivedNotifications | @{utcNow()} |
|
| ReceivedNotifications |
☝Every time we send an SMS, we increment the received notifications count by 1. |
|
Create the “Handle opt-out” Power Automate Flow
This flow is triggerd by a parameter update within a Nimbus workflow. If a Customer opts-out using the IVR in Nimbus, we want to delete the entry from the subscribers list and opt-out the subscriber. Even if the notification via SMS did not work, we need to perform the opt-out.
Overview of the Power Automate flow

- Start with the When a task changes state trigger of the Nimbus Connector.
| Field | Fill in / 🌟 = Nimbus dynamic content | |
|---|---|---|
| Service Item | ||
| Task Events | ||
| Trigger conditions | ||


- Add a SharePoint "Get Items" action to your flow.
- Configure the action as follows:
| Field | Fill in / 🌟 = Nimbus dynamic content | |
|---|---|---|
| Site Address | Either select the SharePoint site containing the SharePoint list from the dropdown box or manually enter the site URL |  |
| List Name | Select the SharePoint List created for keeping track of SMS notification opt-ins | |
| Filter query |
|
|
| All other fields | <leave empty, as is> | |
- Add a Azure Communication Services SMS "Send SMS" action to your flow.
- Configure the action as follows:
| Field | Fill in / 🌟 = SharePoint dynamic content | |
|---|---|---|
| From Phone Number | Select a phone number from the dropdown box or manually enter the sender in case you would like to use another method – like Short Code, Dynamic Alphanumeric Sender ID, Preregistered Alphanumeric Sender ID, etc. – to send the SMS. | |
| Recipients |
Click on |
|
| Message | Lunifico Call Center: You habe been unsubscribed from the SMS notification Service. | |
| DeliveryReport | No | |
- Add a SharePoint "Delete item" action to your flow.
- Configure the action as follows:
| Field | Fill in / 🌟 = Nimbus dynamic content | |
|---|---|---|
| Site Address | Either select the SharePoint site containing the SharePoint list from the dropdown box or manually enter the site URL |   |
| List Name | Select the SharePoint List created for keeping track of SMS notification opt-ins | |
| Id |
|
|
| Run after |
On the Settings page make sure to enable all checkboxes, to have the entry removed from the SharePoint list even if the previous action (Send SMS) fails: 
|
|
| All other fields | <leave empty, as is> | |
Optional: Create an Automatic Opt-out Power Automate Flow
On top of letting the subscribers to opt-out via the opt-out Service, or if you do not want to deal with a specific on demand opt-out Service, you could automatically out-out them after a certain amount of SMS messages sent to them. In this Use Case, as soon the ReceivedNotifications hits the number 5, we will delete the entry and opt-out the subscriber.
Overview of the Power Automate flow

- Start with the When an item is created or modufued trigger of the SharePoint Connector.
| Field | Fill in / 🌟 = Nimbus dynamic content | |
|---|---|---|
| Site Address | Either select the SharePoint site containing the SharePoint list from the dropdown box or manually enter the site URL | |
| List Name | ||
| Trigger conditions | ||


- Add a Azure Communication Services SMS "Send SMS" action to your flow.
- Configure the action as follows:
| Field | Fill in / 🌟 = SharePoint dynamic content | |
|---|---|---|
| From Phone Number | Select a phone number from the dropdown box or manually enter the sender in case you would like to use another method – like Short Code, Dynamic Alphanumeric Sender ID, Preregistered Alphanumeric Sender ID, etc. – to send the SMS. |  |
| Recipients |
Click on |
|
| Message | Lunifico Call Center: You habe been unsubscribed from the SMS notification Service. | |
| DeliveryReport | No | |
- Add a SharePoint "Delete item" action to your flow.
- Configure the action as follows:
| Field | Fill in / 🌟 = Nimbus dynamic content | |
|---|---|---|
| Site Address | Either select the SharePoint site containing the SharePoint list from the dropdown box or manually enter the site URL |  |
| List Name | Select the SharePoint List created for keeping track of SMS notification opt-ins | |
| Id |
|
|
| Run after |
On the Settings page make sure to enable all checkboxes, to have the entry removed from the SharePoint list even if the previous action (Send SMS) fails:
|
|
| All other fields | <leave empty, as is> | |