Nimbus has a built-in editor for which allows you to customize your caller Workflows with various building blocks called Workflow Activities. Workflows are individually configured for each modality, and take affect when applied via Modalities Service Settings.

Workflow Editing
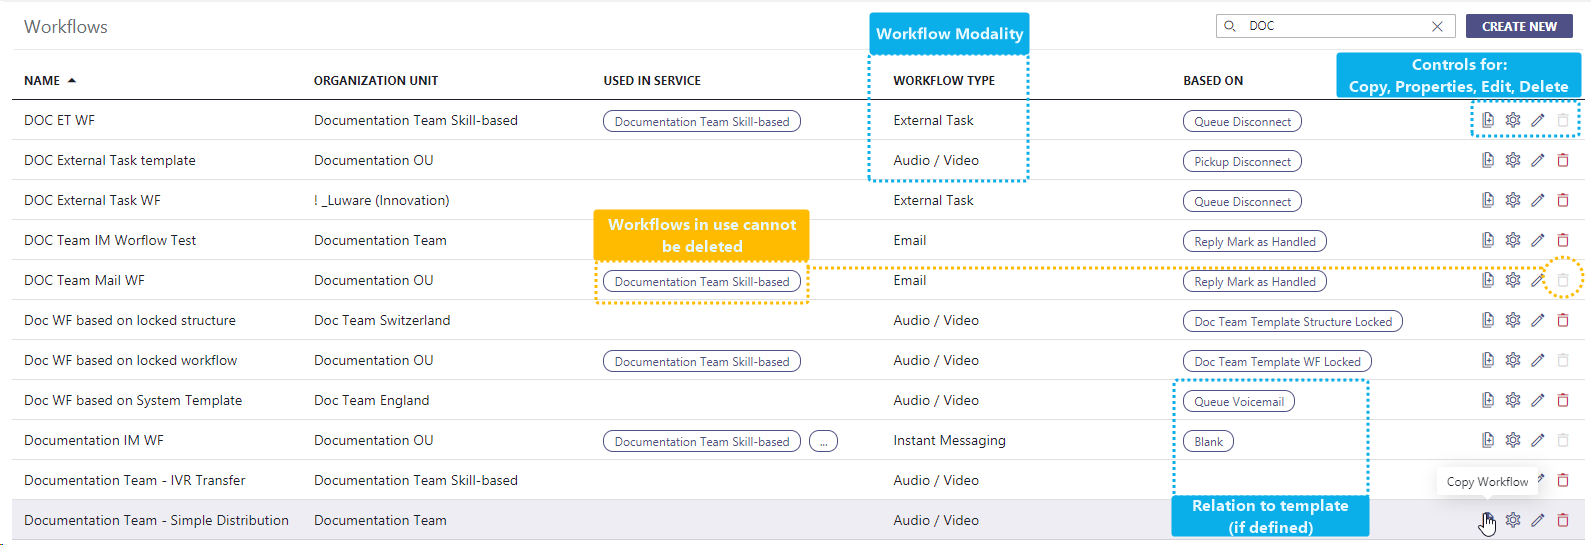
To start editing a workflow, simply select an entry from the list of already available workflows or click on “Create New” to start fresh.
💡You can either click on a workflow entry or use the controls on the right side of an entry to access properties, copy a workflow.
ATTENTION WHILE EDITING A WORKFLOW ALREADY IN USE
Caution - Workflows can also be edited while being used in your (productive) services. Changes saved to such a workflow will immediately reflect in your service team on the next incoming call.
✅ → Always check the highlighted "Used in Service" column first to see which services are affected by a workflow change.
💡 To avoid any issues during your productive hours, we recommend the following:
- Work on workflow copies – and once satisfied – apply them within the Service Settings of the respective service(s).
- Perform and test productive workflow changes outside of your service opening hours.
- Alternatively, create some "Test Services" to try out changes, which recommended when testing complex workflow scenarios with Nimbus Power Automate Connector integrations.
Workflow Editor Overview

Expand and collapse editor view
The editor can be expanded by clicking the expand/collapse icon, which is located on the top right between the Properties icon and Add Activity:

When expanded, the side menu on the left is hidden. Clicking on the expand/collapse icon again will collapse the view and display the side menu:

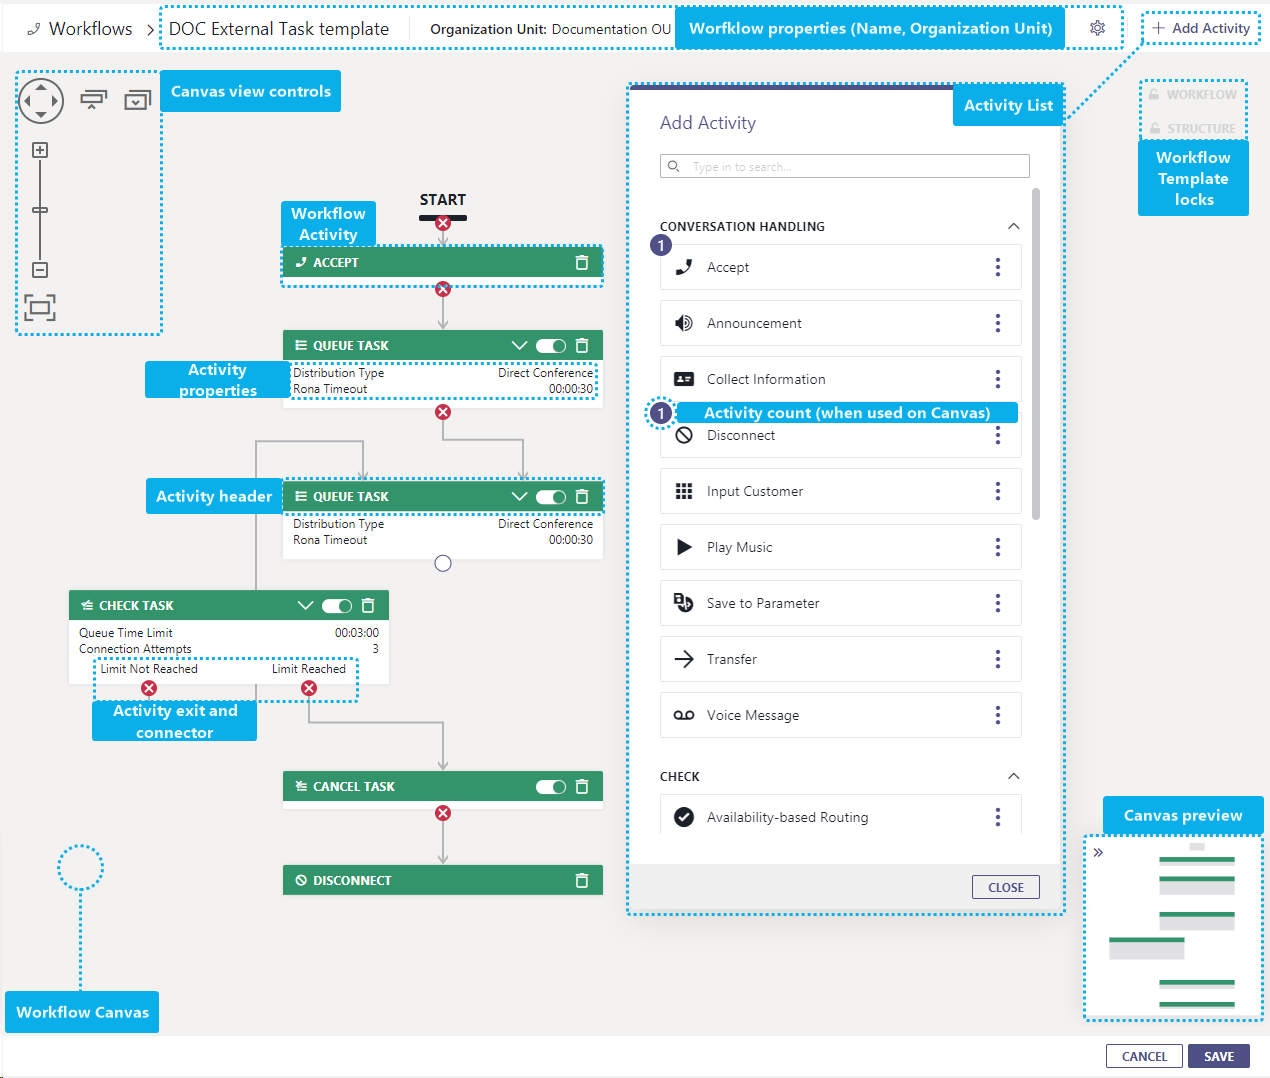
The workflow editor consists of the following UI elements :
| Element | Description |
|---|---|
| Workflow Properties |
Shows the following info:
🔎 Dependencies on Workflow Templates are also indicated in these properties, as well as the lock symbol on the Workflow canvas. 💡 Administrators can adjust these properties via the small “Cog” icon. |
| Workflow Canvas |
The editing area for arranging and connecting your workflow activities.
💡 You can pan the canvas by dragging and using your mouse wheel. 💡 Alternatively you can use the pan and zoom controls located at the top left for fine adjustments. |
| Canvas View Controls | Allows to expand / collapse all workflow activities. Also offers a Navigation, Zoom and “Fit to Screen” options. |
| Workflow Activities list | ✅ Opened when clicking “Add Activities”. Opens a movable pop-up that lists available Workflow Activities.
From here you can:
🔍 Please note: Some activities are Nimbus Features which may require an upgrade to your service license. |
|
Workflow Activity (Name / Header) |
Once dragged onto the Canvas, activities become blocks called Workflow Activities. Each activitiy has a header and one or multiple exits with → Activity connectors that can be connected to other activities.
💡 Some activities can be temporarily disabled via the small toggle on their header. The workflow will just “pass through” them. 🔍 Certain activities have required predecessors and advanced properties to be configured. Refer to our list of Workflow Activities for details. 🔍 If your activities are locked against change your workflow is based on a (locked) Workflow Template. |
| Activity exits and connectors | Activities may have one or several exits and connectors at the end. They are used to connect activities in a logical flow. → Also see chapters below. ✅ Ensure that your first activity (e.g. "Accept Conversation") is ALWAYS connected to the Start node. Otherwise your workflow will not function. 🔍 If your connectors are locked against change your workflow is based on a (locked) Workflow Template. |
| Activity properties | Various toggles, selectors, form fields and other control elements. 🔍 Single properties or the entire activity may appear locked against editing, inherited from the Workflow Template. |
| Canvas Preview | A small unfoldable mini-preview which can be clicked on for fast navigation. Useful to navigate particularly large workflows. |
Handling Workflow Activities
| ➕ Adding Activities | ➖ Removing Activities | ❌ (Dis)connecting Activities |
|---|---|---|
|
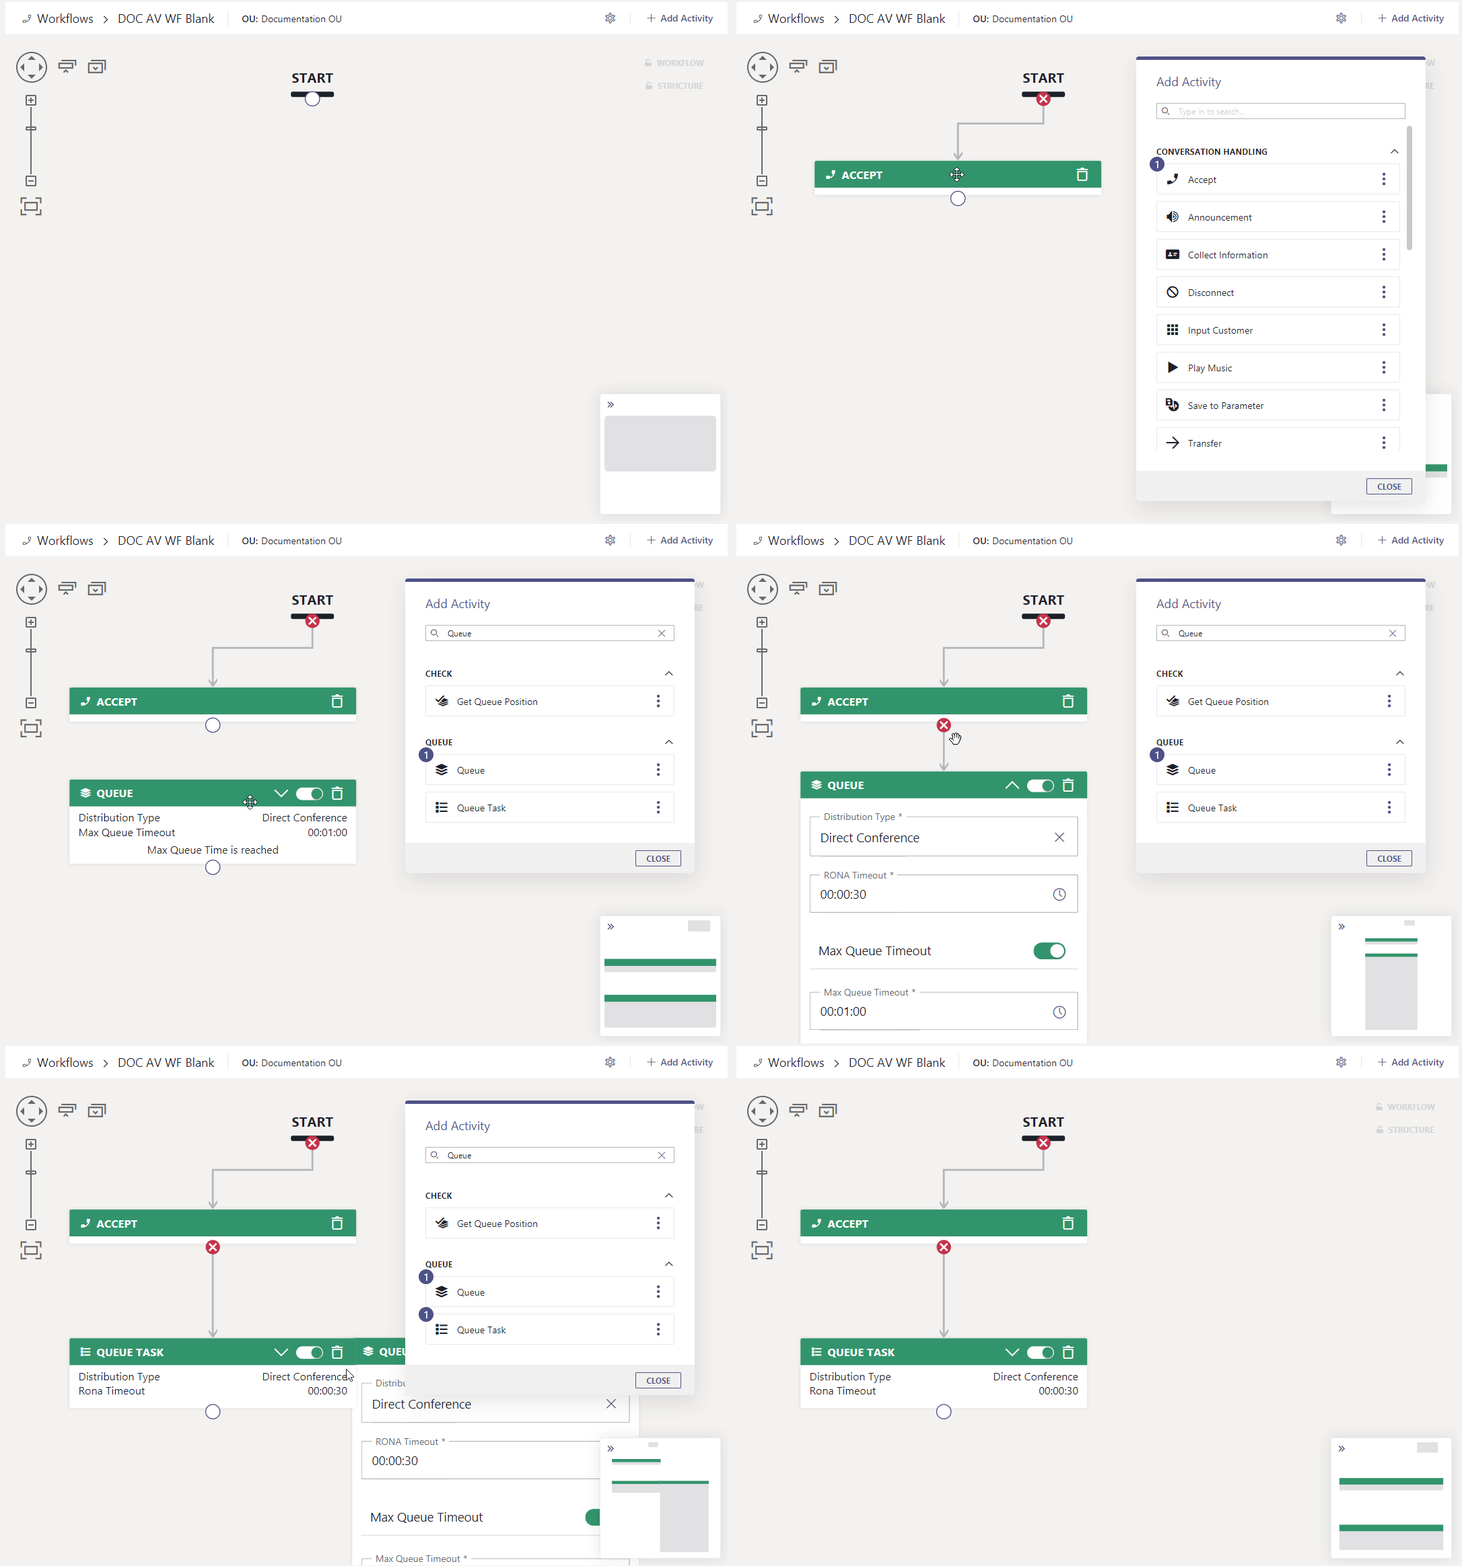
To add an activity, drag and drop it from the list of activities onto the canvas.
⮑ Note how the counter in the activity list increases for that activity you just dragged in. |
To remove any activity, click on its delete button in the header.
☝ Note that any settings made to that activity item are lost upon deletion. 💡 Instead of deleting an activity, you can also disable it temporarily. |
To connect an activity, drag the end connector ⚪ to the next activity.
⮑ A connection (edge) will be created between the activities. To disconnect an activity, click delete ❌ |

RELATED TOPICS
- While editing you might want to refer to the Workflow Activities to get the most out of your workflows.
- You can use Workflow Templates as base for new workflows. Either use System templates or create your own.
- Activities may refer to additional data entities which are managed in the Configuration. Examples of this are Parameters, Playlists and Opening Hours.
BEST PRACTICE
Every workflow activity needs to be connected with at least one node in order for the workflow to be valid. Some activities have multiple exit nodes and may offer options for each node accordingly.
💡 We always recommend handling every ⚪ node so your workflow doesn't cause any dead-end or lost-call situations.
☝ Note that deleting an activity will also remove any connectors to previously connected activities, indicated by ⚪.
💡 Make sure to check and re-establish these connections afterwards so no activity is left open-ended.
Activity Properties / Enable
| ⮟ Accessing Activity Properties | ❍ Disabling an Activity |
|---|---|
|
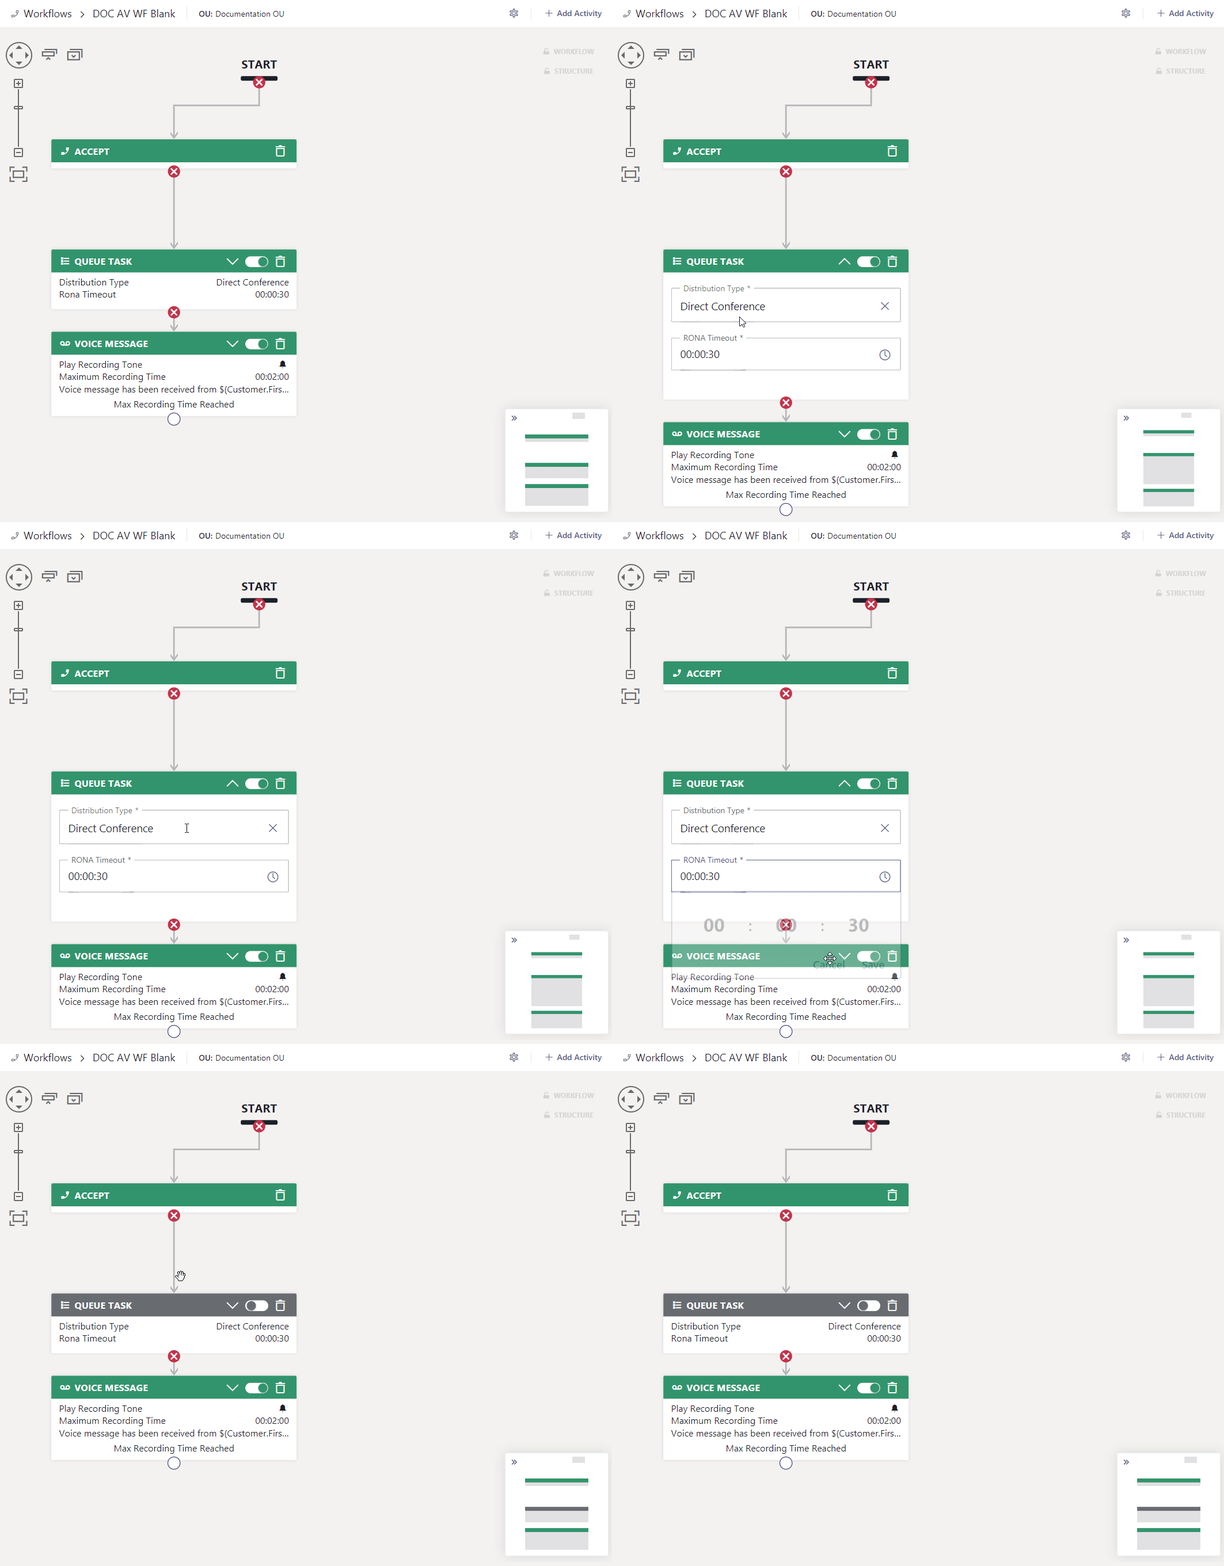
Activities with additional properties have a little caret "v" symbol in the header. Click on on this icon to unfold the activity. ⮑ Additional properties will be shown on the unfolded activity.
💡 Some activities will show the most important properties at all times, regardless if unfolded or not. |
Some activities have a toggle to be completely enabled or disabled. Click on the toggle to temporarily disable the activity. ⮑ Properties remain unchanged
💡 A deactivated activity is skipped as if it “doesn't exist” and the connection passes right through it. On multiple exits usually its default / success exit is taken. |

RELATED CONCEPT: Workflow Templates
Both the activity toggle and its properties may be deactivated / locked via the Workflow Template your workflow is based on.
To change this:
- ... either an administrator needs to edit the template via the Administration > Configuration > Workflows.
- ... or - if your workflow structure is not locked - you can replace the activity yourself, by adding identical activity from the list, which has no locked properties.
☝ Please note: If your activities in your workflow change without your doing, chances are that an administrator has changed the related Workflow Template. If this is undesireable, create a workflow either from scratch or based on a “System Template” which will not inherit structure and properties.