Prerequirements
☝The Nimbus Installation must be completed (and the Nimbus App manifest uploaded) before you can start with Service Provisioning. Otherwise the Nimbus App will not show up for your users.
☝Please note that Service Provisioning is not possible until your Tenant is configured on Luware side. Read the Installation Prerequisites to learn about related concepts such as Required App Permissions and License Management for Nimbus Apps and Services. Note that additional User Permissions will be requested from all onboarded Nimbus users during Service team provisioning and first user login.
✅ Once you are ready, get in touch with your Customer Success contact.
INC Nimbus External Access Requirement
EXTERNAL ACCESS REQUIRED
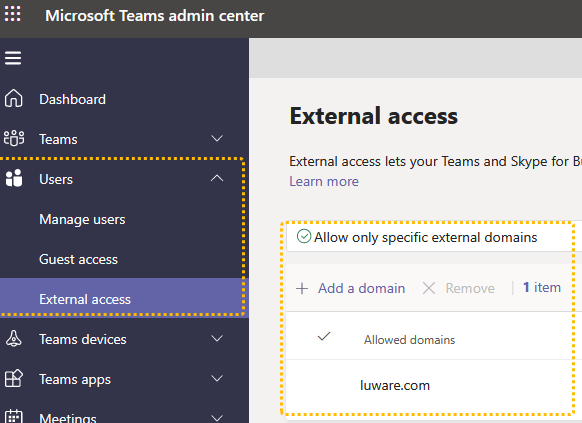
✅ Tenant Admin: You need your tenant to allow external communications with the "luware.com" domain.
Learn more about managing external access
🔍 The necessary configuration steps are described in the Microsoft Teams Documentation: Manage external Access.
✅You will also need to disable the "Enhanced Presence Privacy Mode" policy which prevents visibility of the Teams Presence.
About the "Enhanced Presence Privacy Mode"
The "Enhanced Presence Privacy Mode" is a global configuration which, if enabled, prevents all external organizations from viewing the Teams Presence status of your users via Teams Federation.
If this mode is enabled, Nimbus will see all users as permanently Offline, and thus won't be able to distribute calls to them.
☝ This is a legacy configuration option used in Lync / Skype for Business which is not available anymore in the Microsoft Teams Admin Center. It can only be viewed and configured via PowerShell. As a global setting it applies to all users and cannot be deactivated or bypassed for individual users.
✅ To check whether this is enabled in your tenant by running the following PowerShell command:
Get-CsPrivacyConfiguration | Select EnablePrivacyModeThe command will return "True" if the Enhance Presence Privacy Mode is enabled, or "False" (default value) if it is disabled.
✅ To deactivate it, run the following PowerShell command:
Set-CsPrivacyConfiguration -EnablePrivacyMode $false🤔 Why are these steps necessary? Without being able to read the Teams presence data of your users, Nimbus will consider them as Offline and thus not available for call distribution. They will not be able to receive any inbound calls or place any outbound calls via Nimbus.
Provisioning Steps
✅ Nimbus can be added to any existing Team within MS Teams. If not marked otherwise, all steps below can be done performed either by a Tenant Admin or Team Owner. Administrators may chance this provisioning behavior via Provisioning Tenant Settings.
💡 Licensing: Provisioning a Service according to steps below will automatically apply the Advanced Routing license to your Service the default set of Nimbus Features. Check your License Management to see the available contingency. Contact your Service partner or Luware support if you need any other Service types or discuss your license contingency.
☝Before starting your provisioning, please note:
| TENANT ADMIN: First time Nimbus installation | TEAM OWNER: Existing Nimbus installation |
|---|---|
☝ Make sure you are the FIRST person to provision the first new Nimbus Service on your tenant. Only during the first installation you will be prompted to select a region for all your (future) tenant data. Refer to the Introduction to Nimbus and our Whitepapers in the Documents section for more details on which data gets stored. ☝ After this decision is made, tenant data is stored on the corresponding region. This first selection cannot be changed, as all your future Nimbus Service teams and their call data are automatically stored under that tenant. 💡 We recommend to pick the region mainly for billing (currency) and data-law / compliance reasons. Performance should not be affected by your choice. |
With Nimbus already present on your tenant and at least one Service team existing, future Service Provisioning can be done without having to pick a region again. |
Either Role: Nimbus Services can simply be added to any MS Teams Team as described in the steps below.
Add Nimbus to a Team
-
There are two methods to add Nimbus to a Team:
- Go to the store and search for Nimbus. Locate the Nimbus app and click "Add "
OR - Navigate to the Team itself, click on "Add a Tab" to install Nimbus this way.
- Go to the store and search for Nimbus. Locate the Nimbus app and click "Add "
| Adding Nimbus via the App store | Adding Nimbus to a tab in MS Teams |
|---|---|
 |
 |
💡Good to know:
- You might be requested to log-into your O365 account to confirm the installation.
- If a Nimbus Service already existed for a team, the previous tab will be restored.
-
Select the team you want to add Nimbus to:
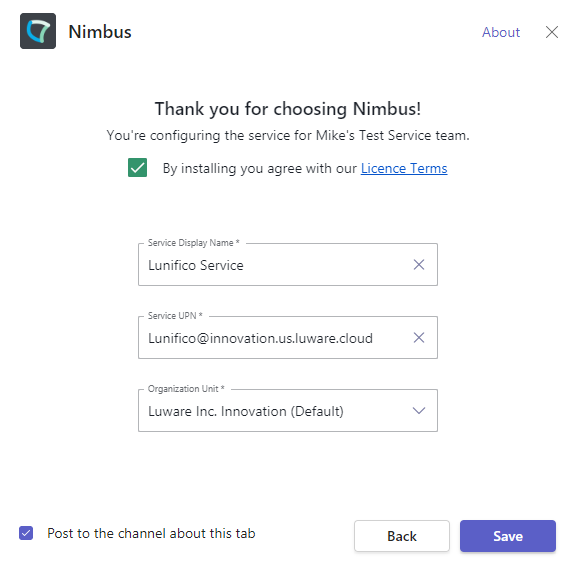
- Read and confirm the License Terms.
- Change or keep the "Service Name" (default = team name) and "UPN", then confirm. 💡 These details can be changed later via General Service Settings
-
Select an Organization Unit (OU) for your new Service.
🤔 What is this? The OU determines placement and visibility of the new Service, its users and related Configuration resources. 💡 This can be changed later via General Service Settings.
💡 When uncertain what to select here, leave this setting at its default.
💡 Note that this field may be disabled or hidden depending on your logged-in user rights.
⮑ At this point Nimbus is now being installed and a Nimbus-Tab will appear within the team channel:
- All team members will be able to see the Nimbus tab and can access Nimbus Features.
- Note that the Service UPN is defined but cannot yet be called yet. (→ A script provisioning script run is required as described below)
- Existing MS Teams roles (owner and member) are included as Nimbus users. More on this in Role Access Concept.
- Calls from outside your tenant can't be made just yet. This requires a PSTN license assignment.
✅ Further settings are required, e.g. to assign a PSTN → Continue with the next step which will venture into the newly created team's Service Settings.
Grant Consent
TENANT ADMIN (recommended step): Nimbus will ask each (new) user for Required User Permissions. As a Tenant Admin you can give this consent once so users are not required to do this individually.
- Open the User Preferences (Portal)
- Under "Admin Permissions" review and grant all required permissions. → The status changes to a Checkmark ✅.
🤔 Why is this required and what happens if these rights are not granted? Nimbus will only support basic MS Teams functionality. Read Required User Permissions for further details.
Configure Service Details
Now it's time for some last adjustments to get the team publicly registered in Microsoft Azure (Cloud) and assign and – if required – add an externally reachable PSTN.
✅ Precondition: Nimbus must have already been added to a team → The Nimbus tab is visible. This step should be done in conjunction with the (future) Service Team Owner and the Tenant Admin on standby.
- When opening Nimbus via the Tab for the first time you are required to log in. Afterwards you will be presented with a screen like the following:

- Go to the Service Settings > "General" Tab
-
Double-Check Service Display Name and SIP-address and adapt them as needed.
💡 If you are hybrid, use the online-only namespace such as lunifico.microsoft.com to make it simpler. - Optionally you can also assign an external PSTN / E.164 number for your Nimbus team. This requires additional licenses distributed by Microsoft. (Learn more → Refer to "Microsoft 365 Phone System - Virtual User")
- Confirm your changes with "SAVE & APPLY".
Script run to apply Service Changes
✅ Note that future changes on any Service will always require another Script Run.
Pushing Tenant Updates via Script
Major technical changes on a tenant-level or within service settings may require a re-execution of a downloadable Microsoft PowerShell script, using tenant admin privileges. The script will push those changes to Azure, and updates should be reflected within minutes.

Nimbus Provisioning Script URLs
🔎Note: You can also retrieve the provisioning script directly from your User Preferences (Nimbus Admin Portal).
Recommended next steps
Test Call
Team Owner: Start a Test Call (button also available within General Service Settings) to see if the bot is taking calls and routing them towards your new (Service) team. Read the next steps below to configure your new Service.

☝Note that test calls are made to the UPN of the Service. For PSTN calls you need to test with manually dialing from a user with an according PSTN license or using your cell phone.
🔍Test calls are treated like any other call and are counted towards the Reporting metric. They should be reflected in Nimbus Service reporting tabs accordingly.
Learn how to access Nimbus
- Familiarize yourself with the Role Access Concept system of Nimbus. Nimbus distinguishes access by users in either Admin Roles and Portal Roles. Of course the same users can act in multiple roles.
- Test the Login to the Nimbus Portal and Admin either in the Teams App or a separate browser window. URLs are shown below:
Frontend (Portal) URLs |
Admin Panel URLs |
||||||||||||||||||||||||||||||||
|---|---|---|---|---|---|---|---|---|---|---|---|---|---|---|---|---|---|---|---|---|---|---|---|---|---|---|---|---|---|---|---|---|---|
|
Portal Roles are for daily “Users” of Nimbus. Nimbus Portal URLs
✅ Make sure to configure your web proxies to allow access to these domains or whitelist the complete |
Admin Roles are for Tenant Admins or delegated Admins. Nimbus Admin URLs
✅ Make sure to configure your web proxies to allow access to these domains or whitelist the complete |
Customize Nimbus to your liking
Start customizing Nimbus to your liking:
- Once basic setup is complete you can start the Configuration of your Service, e.g. start to adjust Service Settings, Workflows, Opening Hours.
- As a great starter we recommend Use Case - Creating a Call Workflow. Check out our Use Cases category for further inspiration.
- We recommended adding more Nimbus users to your new Service team to verify any changes in live call scenario.
- Instruct users to access their User Preferences (Portal) to their personal liking.
- Once you are familiar with your first Service, learn more about the other Service types. Our Administration Use Cases will give you step-by-step instructions on setting up advanced Nimbus Features and Apps.