User preferences allows you to configure settings that refer to your user account only.
💡 User Preferences are structured into tabs, explained in the following:
General
Here you have the following options:
-
Log out of Nimbus in case you want to sign in with a different user.
💡 Note that the Logout is not visible for users in Nimbus Personal App as it uses your MS Teams account credentials for Single-Sign-On. -
Change your personal UI display language1 and date format. You can pick from:
- Dansk (Danish)
- German (Deutsch)
- English (Selected as default and fallback in case of missing translations, System Language for Nimbus)
- Español (Spanish)
- Français (French)
- Italiano (Italian)
- Nederlands (Dutch)
- Change your date format1 (according to the country-specific languages above).
- Change your default theme setting (light, dark, synced with your browser)
💡1 Date format and language settings affects only your personal Nimbus Portal UI experience, not the data stored in the Nimbus Reporting Model, which will always remain in the default English (US) format.
SSO Experience
When you are running the Nimbus Personal App within MS Teams - or opening an Nimbus Teams Tab - your login credentials may be re-used to also sign you into Nimbus.
💡 In this case: A one-time consent window may appear, informing that the Nimbus App will use your MS Teams credentials for login. The "Sign in with Microsoft" button directly signs you into Nimbus (without asking for credentials), or may not appear at all.
💡 Note: that session tokens can still expire, requiring you to re-authenticate regularly. A "Logout" button will not be shown, as your Nimbus login is directly tied to your MS-Teams user.
🤔Sign-In Problems? Ask you administrator to Upload the lastest Nimbus App Manifest.
🤔Sign-In suddenly not possible anymore or stuck in a loop? Your Browser cookie policy restrictions may prevent a clean login. Try clearing your browser cache and cookies first, then retry. If this does not work, adjust your browser settings via the steps below or ask your administrator to do so.
Third-party cookie restriction workaround
INC Third-Party Cookie Restriction Workaround
☝ Note of third-party cookie restriction: In 2024 Google Chrome started restricting third-party cookies “by default for 1% of Chrome users to facilitate testing, and then plans to ramp up to 100% of users in H2 2024.” Other browser vendors are likely to follow suit with similar policies.
✅For Tenant Administrators: Most Enterprise users should be excluded from the 1% experiment group. However, Luware recommends that admins proactively use the BlockThirdPartyCookies and CookiesAllowedForUrls policies in Chrome to avoid sign-in issues, as described in this MS “Teams doesn't load” help article reference.
Add the following sites to the third party cookie exception list:
[*.]microsoft.com
[*.]microsoftonline.com
[*.]teams.skype.com
[*.]teams.microsoft.com
[*.]sfbassets.com
[*.]skypeforbusiness.com
[*.]luware.cloud🤔 What are the risk scenarios?
Not following the recommendations by Google involves a risk that Nimbus stops working in Chrome (or other default browsers) when the Nimbus App is launched embedded via MS Teams.
- MS Teams client in your browser: A likely cookie-related risk scenario occurs as you launch launch the Nimbus App or Nimbus Teams Tabs. This triggers a user authentication using 3rd party cookies.
- MS Teams standalone client: Microsoft claims that Nimbus should continue working in the client. Furthermore, Nimbus standalone tab will open and work when "Open app in browser tab" link is used.
To avoid either scenario, we recommend whitelisting cookie-exceptions in your browsers so that Teams can continue continue working with Nimbus. To allow (whitelist) specific URLs in your browser, refer to the steps described in this MS “Teams doesn't load” help article reference.
🤔 What are the effects/problems?
We identified the following issues in regards to cookie-related authentication:
- Warning at startup - A warning message is shown every time when the user start Nimbus in Teams. It seems it's a general error in case of the third party cookies are blocked.
- Authentication popup issue - Returns a Cancelled By User error even if the authentication was not cancelled by user.
Notifications
User Notifications
By default, Nimbus does only notify on incoming Audio/Video calls, as this can be associated with the “ringing” call event in MS Teams. However, on certain channels of communication (such as the External Task, Email, or Instant Messaging modality) there is no call event in MS Teams to notify the user about. Nimbus therefore offers an audio and browser notification feature that can be toggled on via your individual user preferences.
💡 Good to know: With Assistant App installed on your PC, a pop-up window will already be presented on your desktop during any incoming service task (external or other). In this case, you may not need the extra notification features listed below.
✅GENERAL PRECONDITIONS
- Feature visibility: Notification settings for modalities described on this page are only shown when External Task, Email, or Instant Messaging modality is enabled for the user in General User Settings.
- Licensing: Please note that additional modalities are subject to License Management. It may also be that certain modalities are disabled on your entire tenant, so that the according settings may not be shown for your user account
Audio Notifications
✅ Audio Notification Preconditions
Every user that requires the audio signal needs to have their browsers configured for audio notification playback
How to configure audio in browsers...
INC Audio playback limitation
☝ Audio playback limitation in modern browsers: Chrome (and other browsers) prevent automatic audio playback, only allowing media playback if:
- The media is muted, or …
- The user has interacted with the domain (click, tap, etc.), or…
- .. the domain / app was previously whitelisted in the browser settings.
🤔How does this affect Nimbus? Any kind of signalization (threshold warnings, toasts, notifications) will not play on newly opened or reloaded tab that has not been interacted with. For example, when first-time loading a Personal Dashboards or Non-Personal Dashboards – or force-refreshing any Nimbus UI such as My Sessions with CTRL+F5 – you need to click on it at least once for audio to playback to start.
✅Allow sound playback in your browser
- In Navigate to your Browser Settings > Privacy and Security > Site Settings > Sound.
- Alternatively, enter the following URL into your browser's address bar:
chrome://settings/content/sound - Add an entry to the "Allowed to play sound" section. with the following content:
[*.]nimbus.cloud - Ensure that "Sites can play sound" is also enabled.

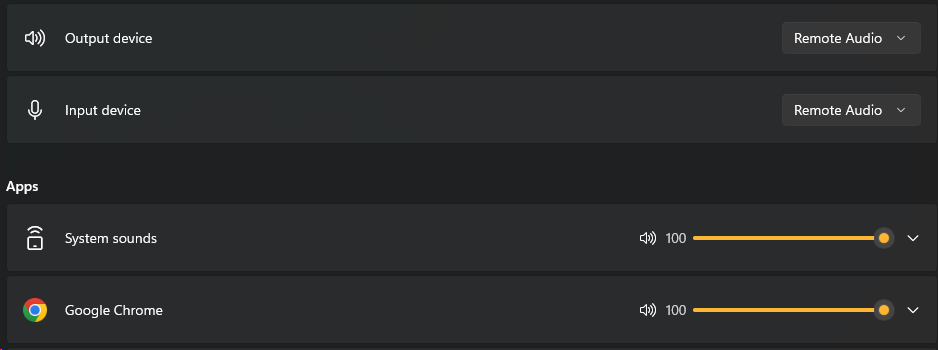
🤔Sound still not playing? Check your volume levels:
- Right-click your speaker tray icon
- Select "Open Volume Mixer"
- Ensure that your main volume levels, output device and browser volume are correctly set.
Configurable Properties
| External Task |
⮑ When enabled: Nimbus plays an audio notification via your Browser or MS Teams for as long as the task has the "incoming" status. The audio file will be looped until the task is accepted or rejected. ✅ Additional Preconditions:
|
||||
| Instant Messaging | |||||
| Pickup |
Pickup notifications enable Nimbus users to reliably notice when a new pickup task enters a service queue by providing an audio signal, regardless of which Nimbus interface they are using. ✅ Additional Preconditions:
⮑ When enabled: The sound loops while at least one “Pickup” is waiting. It stops automatically as soon as the queue clears (or the call is taken, expires, or is no longer one you can act on).
|
Browser Notifications
✅ Browser Notification Preconditions
- Nimbus Portal needs to be open in your Edge/Chrome browser in order to play the audio notification.
- Ensure that settings for both your browser and MS Windows allow notifications.
Show me where to configure this...
✅ Allow browser notifications in Nimbus
- Go to Portal > User Preferences > Notifications.
- In section Browser Notifications, toggle on the modalities you would like to get browser notifications for.
- Save your settings.
✅ Enable notifications in Windows 11
- Click on Start and search for "Notifications". Alternatively you navigate via Start > Settings > System > Notifications.
- Ensure that "Notifications" are toggled “On” for all apps that you use in conjunction with Nimbus (e.g. Chrome, Teams).
 |
☝️ Note: Keep in mind that Windows 11 "Do not Disturb" mode can also prevent Notifications from being shown.  |
✅ Allow notifications in your browser
💡This example is shown in Google Chrome.
- Open "Settings" and search for "Notifications" - shown below is an example for Google Chrome:
- Ensure that “Sites can ask to send notifications” is enabled.
💡You might be requested to “allow” Nimbus when the first notification is being sent.
💡If you do not want to whitelist all sites in general for notifications, you can whitelist[*.]nimbus.cloud

Configurable Properties
| External Task |
⮑ When enabled:
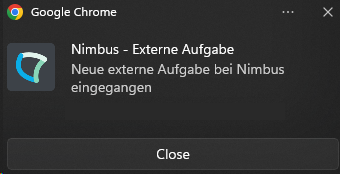 (💡Example in German as per System Language settings) |
| Instant Messaging | |
| Pickup |
🔎Note: Prerequisites and criteria for “Pickup” notifications are the same as for “Pickup call” Audio notifications above. ⮑ When enabled:
|
Permissions
Here you can manage permissions depending on the role of your logged-in user account:
- As User - Review your personal permissions granted to Nimbus in order to perform basic user searches (calendar, presence, contacts)
- As Admin - Review tenant wide permissions needed to unlock advanced search features (e.g. user details, filtering)
Required User Permissions
Affects all Nimbus Users: Please read carefully
Nimbus call distribution and search functionality greatly depends on the permissions granted by individual user.
When logging into Nimbus for the first time, your User Icon in the Nimbus Portal will display a warning to inform that permission consent is required.
🔍The individual sections of this page are explained in further detail below.
Section: User Permissions
Nimbus Users: These permissions are managed and granted only by and for your currently logged-in user.
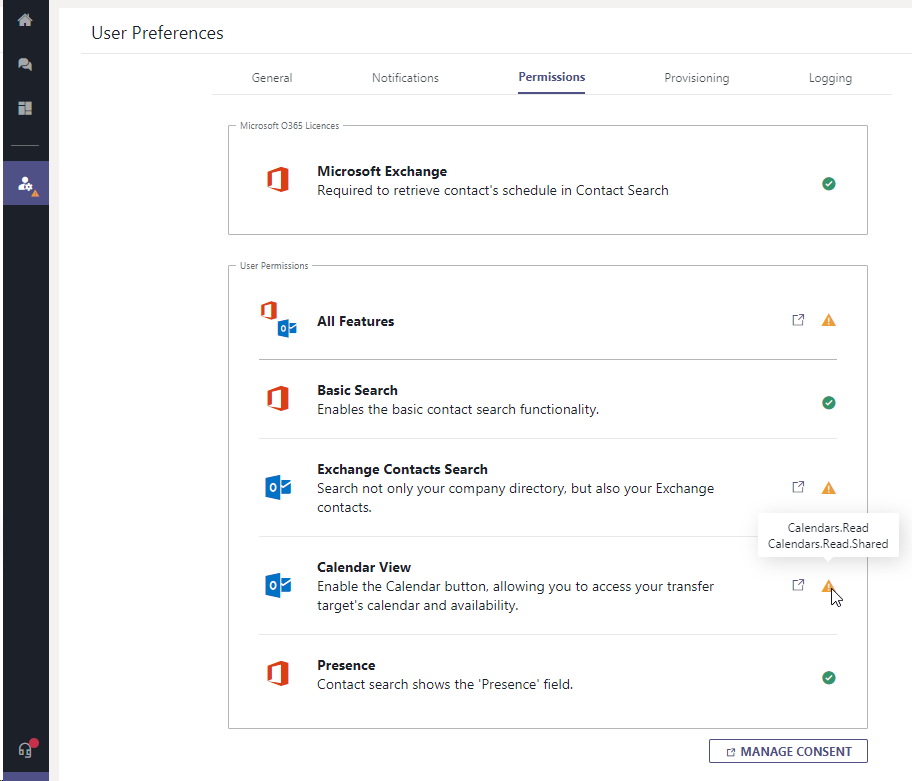
Missing Permission Warning
When your user is missing permissions (usually when Nimbus was just provisioned or new features were added), a warning is shown on your user icon.
🤔 What are the individual permissions needed for?
Features marked with "☝" in the table below are required for any productive work with Nimbus - otherwise the Call Handling features and Apps like Attendant Console will not work properly.
💡 You can also mouse over the individual entries to check which detail permissions are granted.
💡A separate consent request is prominently shown in the Contact Search of Attendant Console upon opening for the first time.
| Feature | Required Permission | Effects |
| ☝ Basic Search | User.Read User.ReadBasic.All |
Basic search for users via their clear name. |
| ☝ Exchange Contacts Search | Contacts.Read Contacts.Read.Shared |
Expands the search to the current user's Exchange Directory. |
| ☝ Calendar View | Calendars.Read, Calendars.Read.Shared |
Will grant calendar view permissions. |
| Presence | Presence.Read.All | Shows a small presence status indicator next to the user. |
🤔 What happens if I don't grant these permissions ?
Without consent, Nimbus cannot search users within your Tenant and/or check calendar entries of your contacts to determine user availability to distribute calls.
Nimbus still works without giving these permissions, but is limited to your basic Microsoft Teams client functionality: Call Accept and On-Hold. Your user may review Reporting details but not interact with services in a productive way. More advanced Nimbus Apps and Features such as Attendant Console or Chat bot interaction will only work with these permissions.
🤔 My Permissions show as already granted, why?
A global Administrator on your Tenant can already grant most permissions on your behalf. If this has been done, no warnings and related further action may be required anymore. Also, please note:
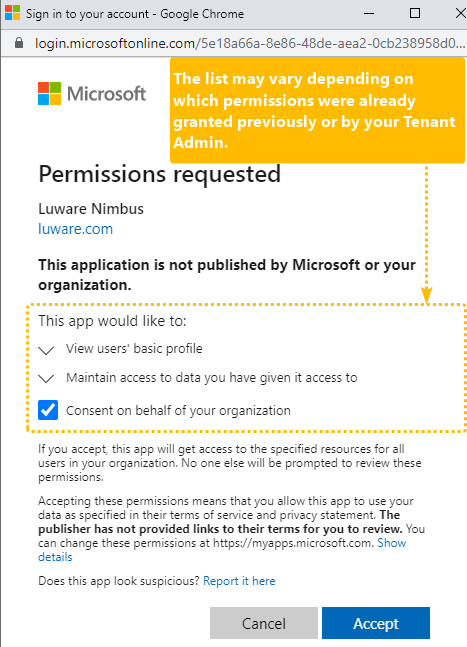
- You can either grant single permissions or all at once by clicking Consent on the "All Features" row. → A popup will open to inform you about the required permissions.
- Any related Nimbus features requiring the same permissions will also be checked off as "OK" as their permission needs are fulfilled.
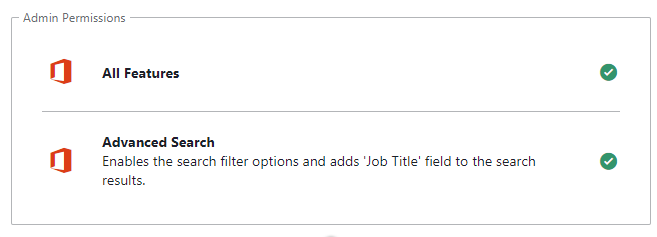
Section: Admin Permissions
These permissions can be managed and granted by any tenant administrator - either as single permissions or all at once.
When your currently logged-in user has Service Administration rights you can see the following section:
Permission Grant Links for Azure Administrators
Since Nimbus cannot detect if you are also a Global Tenant Administrator, this section also shows field to copy the URL.
Procedure:
- If you are the Tenant Admin, simply paste the URL to your browser and grant the permissions.
- If you are not the Tenant Admin, send the link to any Tenant Administrator to grant consent for all Nimbus users.
→ In either case an Azure permissions dialog opens, allowing to grant consent. This needs to be done only once by any tenant administrator with the corresponding rights. Afterwards the permissions should be granted to all future users of Nimbus.
💡 Each user needs to to log out and back in for tenant-wide changes to take effect.
| Feature | Required Permission | Effects |
| Advanced Search | User.Read.All |
Basic search for users via name works without consent. Advanced Search will grant filtering permissions according to predefined search categories / fields (e.g. city, department, job title) |
🤔 Which fields are covered by these advanced search permissions?
INC Supported User Search Fields
Supported fields / filters for Attendant Console 2.0 (AC2)
Attendant Console 2.0 (AC2) supported search fields and filters tables:
INC Supported Search Fields and Filters (AC2.0)
Free Text Search
Prerequisites: The full search functionality only applies if permissions are granted. See Attendant Console - Permissions.
Legend
✅Fields are supported by Free Text Search
❗Limited by "starts with" logic
☝️Needs at least 3 characters to start searching
| Search within | "All" Tab |
Configured Groups |
||||
|---|---|---|---|---|---|---|
Fields |
O365 Directory |
Outlook Address Book |
Nimbus Address Books |
Nimbus Services |
Nimbus Address Books |
All Sources |
Display Name |
✅❗☝️ |
✅❗☝️ |
✅☝️ |
✅☝️ |
✅ |
✅ |
Contact Details |
✅❗☝️ |
✅❗☝️ |
✅☝️ |
✅☝️ |
✅ |
✅ |
Note |
✅☝️ |
✅ |
✅ |
|||
| First Name | ✅☝️ |
✅ |
||||
| Last Name | ✅☝️ |
✅ |
||||
| UPN (User Principal Name) | ✅☝️ |
✅ |
||||
✅☝️ |
✅ |
|||||
| IM Address | ✅☝️ |
✅ |
||||
| Business Phone | ✅☝️ |
✅ |
||||
| Mobile Phone | ✅☝️ |
✅ |
||||
| Home Phone | ✅☝️ |
✅ |
||||
| Company | ✅☝️ |
✅ |
||||
| Department | ✅☝️ |
✅ |
||||
| Job Title | ✅☝️ |
✅ |
||||
| Country | ✅☝️ |
✅ |
||||
| State | ✅☝️ |
✅ |
||||
| City | ✅☝️ |
✅ |
||||
| Postal Code | ✅☝️ |
✅ |
||||
| Street Address | ✅☝️ |
✅ |
||||
| External Custom Field 1-10 | ✅☝️ |
✅ |
||||
Filters
Note: Filters only work if this field is actually used for the contact.
| Search within | "All" Tab |
Configured Groups |
|||
|---|---|---|---|---|---|
Fields |
O365 Directory |
Outlook Address Book |
Nimbus Address Books |
Nimbus Services | All Sources |
City |
✅❗ |
✅ |
✅❗ |
✅ |
|
Company |
✅❗ |
✅ |
✅ |
||
Country |
✅❗ |
✅ |
✅❗ |
✅ |
|
Department |
✅❗ |
✅❗ |
✅ |
✅❗ |
✅ |
Initials |
✅ |
✅ |
|||
Job Title |
✅❗ |
✅❗ |
✅ |
✅❗ |
✅ |
Postal Code |
✅❗ |
✅ |
✅❗ |
✅ |
|
State |
✅❗ |
✅ |
✅❗ |
✅ |
|
Street Address |
✅❗ |
✅ |
✅❗ |
✅ |
|
Note |
✅ |
✅ |
✅ |
✅ |
✅ |
Section: Bot Registration
Each Nimbus user that needs to handle Instant Messages from external customers needs to "register" once with a bot that will be sending out Chat Handling sessions.
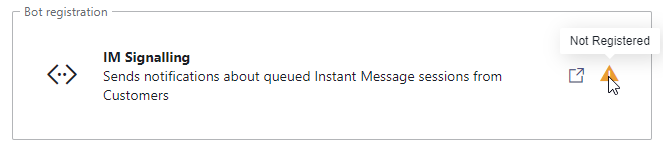
🤔 Why is this required? The bot needs to act as "mediator" between external customer and internal Nimbus user. As there is no call toast or ring notification, the bot will use Adaptive Cards as primary means of checking if a user is ready to accept a pending chat session.
💡 Good to know: If you are not handling Chat or the Instant Messaging modality from either services directly via Interact you do not need to register with the bot.
Manage / Revoke Consent
In case you decide to Uninstall Nimbus or do not participate in any Nimbus service anymore, you can revoke the consent manually in your User Settings:
- This link will open your Office Portal
- Head to App-Permissions menu → Opens in a new browser.
- Identify the Luware Inc. Apps product (e.g. Nimbus) therein and revoke the permissions.
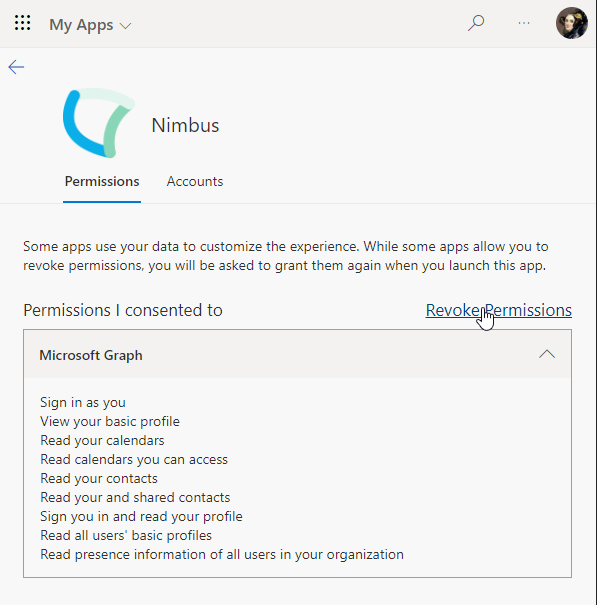
💡 Note: Certain app permissions may not be revokeable because the Tenant Administrator gave his consent, overriding your individual user settings.
Provisioning
Here you can download the latest Microsoft PowerShell script. The script is required to Provision new services and confirm technical Service Settings changes made to existing services, such as applying or removing PSTN licenses. 💡 An outdated script will version-check and require you to update to the latest version if necessary.
💡 If you know your Nimbus cluster location you can use the links below:
Nimbus Provisioning Script URLs
🔎Note: You can also retrieve the provisioning script directly from your User Preferences (Nimbus Admin Portal).
Logging
Allows to enable anonymized logging features for technical analysis provide them as download for technical support.
Logging and Performance
☝ Logging settings are by default disabled for performance reasons and may not be shown for your user at all. Please note the special behavior of these toggles:
- Logging will remain ON as long as you stay on the tab.
- Logging will remain ON as you logout and back in again.
- Logging will will turn OFF as you close the Nimbus tab and open a new one.
✅ If requested by your support, please enable this setting to capture logs during issue reproduction steps, then disable the setting again.
| SignalR Logging |
Logs information in regards to the SignalR library which tracks presence UI status changes and asynchronous notifications. |
|---|---|
| MSAL Logging |
Logs information in regards to the Microsoft Authentication Library which controls user authentication and access. More info: https://learn.microsoft.com/en-us/entra/msal/dotnet/advanced/exceptions/msal-logging |
| Attendant Console Logging | Logs for SignalR processing of delivered data and related http updates shown on screen via Attendant Console. |
Captured Logs
Captured logs are anonymized and created every hour. They contain:
- Connect-/Disconnect time - with timestamps.
- Reconnection attempts - with timestamps.
- Any unhandled errors (exceptions).
✅ Saved logs remain available in your user preferences for download until manually deleted. If requested by support, please download the logs and provide them as attachment to either support tickets or via mail.
INC Luware Support Address
| Luware Website | https://luware.com/support/ |
|---|---|
| Luware Helpdesk | https://helpdesk.luware.cloud |
| Cloud Service Status | https://status.luware.com/ |