INC Use Case Support Disclaimer
LIMITED SUPPORT ON Use Case SCENARIOS
Use Cases are intended to serve as examples of capabilities of Nimbus. Luware only provides limited support for these Use Cases. Restrictions on being up-to-date in their contents apply.
🤔 On which topics can I get support on?
Luware provides support only for its product's inherent capabilities and features. This includes:
- Troubleshooting on the Nimbus Power Automate Connector, its related Trigger Events and Flow Actions.
- Troubleshooting on retrieval/integration of Nimbus System Fields and Parameters.
- Inquiries on improvements and requests for Nimbus Features.
- Any Feedback on our existing documentation (e.g. page corrections and timely update requests).
🤔 What does this mean for 3rd party products?
Luware does not provide support on, nor guarantee the executability of 3rd-party product Use Cases in your environment.
- Use Cases were created within specific versions of 3rd party products (e.g. Salesforce, Zendesk, or other business applications). Your personal version or licensing type of these 3rd party products may differ or change over time. This may result in limited or missing functionality.
- Our support cannot guarantee that the example scenarios will work in every (future) customer scenario. Please consult your 3rd party manufacturer to determine whether your product version supports the functions and interfaces mentioned in the Use Cases.
- Luware and Nimbus Support does not cover integration setup and administrative scenarios with any external systems mentioned in the documentation (e.g. Salesforce, Zendesk, Microsoft Dynamics, and other 3rd party manufacturers).
For the reasons above:
✅ Please ensure that you run your own internal testing before rolling out any large-scale integration into productive systems.
✅ If you need further support for your Nimbus integration, please reach out to your Account Manager or Customer Success Specialist.
🤔 What about AI model service integrations?
While Nimbus offers built-in AI capabilities, leveraging external AI services through integrations can be beneficial, but also introduce errors and intransparent system behavior, as AI outputs are non-deterministic by nature.
You may want to implement additional AI Use Cases IF:
- …you want to use your existing AI models you've already paid for.
- …you want to unlock a wider range of Use Cases.
- …you are aware that the underlying models can lead to changes in response quality.
☝Many AI capabilities are still based on frequently changing models and beta functionality. For these reasons only limited support is available.
So you've read the Nimbus Features matrix and decided to start a Contact Center service? In this article we guide you through the process step by step.
PRECONDITIONS
- A Luware or partner administrator is needed to upgrade your service license. Make sure to get in touch ahead of time for a smooth transition.
- You require tenant administrator rights to create and update service settings after the Contact Center features are enabled.
- In order to make use of skill-based routing, your user directory needs to be connected to Nimbus in order to search and assign skills to your users. The user directory should already be connected with your first Service Provisioning, so that no further actions are required when you add a new Contact Center service.
🔍 Good to know: Nimbus only reads from your user directory and associates its internal skill-assignments for later call distribution - based on those skillsets you define. Your company user directory will not require updates or additional fields.
Creating a New Service
- Go to Service Administration.
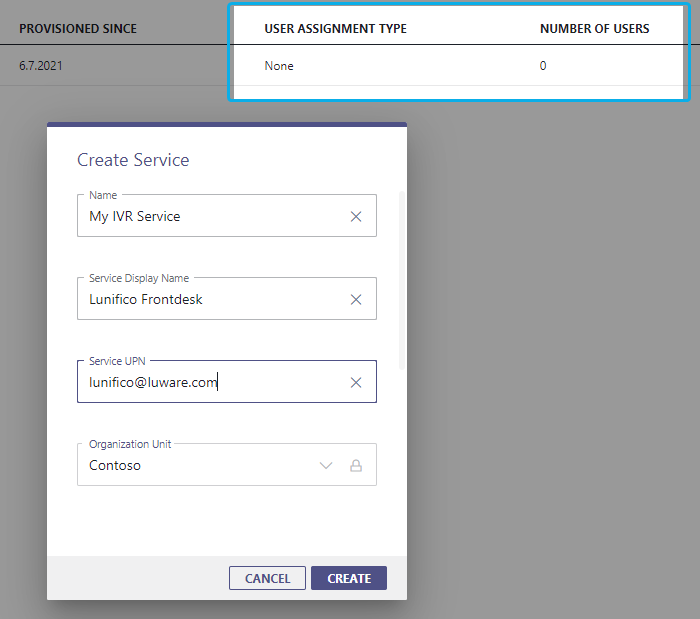
- Click Create Service.
🔍 Note that this service is of "User Assignment Type: None" with 0 users. You will need to assign skill-based Contact Center users manually in a later step.
Applying the Contact Center License
- Now get in contact with Luware or your partner admin and request a Contact Center license to be applied to your new service.
- Via the Service Administration, your partner admin or a Luware technician will apply the Contact Center license to your new service.
→ This will enable related Nimbus Features in your Service Settings.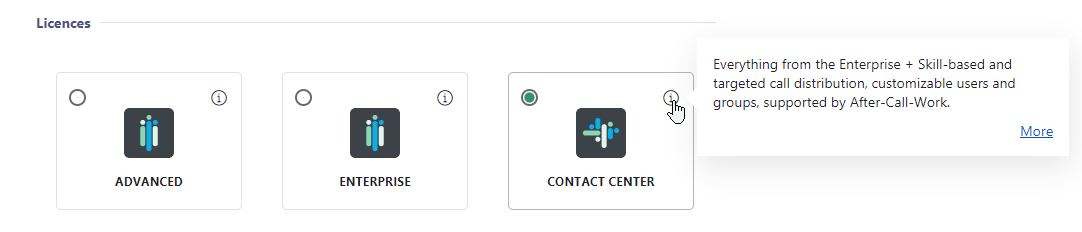
- Now it's time to select the users that are available for skill-based distribution in your Contact Center services. Via the User Administration, your partner admin or a Luware technician will apply the Contact Center license to the user(s).
PREPARATION
Make sure to have a list of user names and services readily at hand for your partner admin or Luware technician. While we perform those administrative tasks, you can already start with the next step.
🤔 Why is this step necessary?
Both Users and Services need to be prepared for Contact Center skill-based distribution. This distinguishes them from any existing (e.g. Teams-based, IVR) services and users therein. Users of an existing team can act as both part of a "Teams" service as well as Contact Center users.
→ Enabling the Contact Center option unlocks Skills and Responsibilities alongside with other Service Settings covered in the next step.
→ You should also have a list of "Service Owners" and "Service Agents" available. Service Owners have access to settings and reporting metrics while Agents don't. More info on this can be found on Role Access Concept.
SKILL-BASED DISTRIBUTION EXPLAINED
In the next steps we will set up skill-based call distribution. If you're unfamiliar with the concept you can learn more below. Otherwise you can skip directly to the next step.
Show more about skill-based distribution
Skills and Responsibilities, same as any configuration entity, can be defined as shared sets across your users. Of course, each user's skill level or responsibility can be different per service and time of day, which is why each user has their own Skills User Settings and Responsibility Profiles to assign.
Distribution Policies allow services to select users according to their skills and responsibility. These are also configured individually as per Distribution Service Settings.
To achieve skill-based distribution and policies, we need to do the following steps:
- Create Skill Categories - Your users need to be defined for targeted call distribution. As you define Skills and Responsibilities, you freely define these criteria of selection first, e.g. a specific language or product proficiency.
- Assign Skills and Responsibility to users - this must be done for each of your Contact Center users individually.
- Create Distribution Policies - Multiple levels of distribution can be part of a policy. Think of a filter that escalates the levels during an incoming call, based on your skill and responsibility criteria.
- Apply the Policy to your Services - Lastly, in order to take effect in call routing, a policy needs to be assigned to a Contact Center licensed Service type.
🤔 This sounds complex. Is there an example? Yes, we've prepared a concept page that explains the Distribution Order algorithm behind Nimbus in more detail.
Click to learn more...
Click on the tabs to learn more.
Skills/Responsibilities
✅ The first step before using skill and responsibility based-routing should always be a look at your organizational structure. Ask: what kind of expertise is important when handling incoming calls? How should our users (agents) be categorized accordingly? Then go ahead and do the following:
- Define Skill Categories - such as "Language Skills" or "Product Expertise". You may also define soft skills or adjectives without levels such as "First Responder".
- Optionally define Skill Levels according to your chosen category. This allows for escalation levels so you can require certain skills or widen the user pool by gradually lowering skill requirements of long-waiting calls.
- Optionally define Responsibilities to apply to any category of skills. Responsibility levels can be used to distinguish skill importance, e.g. based on the time of day, workload, out-of-office status or for "high-demand" situations where users with certain skills are more responsible than others.
- Optionally define Responsibility Profiles for your users to select from. A profile automatically groups skills and responsibility levels together and lets you define corresponding levels for each profile and user.
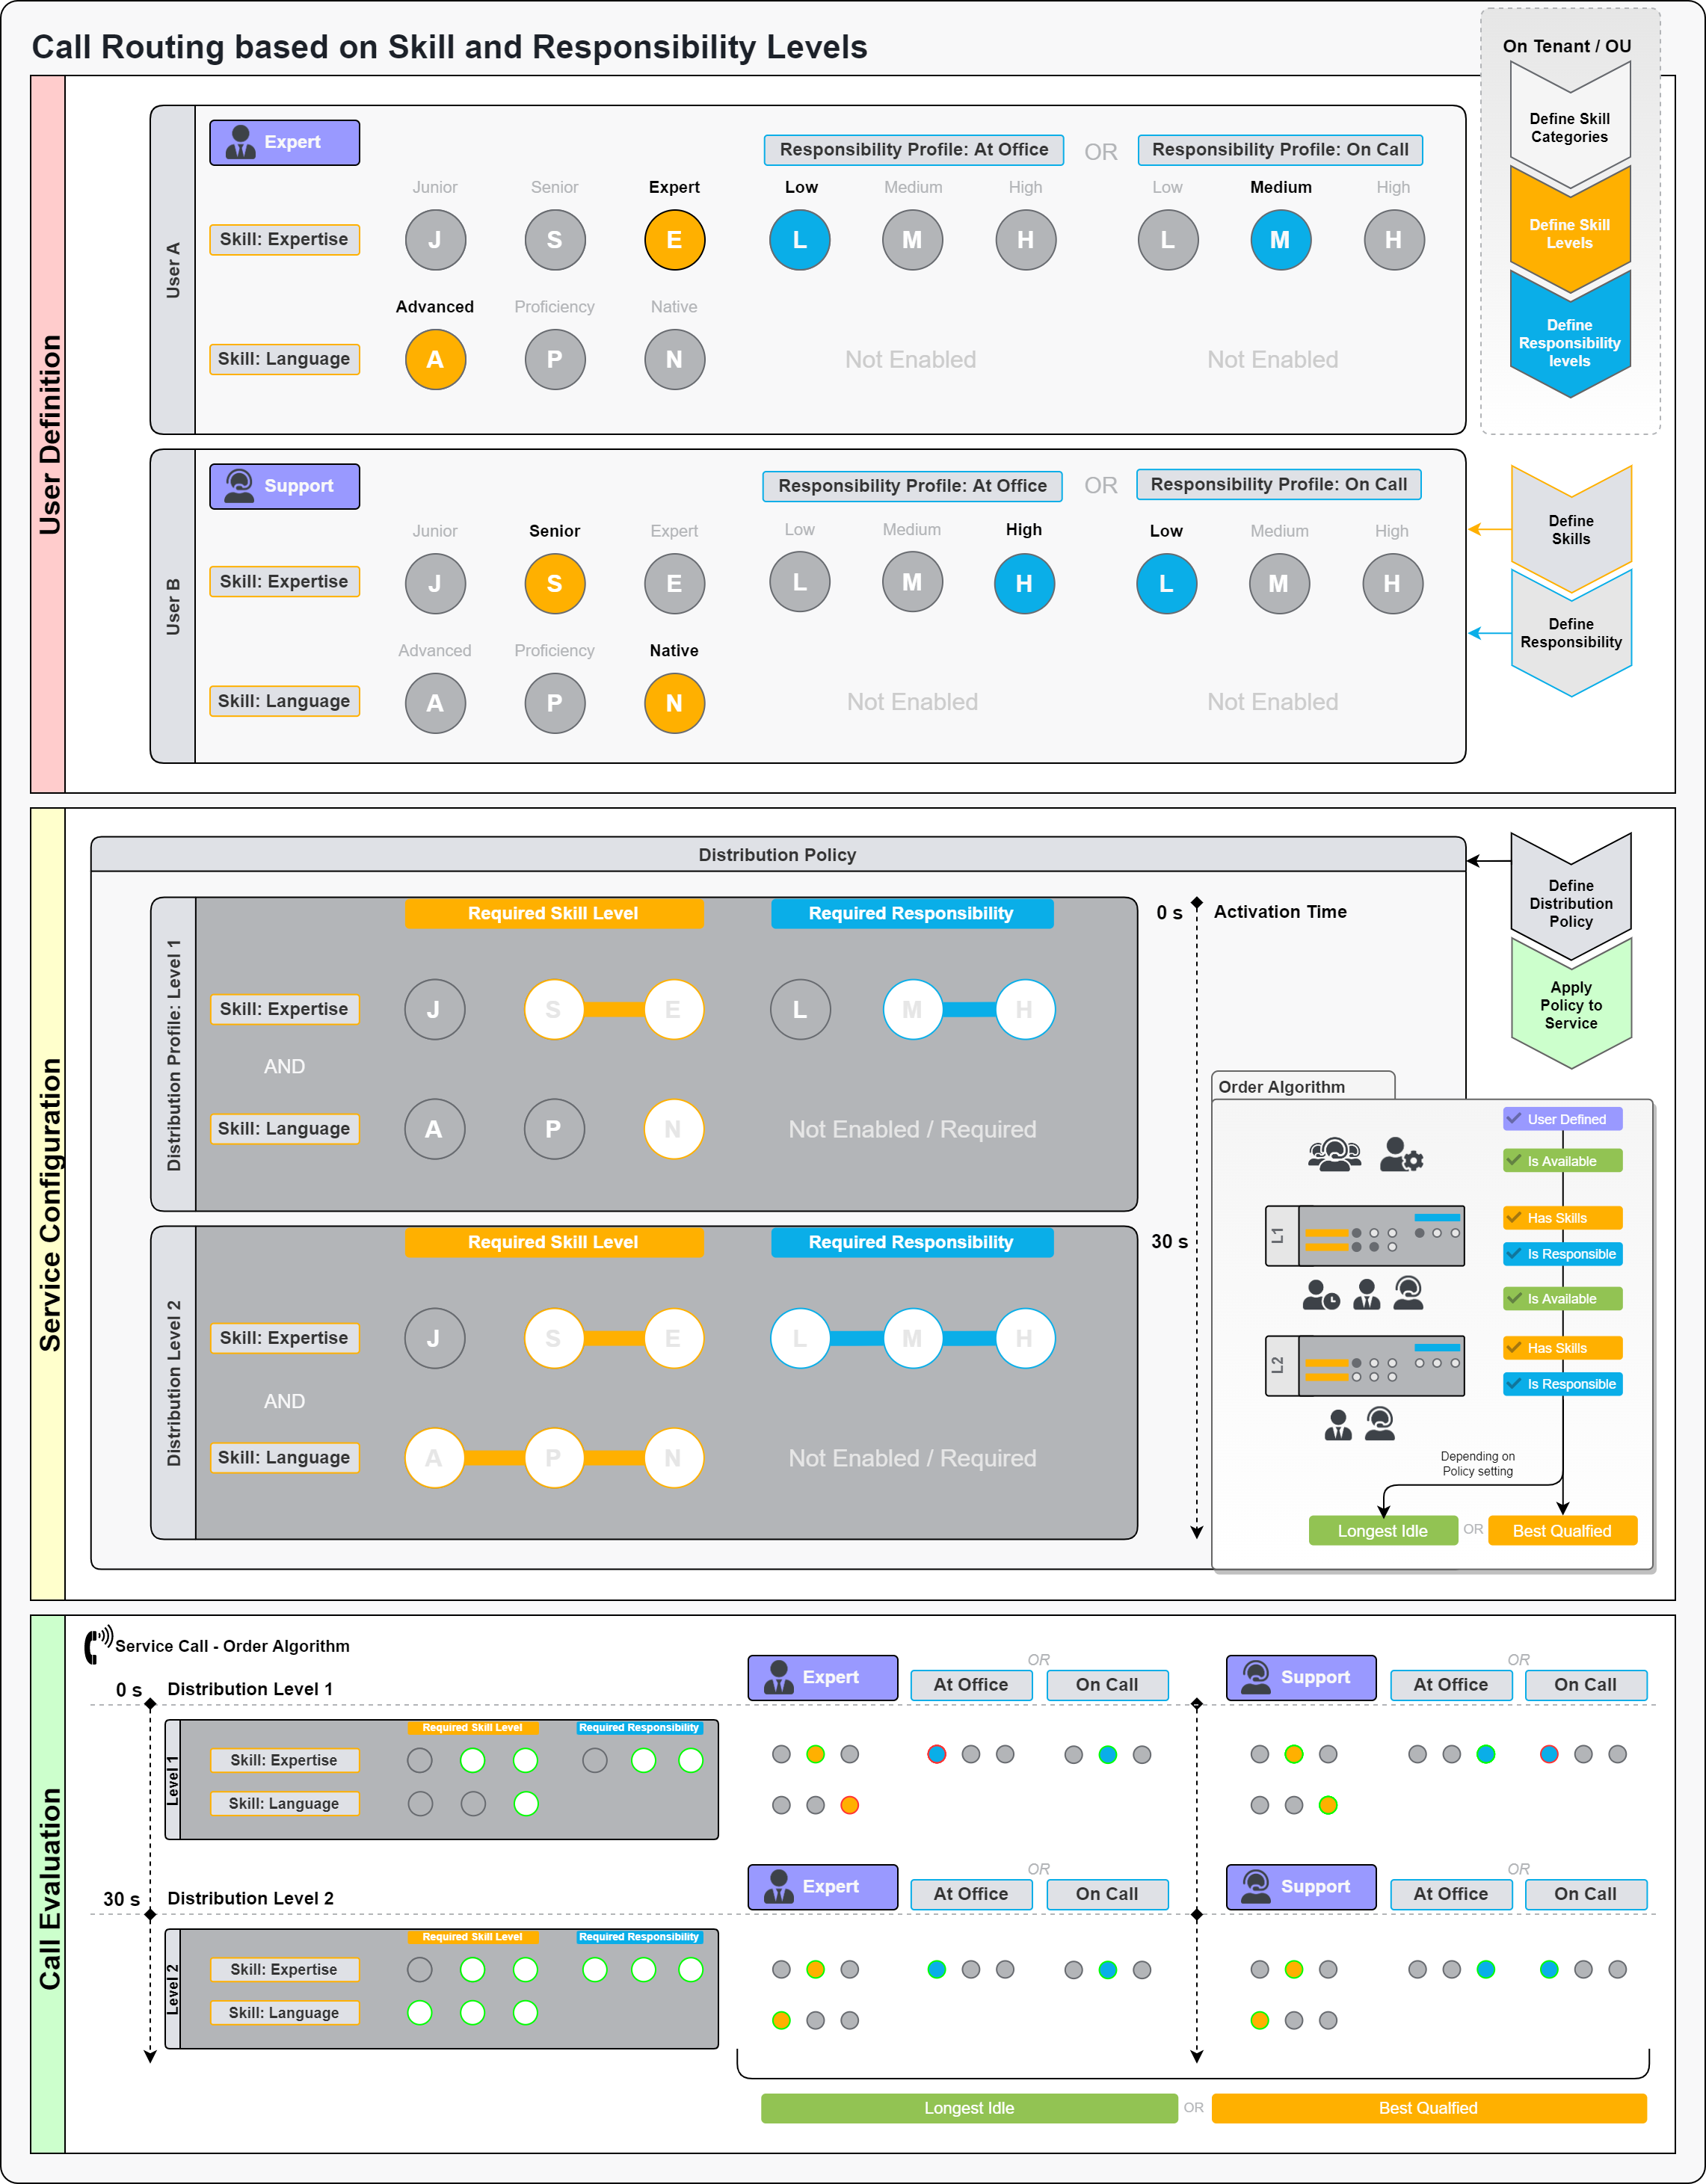
➕ In our example, we defined 2 skill categories with levels. Responsibility is enabled for the "Expertise" skill which will be explained further below.
🔍 Information on this configuration can be found in Skills and Responsibilities .
💡 We recommend you to coordinate this with your (future) Service Team owners and their respective Organization Units. Avoid unnecessary duplicates of skills, categories, and profiles within your Nimbus Tenant.
User Definition
✅ After defining all skills and responsibilities, you want to define your individual Contact Center users (agents).
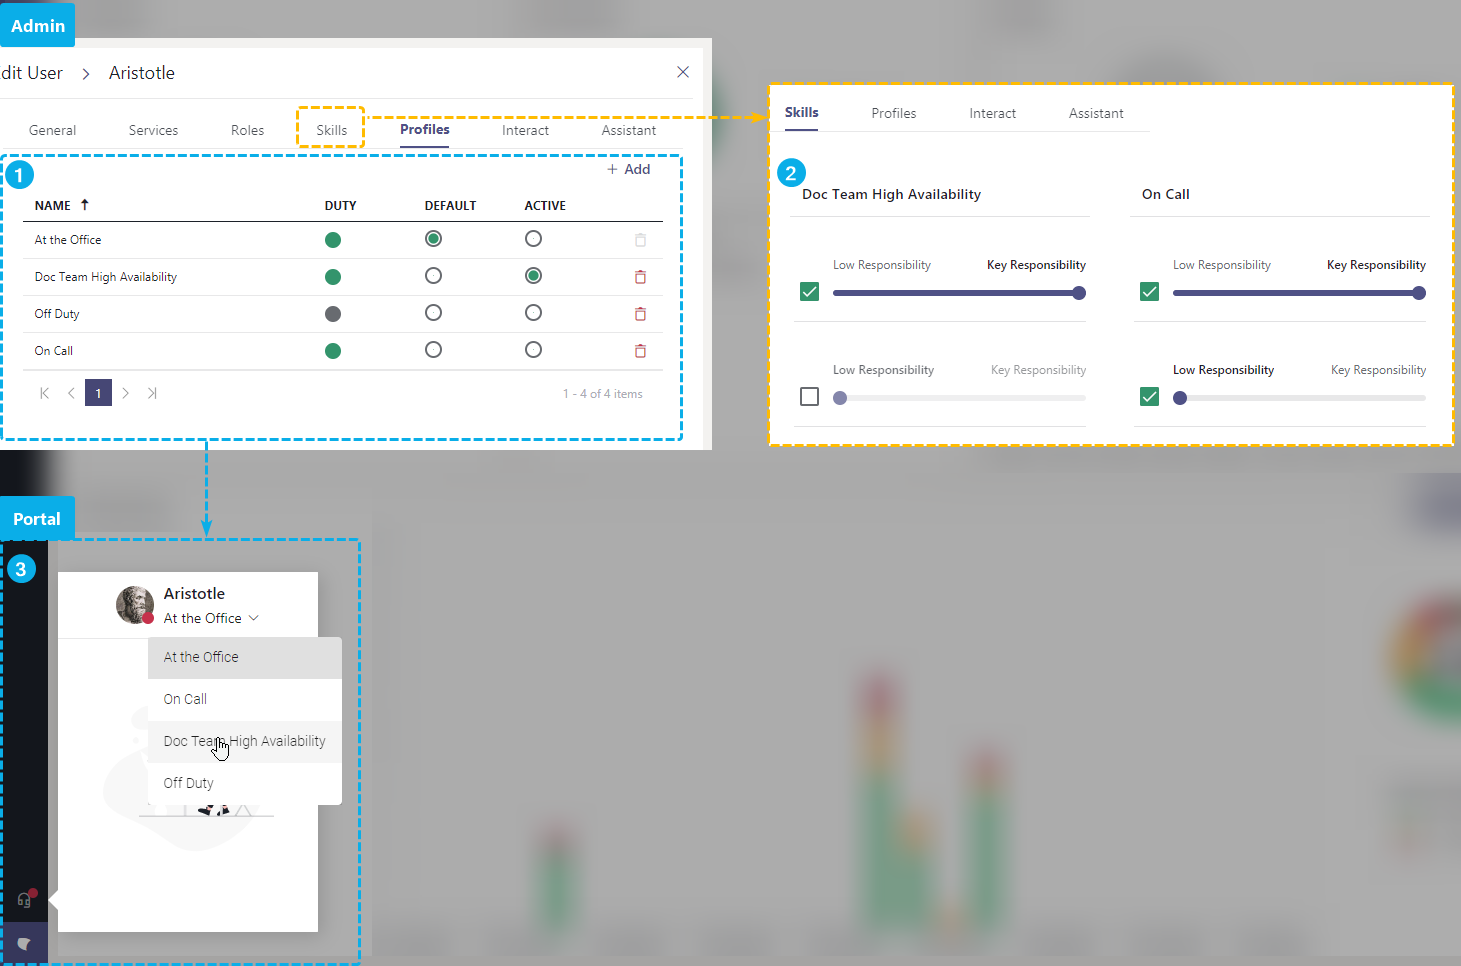
- Optionally assign the additional responsibility profiles for each user where needed. By default, each user has two system profiles: Duty (which considers all skills) and Off Duty. Users will be able to select further responsibility profiles you defined from the Nimbus frontend (based on their respective Organization Units).
- Define skill and responsibility levels for each user. With further profiles, you can define these levels individually for each user.
➕ In our example, we defined two users with varying levels of skill and expertise. A highly skilled user (e.g. a programming expert) may be busy with other tasks during the day, but shall answer questions while being "On Call" at weekends.
💡 Usually you do not change skills on users very often, as they remain consistent. Skill-based responsibility, however, may be different for each user depending on their selected profile. Make sure that the naming and meaning of your profiles is clear and understandable for your users (examples could be: "Night Shift, Weekend Duty", "High Load").
Service Configuration
✅ After defining your agents, it's time to apply policies to your services. These policies define how agents are pooled and selected during an incoming call.
RULES FOR THE SELECTION ORDER ALGORITHM
In order to be selected, defined Nimbus Contact Center users must fulfill all the required criteria:
- Users must have all required skills.
- (Of the required skills) one skill level must match for the user to be selectable.
- (When responsibility is enabled for a skill), one of the required responsibility levels must match as well.
- The user must be available (e.g. not in RONA state, busy in an other call)
-
If multiple available users match the requirements above, the order algorithm defines the priority as follows:
- Best Qualified: Prefers highest skill qualification (even if higher respond)
- Longest Idle: Prefers longest idle team over both responsibility and skill level.
-
Define a distribution policy with a clear name (e.g. Regular day service policy) and an order algorithm (see info above).
- Define the distribution levels with one or more profiles of escalation.
- Each profile determines the required skills AND their required responsibility ranged.
- Assign the policy within your Service Settings so it takes effect immediately on the next call.
➕ In our example, we defined a policy with two levels, both excluding the "Junior" expertise level, but lowering the responsibility and language requirements on the 2nd level at the 30 second mark.
Call Evaluation
Once assigned to your Contact Center service, the call will be distributed according to the order algorithm.
- All skill-defined users are pooled. Users must be available (not in other calls, not busy in meetings, etc.)
- The rules of selection are applied (MUST have all skills, MUST be in any allowed responsibility level)
- On equal match, the users are selected based on the order algorithm setting (Longest Idle, Best Qualified)
➕ In our example, we explain the algorithm via the two levels defined in our distribution profile earlier:
| Level | Selection Criteria |
|---|---|
| 1 |
|
| 2 |
|
Setting Up Distribution
✅ Before you start, make sure the partner admin or Luware technician has given you the go for the further configuration.
You should see Contact Center distribution features available in the Nimbus administration. We'll focus on these concepts one at a time:
Defining Skills and Categories
✅ If you haven't set up Skills and Responsibilities before, it's a good time to start now. Note that these definitions – as any Nimbus configuration – follow Organization Units placement rules, so it makes sense to think of "common ground skills and traits" and make them available at high-level for frequent reuse.
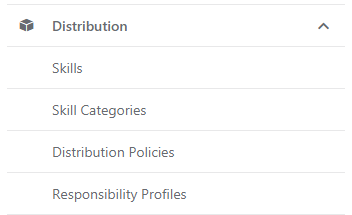
- Let's start by opening your Configuration (Admin) > Skill Categories
-
Define one or several skill categories you want your Contact Center users to be distinguished by.
-
Add skill levels where required, e.g. for comparable skills.
💡 Examples could be:- Language Proficiency (A1, A2, B1, B2... etc)
- Product Skills (Beginner User, Poweruser, Admin, Product Lead)
- A generic level category (High, Medium, Low)
-
Optionally: Add responsibility levels for your skills.
💡 They can be part of Responsibility Profiles which – for example – allow your users to switch to a "Low Responsible" profile during their absence hours, while remaining "Highly Skilled".
💡 Definition of responsibility and skill criteria is completely up to you. If you're uncertain, just go by "Low, Medium and High" and change them later.
-
Add skill levels where required, e.g. for comparable skills.
-
Optionally: You can also define categories with no level, e.g. to distinguish soft skills or regional differences.
Here is an example skill category with skill and responsibility levels: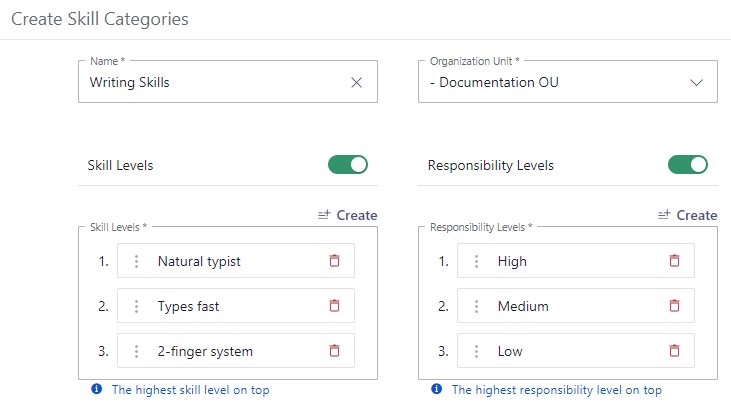
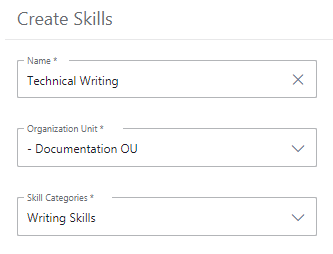
- After defining the categories, it's time to add individual skills to them. Go to Configuration (Admin) > Skills.
- Define one or more skills and assign them to their categories.
💡 Note that similar skills can be put in the same category and follow the same level definitions. Some Examples:
Skill |
Skill Category |
|---|---|
| German | Language Skills |
| Upselling Expertise | Sales Skills |
| Empathy | Listening Skills |
| Product X Knowledge | Product Skills |
Responsibility Profiles
✅ Optional Tip: For each user you can assign not only skills, but Responsibility Profiles in the "Profiles" tab for your users.
- First you need to Create a Responsibility Profile in the configuration. Go to Configuration (Admin) > Responsibility Profiles.
-
Pick any name for your profile and select the Organization Unit under which it should be visible.
💡 Note that this name will also be visible for Portal users as explained further below.
A Responsibility Profile should be named clearly as users will get to select it via the UI later: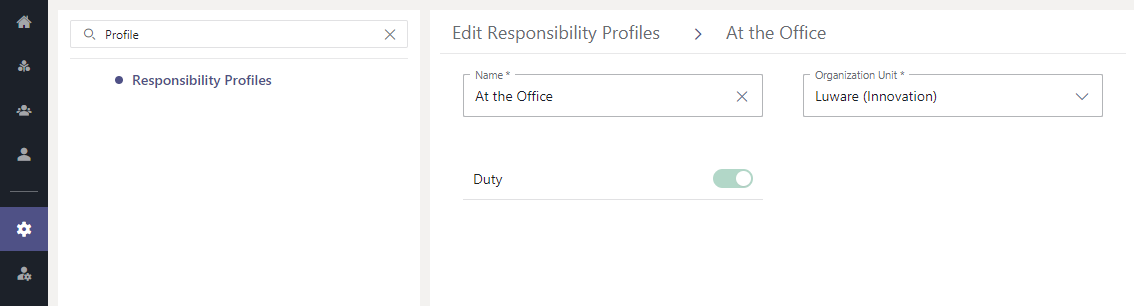
- Then you can assign these profiles to your users (→ see next step).
Assign your Skills and Profiles
With your newly defined skills and profiles, it's time to define your users:
-
To define your users, go to your User Administration and select edit to access user details.
💡 Note that "Skills" and "Profiles" tabs are available for the user once the Contact Center license is enabled.
💡 Note that Skills and Responsibility Profiles must be in the same Organization Unit as the user in order to be assigned to them.- Add the previously defined skills to the user as needed.
- Define the responsibility levels for these skills as well.
- Optional Step: If you have multiple Responsibility Profiles assigned to a user, you can define the skills per profile, so that the user can select between them.
Repeat the steps above for all further users as needed.
Creating a Distribution Policy
✅ Your new skills now need to be defined in Distribution Policies before they can be used in your service. Think of these policies as "requirements" that your services apply to your users, choosing only the ones that meet the criteria.
- Go to Configuration (Admin) > Distribution Policies.
- Click “Create new”.
- Within the "General" tab, define a new Distribution Policy.
🔍 For more information on the fields and options, see Distribution Policies. - Within the "Distribution Levels" tab, define one or more distribution levels.
Here is an escalating 3 level policy example. Sliders define skill and responsibility levels that apply once the activation time is met: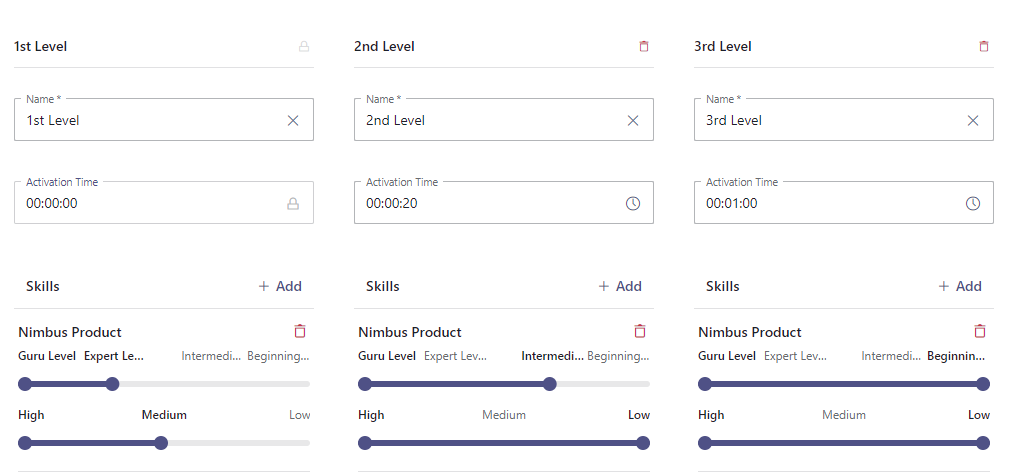
- Continue to add further distribution levels as needed, then save.
Add users as "Service Agents" and “Service Owners”
✅ When the Contact Center license is applied, a tenant admin can access Service Permissions to define users. If you do not have access, get in contact with your partner admin or Luware technician to perform these steps.
- Go to Service Administration > Find your Contact Center licensed service and edit its Service Settings.
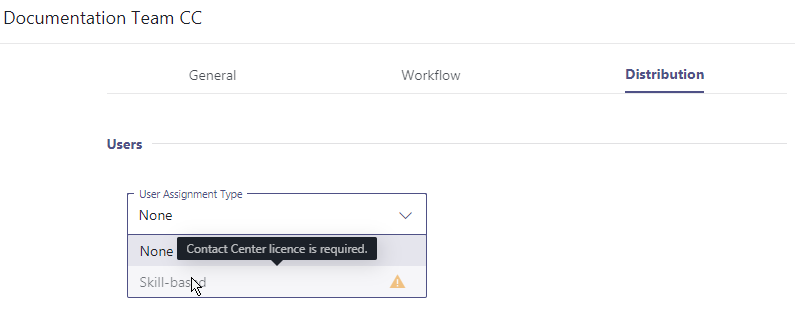
- Within Service Settings, open the "Distribution" tab.
- If not done so before, select User Assignment Type "Skill-based".
- Select the Distribution Policy created previously.
- Click Save & Apply.
⮑ New tabs become available. - Go to the “Permissions” tab.
- Add users as Service Agents or Service Owners.
- Click Save & Apply when finished.
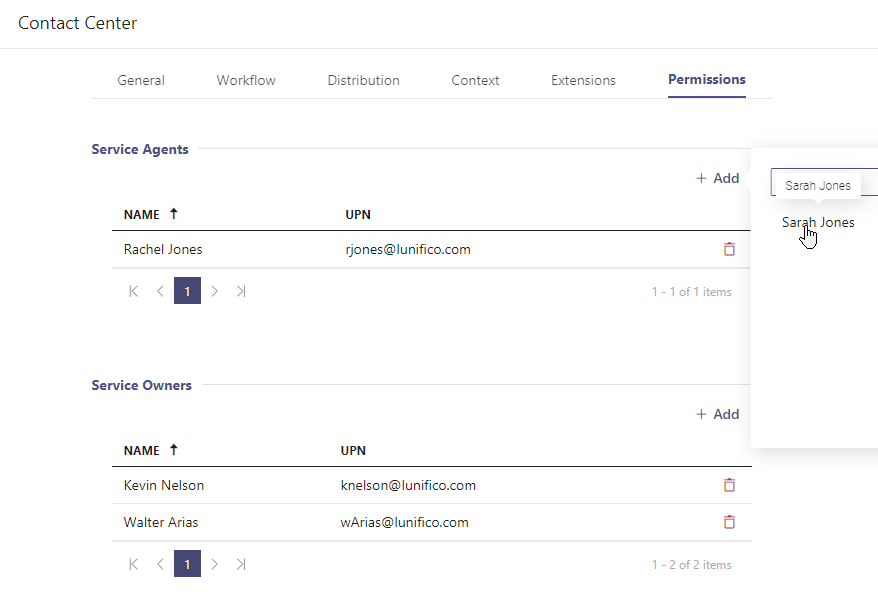
Please note for this view:
- You can either assign a user as "Service Agent" OR "Service Owner", not both. Owners can also perform Agent tasks and access Service Settings via the Nimbus Portal.
- After the configuration was saved, user(s) will get the according Roles and according Permissions granted immediately and see the service in the Nimbus Portal UI, e.g. via My Services.
Changing Service Settings
✅ Distribution Policies take effect only in the services they are applied to. So let's do that now:
- Go to Service Administration > Find your Contact Center licensed service and edit its Service Settings.
- Within Service Settings, open the "Distribution" tab.
- If not done so before, select User Assignment Type "Skill-based".
⮑ New options become available.
🔍 All related fields and options are explained in Service Settings.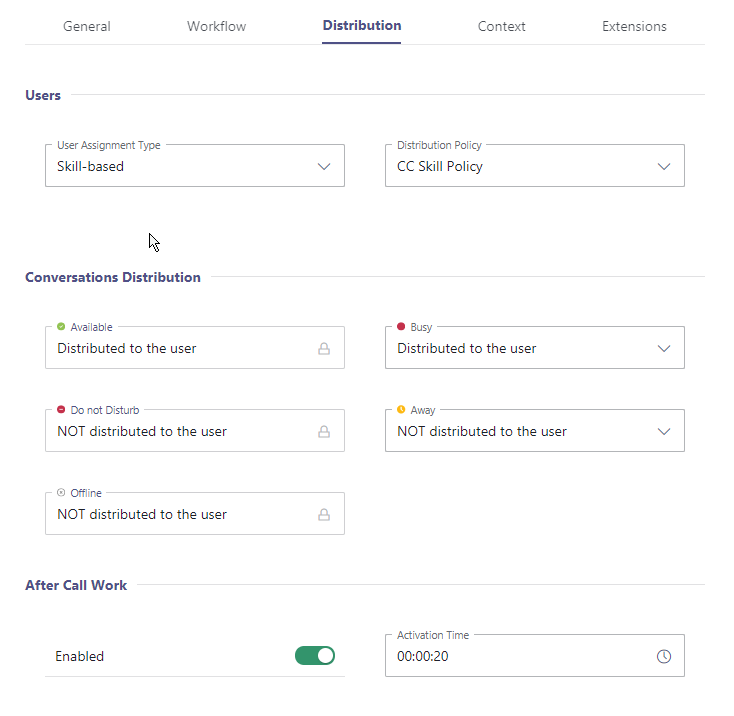
-
Enabled skill-based distribution options and apply policy:
- Apply the Distribution Policy created in the previous step.
- Adjust Conversation Distribution settings depending on if you want to also include users that are busy or away.
- Optionally enable and/or adjust settings such as After Call Work.
- Once satisfied, save your settings.
Apply Pending Service Changes
✅ On existing services, your changes from the previous settings should become effective immediately as you save them. However, when your Contact Center service was just created without earlier setup, finalizing steps need to be performed:
- Go to Service Administration and access the Service Settings > General tab of your new Contact Center service.
💡 Note that when pending changes require Provisioning via Microsoft PowerShell fields are highlighted accordingly.
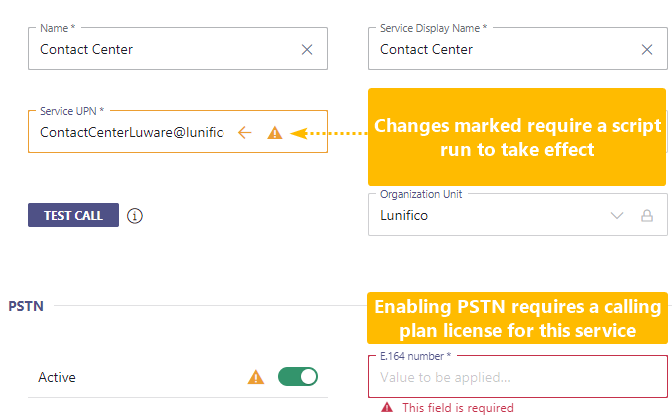
- Make further adjustments to all Service Settings tabs or at least review their parameters.
💡 We recommend the following:- Adjust the general service settings, like the outwards-facing name or PSTN number, Opening Hours and SLA (Service Level Agreement).
- Set up and apply a Workflow for your service. Otherwise calls will not be accepted.
🔍 Also read the related Use Case - Creating a Call Workflow. - Configure distribution settings, e.g. for "Busy" or "Away" users (which apply even if skill criteria are met).
- Add Conversation Context and Codes, e.g. for when you added "After Call Work" in the previous step to be required for your Contact Center users.
🔍 Also read the related Use Case - Defining and using Codes.
- Finally, a user with tenant admin permissions needs to run the Provisioning PowerShell script to apply the changes.
⮑ If all changes were applied successfully, the "Test Call" button becomes enabled. Make sure to test if the distribution works, maybe together with some other users.
✅ Congratulations! Your new Contact Center service should now be reachable.