NEW CERTIFIED CONNECTOR (V1) AVAILABLE
The Luware Nimbus Power Automate Connector has been certified by Microsoft and is available in all Microsoft Datacenters. This means that the connector has passed rigorous testing and validation by Microsoft and meets the highest standards of quality, security, and performance.
✅EXISTING Nimbus users: We recommend switching to the new certified connector. Note that this requires a manual Connector migration as the Flows and Triggers are differently structured/named. If you have already used any version of the connector before it has been certified, you need to carefully plan the migration to the new certified connector.
Learn more about the available Connector update paths….
INC Power Automate Connector Update Path

| Customer Tenant Admin Procedures |
Nimbus Customers can choose between following upgrade paths for the Power Automate connector:
|
||||||||
| Luware Development |
Whenever Luware releases a Nimbus Version, the “Upcoming V1” connector can be retrieved as a Luware-hosted download.
|
||||||||
| Luware / Microsoft connector Certification Process |
The V1 download package is submitted to Microsoft for Store Certification.
💡Note: Each update triggers a re-certification process by Microsoft and takes ~4-6 weeks. |
🌟NEW Nimbus users: If you are new to Nimbus and haven't yet started with productive Flow integrations, you can use the new certified connector directly from Power Automate without any further registration.
Introduction
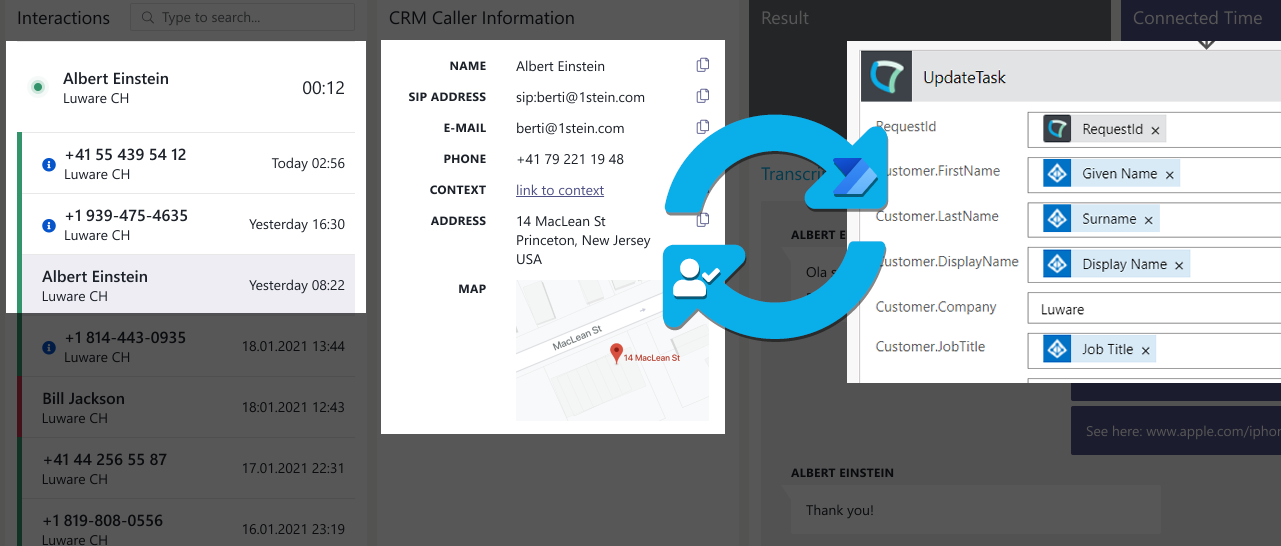
The Nimbus Power Automate Connector allows you to quickly connect Nimbus with third-party systems removing the need for extensive coding or custom development integrations. By listening and reacting to Trigger Events, the connector can follow up with Flow Actions, e.g. to retrieve data from external systems and store them into Nimbus Parameters for later use within your Workflows.
💡Some of the possible Use Cases:
- Connecting to Address Books: On incoming Tasks → Retrieve (or update) caller details from External Address Books.
- Live Context during Calls: Nimbus Task updates → Store and retrieve data with Parameters from a CRM or User Directory → Update Task details.
- Trigger Notifications: A Nimbus Task gets lost → Trigger an Email or scheduling a Callback.
- Routing according to lists and parameters: e.g. handle Blacklists or Whitelists in Nimbus and route callers accordingly within your services.
INC Power Automate Preconditions
PRECONDITIONS
☝External licensing costs
A Microsoft Power Automate subscription with "Premium Tier" license is required to set up the necessary connectors in your Flows. Note that the pricing for these accounts is determined by Microsoft and outside of your Luware subscription.
☝Nimbus Licensing
Licensing: To use the Power Automate integration, at least one of your Nimbus services must be Enterprise Routing or Contact Center licensed. Additional licenses can be assigned via License Management in the Administration UI.
Configuration: Flow interaction requires an existing Nimbus service already provisioned on your tenant. Power Automate Trigger Events react to Workflow Activities in your currently running Nimbus Workflows – as defined in your Modalities Service Settings. If your service has no (valid) workflow defined, trigger events will not be recognized.
☝User Roles
You need either Team Owner or Administrator in Nimbus to set up Power Automate Flows. Check that your currently logged-in user account has one of the required Nimbus Power Automate Roles.
💡Tip: To keep impacts and licensing cost to a minimum we recommend setting up flows as a Tenant Administrator as you have full access to all services and their configuration items located within their respective Organization Units. This also reduces the risk that Flow Actions and related Trigger Events suddenly stop working, as Nimbus Configuration entities, permissions or related user roles change.
Learn more about this…
The same user account UPN you use in Microsoft Flow is matched with the according User Role granted via Nimbus User Administration. Nimbus data is filtered via the Organization Unit placement of your logged-in user account. In effect, Services and Users outside of this OU placement are (not) shown in Flow Actions and Trigger Events to prevent accidental manipulation.
The following table will give you a brief overview on which Nimbus User Role can manage Power Automate flows:
| Nimbus User Role | Notes on Flow access |
|---|---|
| Partner Admin | ❌ Cannot use triggers for services in the customer tenant with his own account. Also have limited visibility on live-data. |
| OU Admin |
☝ Can access the connector, but is not recommended to manage live call-data with, as the view on services and user data is restricted by Organization Units. If the Admin role is moved or deprecated, flows may cease to function correctly.
💡This role is primarily meant for assisting on configuration tasks, e.g. managing flow-related Address Books and Workflows. |
| Tenant Admin |
✅ Recommended!
|
| Team / Service Owner |
☝ Usable, but limited access to data entities within Organization Unit rules of user account (reading up the path rule):
|
| Supervisor / User | ❌ Have no access to the connector itself or any related configuration items and service settings. |
🔎 Refer to Power Automate Roles for more details.
Using the Nimbus Power Automate Connector
With each release, we submit the official Nimbus Power Automate connector for certification by Microsoft. Changes on the connector itself will be listed in our Release Notes.
There are two ways to retrieve and use the Nimbus Power Automate connector:
- Via Microsoft Store (certified connector, search- and usable directly in Power Automate)
OR - Via Custom Connector Installation (manually downloaded and installed on your Tenant)
☝If you are new to Nimbus and start your productive Flow integrations after May 2024 or later we always recommend the Certified Connector. For further details, read about the Legacy and Certified Connector Differences.
Certified connector retrieval
☝ Use this method to:
- Get the Microsoft-Certified connector directly from the store.
- Use only verified and fully released functionality.
Connector retrieval
- Log into your Microsoft Power Automate https://flow.microsoft.com account.
- Create an empty Cloud Flow → Select Skip in the next dialogue
- Add a new trigger to your empty flow by searching “Nimbus” - here is our list of Trigger Events and related Flow Actions.
- During first use of the Connector you will be requested to pick a region (cluster location).
- ✅Pick the same cluster location as your Nimbus installation.
- 🔎You can identify your cluster location by logging into the Nimbus Administration and checking the redirected URL in your browser.
- An authentication dialogue will request Nimbus App Permissions from your user. 💡This dialogue may not appear if consent has already been granted
🔎 Reference: URLs for Cluster location identification during connector installation:
INC Nimbus Admin URLs
| Switzerland 01 | https://admin.ch-01.luware.cloud/ |
|---|---|
| Switzerland 02 | https://admin.ch-02.luware.cloud/ |
| Germany 01 | https://admin.dewe-01.luware.cloud/ |
| Germany 02 | https://admin.dewe-02.luware.cloud/ |
| United Kingdom 01 | https://admin.ukso-01.luware.cloud/ |
| Australia 01 | https://admin.aue-01.luware.cloud/ |
| West Europe 01 | https://admin.euwe-01.luware.cloud/ |
| East United States 01 | https://admin.use-01.luware.cloud/ |
✅ Make sure to configure your web proxies to allow access to these domains or whitelist the complete *.luware.cloud domain.
Custom connector installation
INC Power Automate Connector Deprecation Notice
☝ Deprecation notice: With the new (store-certified) Nimbus Power Automate Connector there are changes on Flow Actions, Triggers as well as Field and Event descriptors which require a Connector Migration.
✅ If you are using a deprecated (manually installed) connector you should perform a Connector Migration as soon as possible.
Learn more…
🤔 Why are contents on the Knowledge Base still showing old connector info? As Microsoft still changes the design / naming on Power Automate rather frequently and without notice, we shift our approach to be more “In-App” centric. This means that future connector updates will include guidance and in-app help as far as the Flow UI allows. Legacy Connector Knowledge Base contents will remain online for future reference, e.g. to perform a Connector Migration and comparison.
🤔 Why is the new verified Connector still shown as “Preview”? The Luware Nimbus certified connector and related Flow Actions are ready for productive use. Microsoft will remove this tag once the connector has seen frequent use on Microsoft official clusters, primarily after meeting their “General Availability” criteria.
🤔Why is Use Case XY is not covered in the new Connector (yet)? Our Knowledge Base will gradually move existing Power Automate Use Cases over to the new certified connector. If you require assistance on our existing Power Automate Use Cases, first check the Connector Migration page for hints. You can also contact Customer Success to request updates to Knowledge Base pages.
☝ We recommend to use this method ONLY to:
- Install an Upcoming (V1) connector prior to official rollout, in order to test out the newest features ahead of time.
- Install a legacy (V0) connector Update an existing connector to keep your previous legacy flows intact, until the Connector Migration is done.
Adding the Custom Connector
1.Log into your Microsoft Power Automate https://flow.microsoft.com account.
2-On the left menu, click on "More" > "Discover all".
3.Locate and pin the "Custom Connectors" entry to your menu.
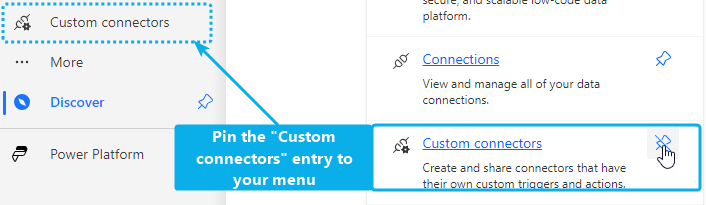
4.Select your new Custom Connectors entry.
5.Add the top right, click "New custom connector" to open a pulldown. Select "Import an OpenAPI file".
6.Enter Nimbus and the environment (e.g. Nimbus Production), then choose the OpenApi file according to your data cluster location:
Nimbus Power Automate connector URLs
☝Legacy (v0) Custom Connector users: Replace the /v1/ part of the URL above with /v0/ to download the legacy connector (e.g. to Update your existing Connector) with new files. Note that the legacy connector will not receive feature updates anymore.
☝Migration note for all custom-installed connectors: You can install the v1 to-be-certified connector as Custom Connector. However, when switching to the certified connector within Microsoft Power Automate, a Connector migration is necessary for all existing custom connectors.
🤔 How can I find out my location? The location of your data cluster is picked once during the first Service Provisioning. You can also see it in your browser URL when logging into the Nimbus Administration which redirects you to the location where your Nimbus instance is installed.
Fine-tune Custom connector details
- Unfortunately a couple of things can not be specified in the OpenApi File. So we will need to edit them manually now.
- Upload the connector icon

- Upload the connector icon
- Set the Icon background color to #6E2878
Azure App registration
INC Power Automate Azure App registration
On your Azure Tenant the Nimbus Connector needs to be registred to establish a trust relationship between your app and the Microsoft identity platform. 🔍 Refer to: https://docs.microsoft.com/en-us/azure/active-directory/develop/quickstart-register-app
- Go to portal.azure.com > App Registrations > New registration
- Name your application “Luware PowerAutomate connector”
⮑ The end result should look like this:
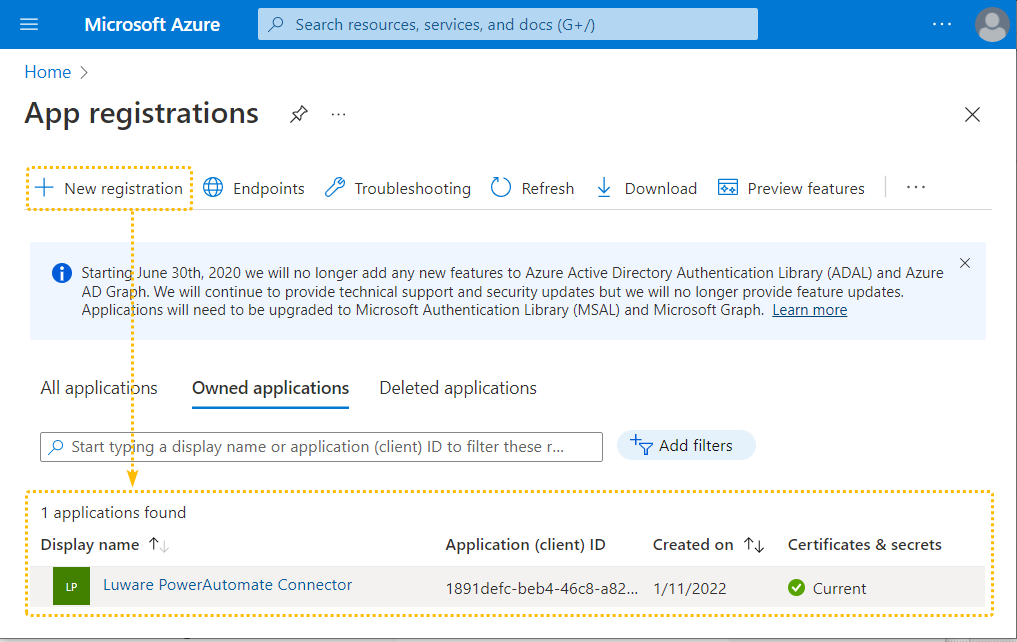
✅Keep this page open as you will need the Application (client) ID to copy for later.
Create the Application Secret
Sometimes also called an application password, a client secret is a string value your app can use in place of a certificate to identity itself.
🔍Refer to https://learn.microsoft.com/en-us/entra/identity-platform/quickstart-register-app?tabs=client-secret#add-credentials
✅ Fill out your Flow config as follows.
- Use your Application ClientID (copied from the previous step), also use it as the Resource URL.
- Fill out the Client secret with secret created.
- Check via the table below that your App details are correct.
☝ Note that these values are unique to you. Screenshots below are just examples.
| Field | Description | Filled-out App |
|---|---|---|
| Auth Type | OAuth 2.0 (automatically filled) | 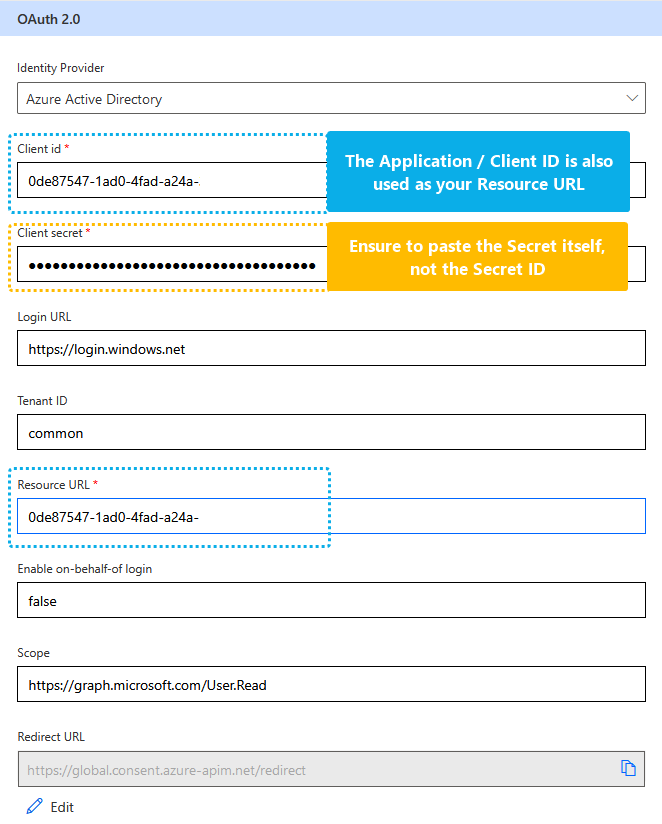
|
| Identity Provider | ☝ Attention: By default Generic OAuth 2 is selected → Select Microsoft Entra ID | |
| Client ID |
Application / Client ID (👇same as Resource URL) ✅ Taken from Azure App Registration (Overview > "Application (client) ID") → See previous step above. |
|
| Client Secret |
Application / Client Secret ✅ Taken from Azure App Registration (Certificates & secrets > Client secrets > New client secret > "Client Secret Value" → See previous step above. ☝ Make sure to paste the secret itself, not the Secret ID. |
|
| Login URL | https://login.windows.net/ (automatically filled) | |
| Tenant ID | common (automatically filled) | |
| Resource URL |
☝ Same as Application / Client ID ✅ Taken from Azure App Registration (Overview > "Application (client) ID") → See previous step above. |
|
| Scope | https://graph.microsoft.com/User.Read (automatically filled) | |
| Redirect URL |
https://global.consent.azure-apim.net/redirect ☝Will be automatically filled in once the connector is created → See next step below. |
Create Connector
- Click "Create connector". ⮑ The Redirect URL will be filled in automatically.
- ✅ Copy the Redirect URL.
- Back in Azure, make sure to enter the Redirect URL in your Application Registration.
Show me how...
-
Add the Redirect URL:
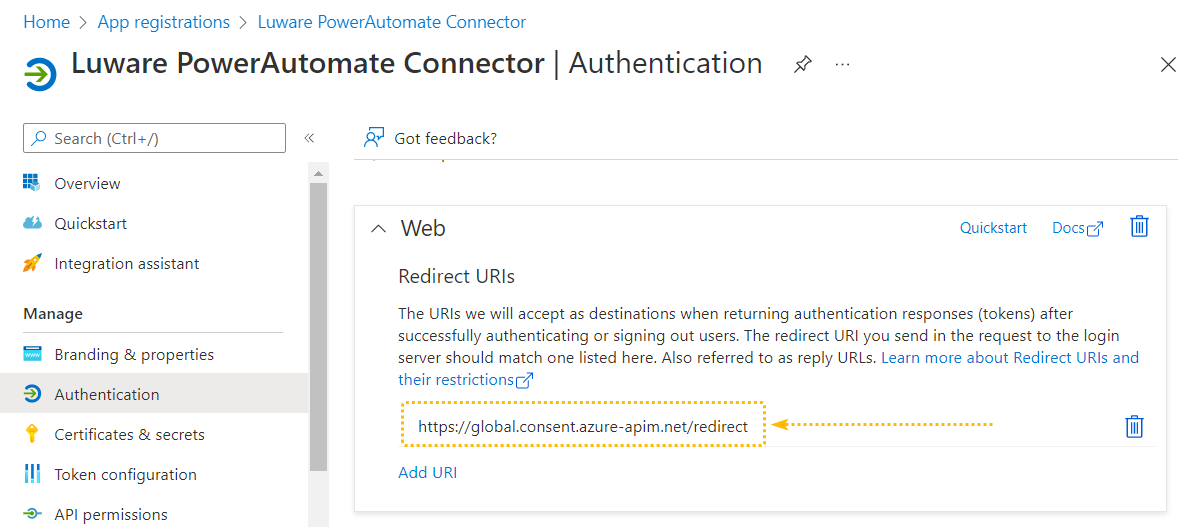
-
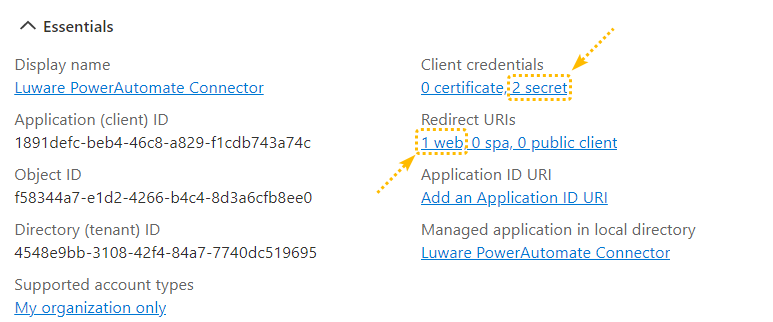
Check your App registration. It should have at least 1 Redirect URL and 1 secret.
Test the connector
On the last page of the connector creation process you can test your connector. Click New Connection and sign in with the account with which you will be creating the flows.
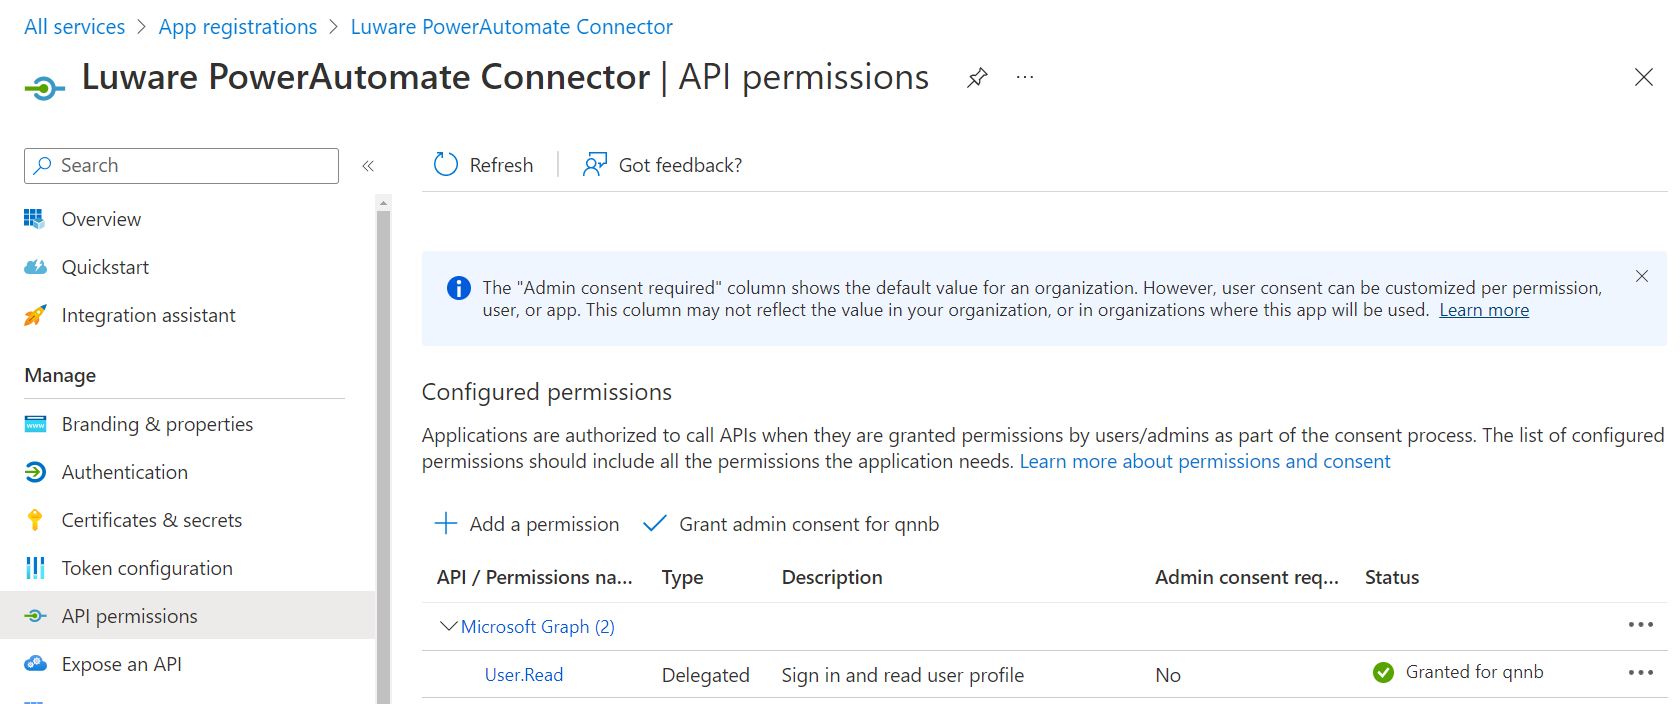
🤔 Connection refused? Your tenant admin needs to give consent on User.Read Permissions during the Nimbus App registration. This will allow you to Sign-In on the connector on behalf of the tenant administrator.
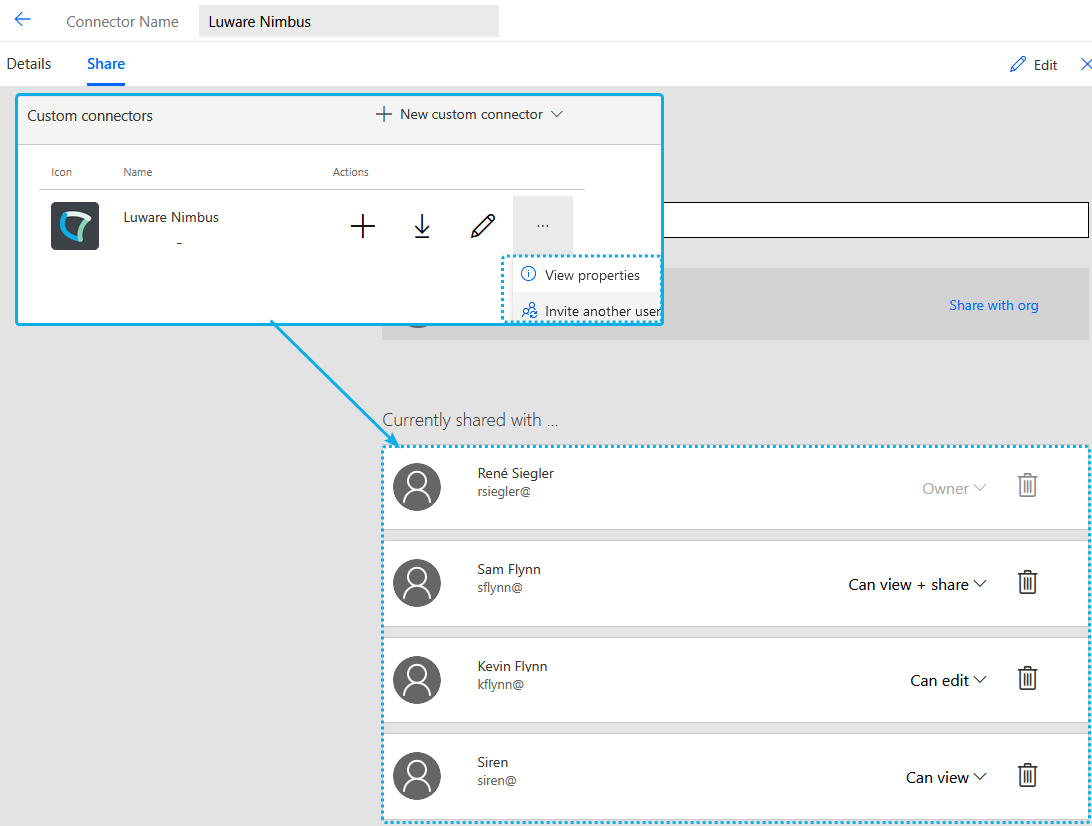
Optional: Share the connector with other users
A custom connector is initially just available to you. You can optionally share the connector with other owners / users if needed.
☝NOTE BEFORE SHARING A CONNECTOR
All users requiring access to a shared flow also need to be granted access to the Nimbus Power Automate connector App itself.
-
Keep in mind that each user accessing the Nimbus connector also needs a Microsoft Power Automate license to create flows.
💡Any Microsoft product licensing cost are outside of Luware scope. -
Connector access is restricted by the Role-based Access Concept (RBAC) to Nimbus Service / Team Owners /Administrators on your Tenant.
💡All users sharing the connector require a valid Nimbus Power Automate User Role, granted within the User Administration.
💡Most of our customers create Nimbus Power Automate Flows with a service account that is also Nimbus Tenant Admin at the same time. This ensures unhindered access to all services and their required flows while keeping maintenance on a minimal level.
Notes
✅Next Steps:
- As you add the Nimbus connector trigger / action event to a flow for the first time a consent dialogue may be shown to you.
- With the connector installed, access and consent given, new Nimbus Trigger Events and Flow Actions should now be available for selection in your Power Automate flows.
🔎 As starter topics we suggest reading the following:
- Read about Creating an example Flow to get a first impression of the connector.
- Visit our growing selection of Power Automate Use Cases for further inspiration.
- Once you know the basics, you should learn about all System Fields and Parameters which can be used in your flow.
- Additionally you can also create Custom Parameters with defaults of your own, and use them within your flows.
☝Note on Power Platform rate limits: To ensure service levels, availability and quality, there are limits on the number of Power Platform requests that users can make across all Power Platform products. Service limits are based on normal usage patterns in both five-minute and 24-hour intervals.
💡Good to know: Most customers usually don't exceed these limits.