In this Use Case, we're going to tackle the following topics:
- Cover technical and licensing preconditions for enabling the Instant Messaging (IM) modality.
- Explain all Administration and Integration steps to enable the Instant Messaging (IM) modality on your tenant.
- Recommend follow-up steps after the IM modality has been enabled.
INC Instant Messaging Preconditions
PRECONDITIONS
✅ Instant Messaging (IM) is a user modality (channel of communication) to be enabled for your tenant. This is done during initial setup with your Luware Customer Success representative and in tandem with License Management for your users and services.
✅IM Integration paths
✅IM Integration paths
INC Instant Messaging Integration Channels
There are currently three integration channels to route Instant Messages to Nimbus users: via Luware Interact (Website embed widget), WhatsApp, and SMS.
| Channel | Channel Description | Related Pages |
| via Interact |
|
✅Getting started: 🔎Additional sources: |
 | ||
| via WhatsApp |
|
✅Getting started: 🔎Additional sources:
|
| via SMS/RCS |
|
✅Getting started: 🔎Additional sources:
|
✅User access
✅User access
- Tenant Admin rights are needed to enable Modalities Tenant Settings and apply related licenses via Licenses Tenant Settings.
- Additional roles and permissions (e.g. external business and service accounts) may be involved as per integration scenario → See specific use cases below.
- Once enabled, regular Nimbus users will access the features as described per Instant Message Handling.
✅Nimbus licensing
✅Nimbus service and user licensing
Instant Messaging can be enabled and licensed per user or service. The table below outlines which licenses are required depending on your usage scenario:
| For | Applicable Licenses | Your usage scenario | Configuration areas |
| Service |
Contact Center license |
|
|
|
Interact Service (optional) |
|
|
|
| User | Instant Messaging modality license |
|
|
|
Interact User (optional) |
|
|
💡Licensing examples
-
Your Service A shall be reachable via WhatsApp - you need:
- The Contact Center service license → Enables the "WhatsApp" channel and according workflow options in the Modalities Service Settings in order to distribute the Instant Messaging tasks.
- At least one user as member of this service, with the Instant Messaging modality enabled to receive the tasks.
-
Your Service B shall be reachable via Website - you need:
- The Contact Center license on the service → Enables the “Interact” channel and according workflow options in the Modalities Service Settings in order to distribute the Instant Messaging tasks.
- The Interact service addon → Enables the “Interact” tab for configuration of the integration and restrictions.
- At least one user as member of this service, with the Instant Messaging modality enabled to receive the tasks.
💡As long as the user should not be directly reachable, no extra user Interact license is required. → see next point.
-
Your User Y shall be directly reachable via Website (and is not necessarily part of Service B)
- The Interact User license → Enables the “Interact” tab for configuration of integration and restrictions.
- Use this method if you want the user to be directly exposed on a website instead of going via service workflows.
INC Icon Legend Accordion
Show Icon Legend
| 💡 = A hint to signal learnings, improvements or useful information in context. | 🔍 = Info points out essential notes or related page in context. |
| ☝ = Notifies you about fallacies and tricky parts that help avoid problems. | 🤔 = Asks and answers common questions and troubleshooting points. |
| ❌ = Warns you of actions with irreversible / data-destructive consequence. | ✅ = Intructs you to perform a certain (prerequired) action to complete a related step. |
Integration Use Cases
The following scenarios and steps are directly taken from our Use Cases. Depending on your chosen integration scenario, follow the steps inside.
Interact Setup
Setting up Interact
🔎Source: Use Case - Setting Up Interact.
Use Case - Setting Up Interact
On this page, we're going through an example setup for your own Interact web presence, covering the following steps:
- Necessary tenant Administration steps.
- Mandatory ACS Instance Setup steps to bring your own Azure Communication Service environment.
- Interact Domain Templates (CORS) to control access to your external website widgets.
- Individual
- Interact Service Settings to enable Interact for services.
- Interact User Settings to enable Interact for users.
PRECONDITIONS
✅Before you start
- This Use Case is a follow-up to Use Case - Setting Up Instant Messaging. Refer to it for general and licensing preconditions on your tenant.
- For this Use Case to work, the Instant Messaging modality must be enabled on your tenant. If this hasn't been done already, please get in contact with your Luware Customer Success specialist to discuss terms and License Management details.
✅User Permissions
- Tenant Admin rights are required to create and update tenant, user, and service settings.
-
Delegated Tenant Admin permissions are required to grant Nimbus App Permissions once via grant link.
🔎This link can be found under Modalities Tenant > Modalities Tab > Instant Messaging > “Grant Permissions”.
✅Additional users
- You need a dedicated O365-user (teams license assigned) on behalf of which Teams meetings will be created. This user needs to have a proper Access Policy assigned.
- You also require Web developer privileges on your homepage to embed Interact widget codes wherever you want to allow customers to interact with your Nimbus services or users.
-
☝ Note: For direct-to-person Audio/Video Interact sessions (i.e. not distributed via a Nimbus service), the Teams meeting policy assigned to this O365 account also matters. Depending on the customer tenant's default meeting policy, the session may fail to connect if the invited participant isn't automatically let in. We recommend assigning a meeting policy with:
- Who can bypass the lobby: People who were invited
- People dialing in can bypass the lobby: Off
✅ Data access
- By default all Instant Messaging data is routed through Nimbus ACS (Azure Communication Service) instance
- OPTIONALLY you can bring your own dedicated ACS instance. → The setup steps for this are explained below.
🔎GOOD TO KNOW: Before you start
Supported Modalities
Audio/Video Instant Messaging Luware Interact can be licensed and configured to handle multiple incoming modalities:
Modality |
Nimbus Distribution |
Customer touchpoint scenario |
|---|---|---|
|
Either handed directly by a user OR |
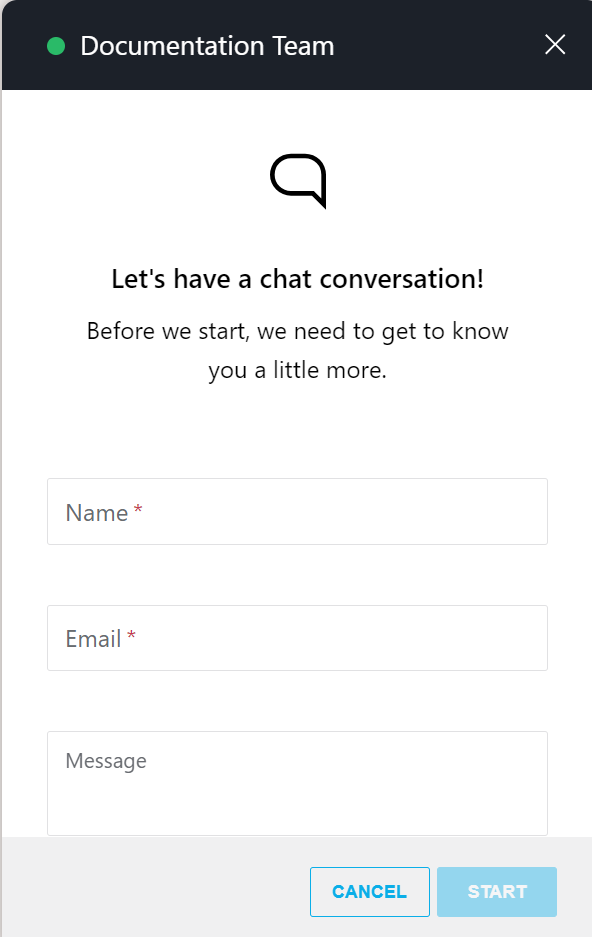
Customers use an Interact widget on your website where they can configure their headset, webcam, and screen sharing options. | |
| Either handed directly by a user OR distributed according to the service's Instant Messaging Workflow. |
Customers use an Interact widget on your website where they can provide a name, an email address, and an initial message, and start chatting. |
Individual User / Service configuration
💡You can configure either modality independently per service and user. If not marked further, steps are generally applicable regardless of modality.
🔎Depending on your scenario, refer to Nimbus Features (respectively for users / services) and do not hesitate to contact your Customer Success partner to define the best approach to your setup and License Management.
☝Note: Unless stated otherwise, all setup steps below cover both service / user touchpoint scenarios. Any specific instructions are divided into “for users / services” tabs respectively.
INC Icon Legend Accordion
Show Icon Legend
| 💡 = A hint to signal learnings, improvements or useful information in context. | 🔍 = Info points out essential notes or related page in context. |
| ☝ = Notifies you about fallacies and tricky parts that help avoid problems. | 🤔 = Asks and answers common questions and troubleshooting points. |
| ❌ = Warns you of actions with irreversible / data-destructive consequence. | ✅ = Intructs you to perform a certain (prerequired) action to complete a related step. |
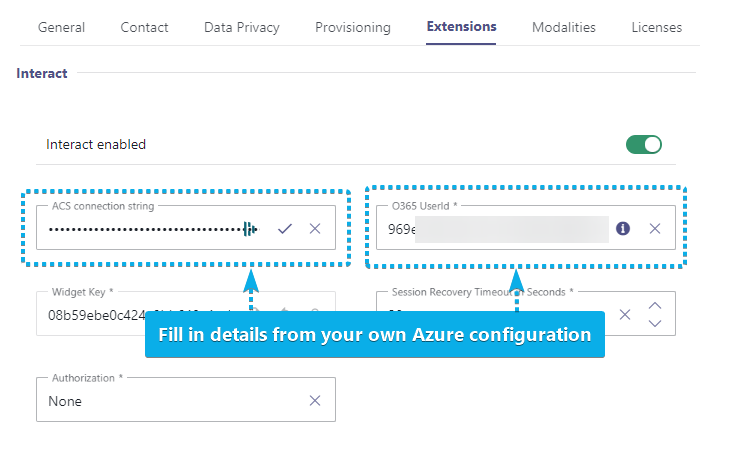
Enable Interact on your Tenant
- Navigate to Nimbus Admin > Tenant Administration.
- In the Extensions tab, go to section Interact.
- Enable Interact for your Tenant.
-
Specify the following Interact settings:
- ACS Connection string (from the ACS instance which was created)
-
O365 User ID (newly created Azure EntraID User with a proper Teams License) → ✅ See Preconditions.
☝ For direct-to-person Audio/Video sessions, also check the required Teams meeting policy settings under Preconditions > Additional users. - Widget Key (autogenerated)
- Session Recovery Timeout in Seconds
- Authorization. → 🔍Follow Use Case - Enabling Additional Authorization for Interact when you want to implement token-based authentication.
- Save the changes.
Mandatory: Bring your own ACS instance
💡Note: For Interact, an Azure Communication Services endpoint is required. This is so Nimbus can make use of your own dedicated ACS (Azure Communication Services) instance from Azure.
- Navigate to Nimbus Admin > Tenant Administration
- In the Modalities tab, go to section Interact.
- Locate the "Instant Messaging" section.
- Enable "Use your own ACS Instance" and provide the ACS connection string and resource ID.
Learn how to get this ACS connection string
INC ACS Instance Setup
INC ACS Instance Setup
The following steps describe how an ACS instance can be setup. Which is required for Nimbus Assistant and/or Interact.
INC Interact Azure Billing
AZURE BILLING
The usage of Interact will cause additional monthly ACS (Azure Communication Services) costs depending on modality (IM/AV) used. These cost are determined by Microsoft. Also see: https://learn.microsoft.com/en-us/azure/communication-services/concepts/pricing
- Before enabling additional modality features for your services, get in touch with your Luware Customer Success specialist to discuss terms, usage scenarios, and necessary setup procedures.
- Please note that Nimbus and Interact support does not cover pricing discussions or make recommendations based on the Microsoft Azure infrastructure.
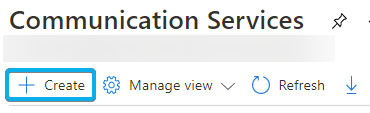
Create new Azure Communication Service
To create a new Azure Communication Service perform the steps:
- Head to Azure Portal and login with tenant admin rights.
- Search for "Azure Communication Service" component and click "Create".
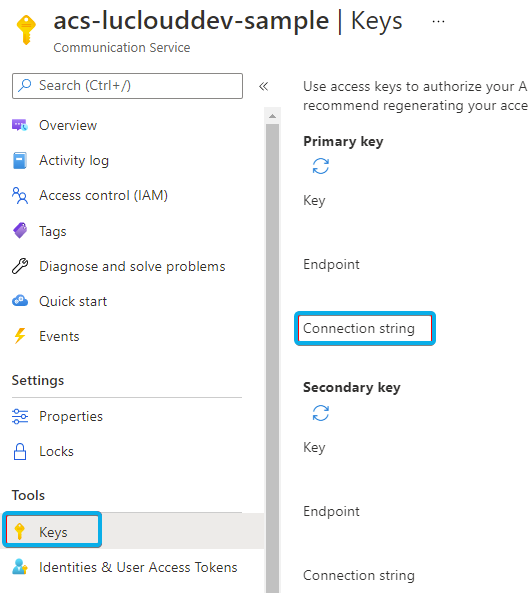
☝ Make sure not to use any underline/underscores within the name. - Switch to the Keys tab and copy the connection string
- Additionally, you need to setup an ACS Event subscription.
Learn how to set up an ACS Event Subscription
INC Setting Up an ACS Event Subscription
- Go to your created ACS instance and select Events.
- Create an event subscription with the Event Grid Schema.
- Choose a suitable System Topic Name (no impact).
- Select the following filters:
- Chat Message Received
- Chat Message Edited
- Chat Message Deleted
- Participant Added To Chat Thread
- Participant Removed From Chat Thread
- The endpoint type needs to be Web Hook.
-
The URL needs to contain as base URL your Cluster and as suffix /api/acs-driver/v1/events
- e.g. https://portal.ukso-01.luware.cloud/api/acs-driver/v1/events for the UK Cluster
-
The URL needs to contain as base URL your Cluster and as suffix /api/acs-driver/v1/events
- Go to the Overview tab, select the JSON View, and copy the immutableResourceId into the Nimbus Admin.
Provisioning via Microsoft PowerShell - After the tenant configuration is completed, your need to run the Nimbus provisioning script in order to get the changes applied.
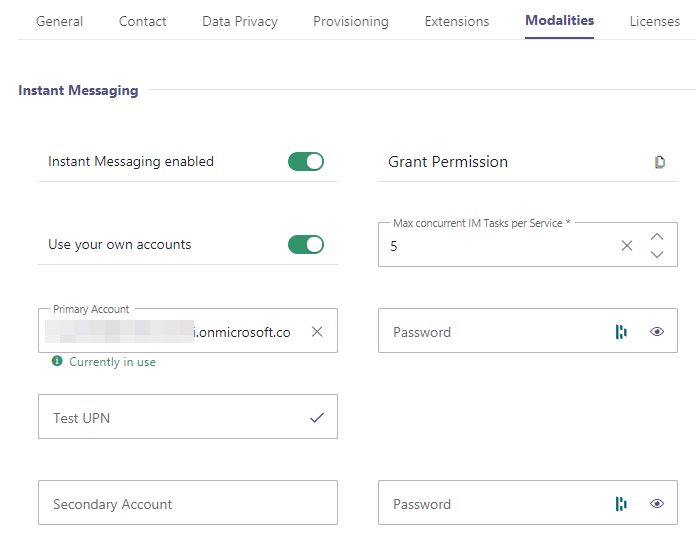
Instant Messaging user account setup
💡Note: Nimbus / Interact uses guest accounts to track the status of your other Nimbus user's availability in MS Teams. Luware will provide these
- Go to Modalities Tenant Settings.
- In the Modalities tab, go to section Interact. Ensure Interact is enabled.
- Depending on the option “Use your own accounts” follow the steps below:
Either Case A (Use the Luware accounts) or Case B (Bring your own Instant Messaging account).
✅ In either case, you need to “Grant Permissions” to the Nimbus App to send Instant Messages.

This solution uses 2 guest accounts provided by Luware. You will be performing these tasks in tandem with Customer Success.
-
Invite the external guest account users for IM on your tenant.
Learn how to invite external accounts to your tenant
INC Invite Azure Guest Accounts
- As Tenant Admin, log into your Azure Portal.
- Go to Users > New Users and select “Invite external User”.
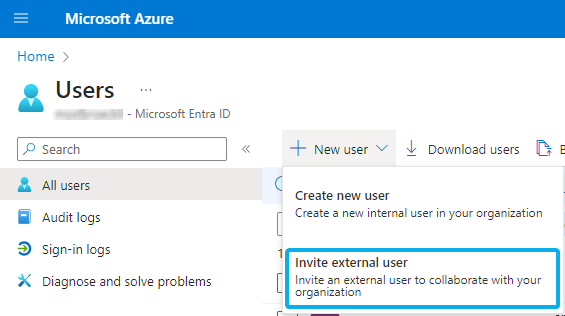
-
Invite both guest users 1&2 on your tenant. Add each of the previously copied email addresses (e.g. svr_nimbus_guest@onmicrosoft.com) and click Invite.
⮑ A standard Azure invite mail will be sent out to Luware.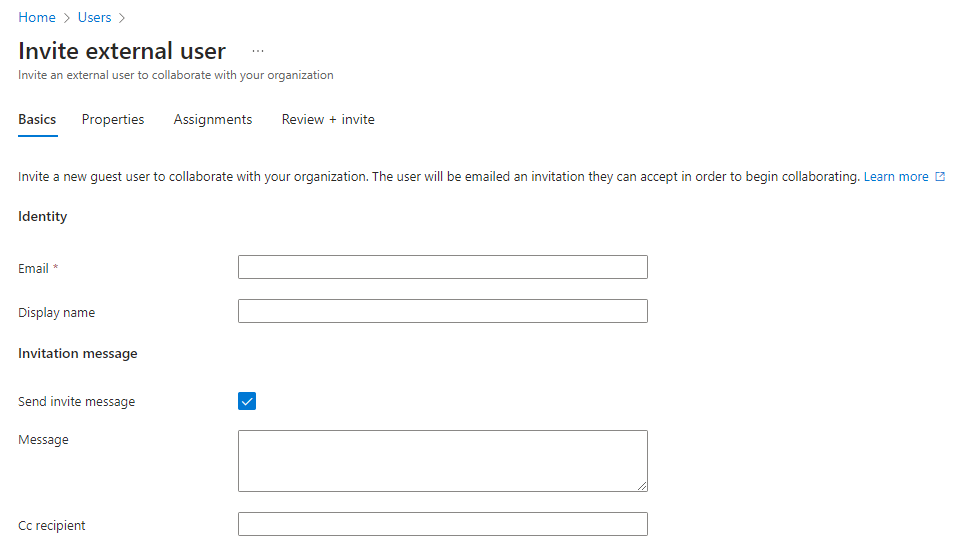
☝ Note that MFA (Multi Factor Authentication) needs to be disabled for these users. Otherwise, this feature will not work as the guest users cannot sign in to your tenant. - Let your Customer Success Specialist know that the guest users have been invited.
-
Please wait while steps are done in the background:
- Luware cloud operations team must accept the guest invitations. Please allow for some time for this to happen.
- Once successful, the "Account is not added as guest" message should disappear on your side in the Nimbus admin UI.
- If this is not the case, please get in contact with the Luware support.
-
As Tenant Admin: Inform your Customer Success partner about the pending user user invite.
💡 This invitation needs to be accepted by us before usage is possible on your side. - After receiving the confirmation from Customer Success and having permissions granted on your behalf, you can use the Test UPN field to send messages to any user on your tenant (e.g. a future chat message recipient acting as service user).
✅ For this solution, you need to have at least one dedicated service account ready, fulfilling the following requirements:
- A valid Teams license, with no MFA enabled and no password policy.
- Ideally a second account with the same settings should be used as fallback.
- Navigate to Nimbus Admin > Tenant Administration.
- Go to the Modalities tab.
- Locate the "Instant Messaging" section.
- Enable the “Use your own account” toggle.
- Fill in the UPN and the password.
- Save your changes.
- When accounts are configured and the permissions granted, you can use the Test UPN field to send messages to any user on your tenant (e.g. a future chat message recipient acting as service user).
Configuring a Domain Template
Domain templates define where Interact widgets are allowed to be used on the web, so that no external websites can "redirect" traffic to your services. Templates can be applied to either users or services independently. To define templates, perform the following steps:
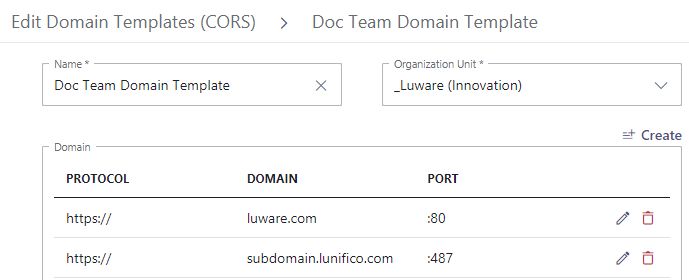
- Navigate to Nimbus Admin > Configuration > Interact Domain Templates (CORS).
- Click Create new.
- Enter a name and select the relevant Organization Unit.
- Specify Domain name(s) on which you want to allow Interact usage (whitelist).
- Click Create.
Restricting Access (CORS)
The previously created domain template needs to be applied to either users or services.
☝Please Note: CORS templates with the same or a higher Organization Units level as your user/service may be available for selection. Ensure you do not select the wrong template (e.g. provided by a higher OU level administrators) or your embedded widgets may not work.
For users
- Navigate to Nimbus Admin > users and select the user.
-
Enable Interact license for the user and click Save.
⮑ The Interact tab appears. - Go to the Interact tab and activate Interact.
- In section Restriction, enable Restrict Access.
💡You can skip this and the next step if you don't want to apply domain templates to the user. - Select the previously created CORS-Domain-Template in the Domain Template dropdown list.
- Click Save.
For services
✅Your Service has either an Enterprise or a Contact Center license applied.
- Navigate to Nimbus Admin > Services.
- Select the service you want to enable Interact for.
- In General Service Settings, assign an Interact license for the service.
- Click Save & Apply.
⮑ The Interact tab appears. - Go to the Interact tab and activate Interact.
- In section Restriction, enable Restrict Access.
💡You can skip this and the next step if you don't want to apply domain templates to the service. - Select the previously created CORS-Domain-Template in the Domain Template dropdown list.
- Click Save & Apply.
Creating Service and Direct System Messages
💡This step is optional and only necessary if you want to add Service System Messages to your service or Direct System Messages for users.
Direct and System Messages are messages displayed to the customer and user before, during, and after the session, e.g. a welcome message for the customer, or an informative message for the user on the Adaptive Card.
For users
- Go to Nimbus Admin > Configuration.
- Select Instant Messaging > Direct System Messages
- Click Create New.
- Start filling the fields according to your preferences and the descriptions below.
Direct System Messages
☝Options described on this page only apply for the Interact integration channel of the Instant Messaging modality.
💡Direct System Messages are configuration items that specify standardized messages sent to Nimbus users and/or customers at certain points during an Instant Messaging session. An example could be a welcome message for the customer, or an informative message for the user on the Adaptive Card, each leveraging Parameters and System Fields for more rich content.
💡Compared to Service System Messages, Direct System Messages only apply for direct website-to-user communication, and are therefore applied on user level, e.g. via Interact User Settings. For more details, refer to Use Case - Setting Up Interact.
Direct System Messages are structured into three parts:
- General properties and settings, specifying details like Organization Unit, Name and Description of the configuration item.
- Messages to User - specifying the messages shown for the Nimbus user at certain events.
- Messages to Customer - specifying the messages shown for the customer at certain events.
General
General Properties
| Name | Name of the configuration item, as it will appear in other Nimbus selection dialogues. |
|---|---|
| Organization Unit | Determines the Organization Unit placement of the item, and thus steers visibility in other Nimbus selection dialogues. |
| Description | Description of the item, primarily used for tabular listings and overviews. |
Display Name
| User |
Defines how the Nimbus user's display name is shown to the customer on the website. Allows the following options:
|
|---|
Messages to User
This tab allows you to define messages displayed to Nimbus users at specific session events. Each message can leverage Parameters and System Fields for more rich content.
| “Accept” Adaptive Card |
Message shown inside the Adaptive Card when a user can opt-in to “Accept” and start the chat session with the customer. 💡Example: |
|---|---|
| “Terminate” Adaptive Card |
Message shown inside the Adaptive Card when a user wants to “Terminate” an already ongoing chat session with the customer. 💡Example:
|
| Session Ended |
💡Example:
|
Messages to Customer
This tab allows you to define messages displayed to customers at specific session events. Each message can leverage Parameters and System Fields for more rich content.
| Session Connected |
Message shown when the session between user and customer is established. 💡Note: This field is intentionally left blank, because Integrations via SMS might send additional messages (at additional cost). |
|---|---|
| Session Ended by User |
Message shown to the customer when the Nimbus user has ended the session. 💡Example:
|
| Session Declined by User |
Message shown to the customer when the Nimbus user has declined the session. 💡Example:
|
✅Follow-up action: In order for any System Messages to take effect you need to apply them on Interact User Settings > Allowed Modalities section.
For services
- Go to Nimbus Admin > Configuration.
- Select Instant Messaging > Service System Messages
- Click Create New.
- Start filling the fields according to your preferences and the descriptions below.
Service System Messages
💡Service System Messages are configuration items that specify standardized messages sent Nimbus users and/or customers at certain points during an Instant Messaging session. An example could be a welcome message for the customer, or an informative message for the user on the Adaptive Card, each leveraging Parameters and System Fields for more rich content.
☝Note that certain options apply only for certain instant messaging integrations, e.g. Interact. Compared to Direct System Messages they are applied on service level via Modalities Service Settings.
Service System Messages are structured into three parts:
- General properties and settings, specifying details like Organization Unit, Name and Description of the configuration item.
- Messages to User - specifying the messages shown for the Nimbus user at certain events.
- Messages to Customer - specifying the messages shown for the customer at certain events.
General
General Properties
| Name | Name of the configuration item, as it will appear in other Nimbus selection dialogues. |
|---|---|
| Organization Unit | Determines the Organization Unit placement of the item, and thus steers visibility in other Nimbus selection dialogues. |
| Description | Description of the item, primarily used for tabular listings and overviews. |
Display Name - Interact
☝Only affects the Interact integration. For more details, refer to Use Case - Setting Up Interact.
| User |
Allows the following options:
|
|---|---|
| Service |
Allows the following options:
|
Messages to User - Interact
This tab allows you to define messages displayed to Nimbus users at specific session events. Each message can leverage Parameters and System Fields for more rich content.
☝Only affects the Interact integration. For more details, refer to Use Case - Setting Up Interact.
| “Accept” Adaptive Card |
Message shown inside the Adaptive Card when a user can opt-in to “Accept” and start the chat session with the customer. 💡Example (default): |
|---|---|
| “Terminate” Adaptive Card |
Message shown inside the Adaptive Card when a user wants to “Terminate” an already ongoing chat session with the customer. 💡Example (default):
|
| Session Ended |
💡Example (default):
|
Messages to Customer
This tab allows you to define messages displayed to customers at specific session events. Each message can leverage Parameters and System Fields for more rich content.
☝Settings affects both Interact as well as other chat integrations such as WhatsApp & SMS integrations. For more details, refer to Use Case - Setting Up Instant Messaging.
| Session Connected |
Message shown when the session between user and customer is established. 💡Note: This field is intentionally left blank, because Integrations via SMS might send additional messages (at additional cost). |
|---|---|
| Task Limit Reached |
Message shown when the maximum (concurrent) task limit by the service has been reached. 🔎This limit is set in Modalities Tenant Settings in the Instant Messaging section. 💡Example (default):
|
| Session Ended by User |
Message shown when the Nimbus user (Agent) leaves the chat session. 💡Example (default):
|
| Session Ended by System |
Message sent when the Nimbus system terminates the IM session after a 24h window, as mandated by the messaging provider Twilio. 💡This is an optional, automatic system fallback message. You can leave this empty or define it as a fallback. This does not replace the “Message” activity in your workflow. 💡Example (default):
|
✅Follow-up action: In order for any System Messages to take effect you need to apply them on your Modalities Service Settings > Instant Messaging section.
By defining different system message configurations you can steer the behavior per integration, e.g. send smaller messages when using SMS as compared to WhatsApp.
Interact to Service/user Settings
☝This step is required if you want to distribute instant messages to either users and/or services. You can freely combine both options.
For users
Configure your user for IM
- Go to Admin > Users
- Select the user.
- In the “General” Tab, ensure “Interact” is enabled.
⮑ This will show the “Interact” tab for the user. - In the Interact Tab:
- Ensure that “Interact” is enabled.
- Set “Instant Messaging" is enabled.
- OPTIONAL, In the “Direct System Messages” dropdown, select a direct system message created previously in the chapter above.
💡⮑ This message configuration is shown to all users and customers during to a chat session when engaging directly with each other. - OPTIONAL: Apply CORS Templates
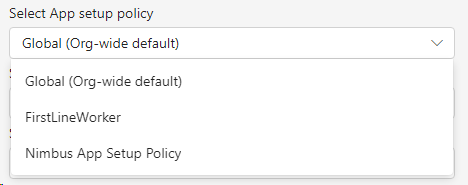
Teams App Setup Policy
Within Microsoft Teams Admin Center, you need to enable Upload custom apps for Nimbus. Otherwise, sending messages via the Nimbus bot might not work. You can create a separate Nimbus App Setup Policy for this or configure your global policy accordingly. For this example, we created a separate App Setup Policy for Nimbus.
- In Microsoft Teams admin center, go to Teams apps > Setup policies and select the Nimbus App Setup Policy.
- Enable Upload custom apps.
- Optionally, enable User pinning.
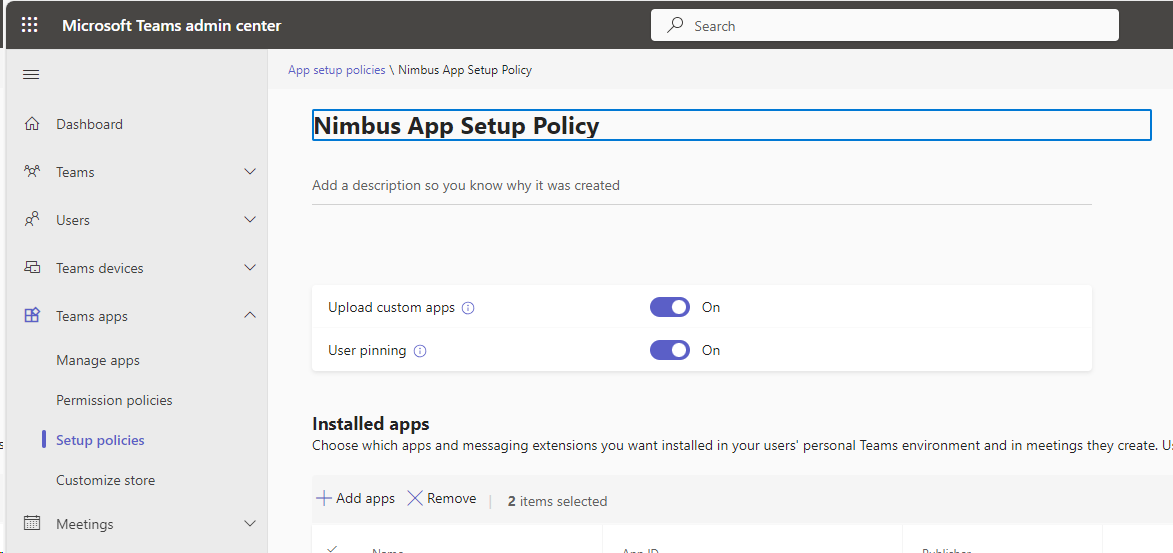
- Save the configuration.
Upload Custom App
✅ Tenant Administrator: You need to download the latest "Nimbus Manifest for Instant Messaging" from your User Preferences (Admin) > Resources tab.
- Go to "Manage Apps"
-
Upload the App manifest you just retrieved.
⮑☝The App is now available to all MS Teams users on your tenant. You can adjust this availability via the “App Setup Policy” explained below.
Assign the App Setup Policy to your IM users
✅Teams Administrator: Now, the Nimbus App Setup Policy needs to be assigned to all Nimbus IM users.
- In Microsoft Teams admin center, go to Users > Manage Users and select the user you want to assign the policy to.
- Click Edit.
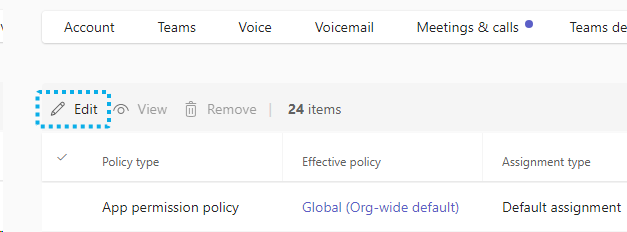
⮑ A popup will appear on the right-and side. - In the Select App setup policy dropdown, select the Nimbus App Setup Policy.
- Click Apply.
Prepare your users for Instant Messaging
Service Owner / Admin - Permission consent
☝Note that the Nimbus Chatbot requires a one-time consent on each user's behalf → See below. More details can be found on page Nimbus User Permissions.
🤔 Why is this necessary? As no service can distribute the IM task in a “direct to user” scenario, Nimbus instead uses a chatbot to post Adaptive Cards directly to users, effectively allowing them to accept/decline/terminate incoming Instant Messaging sessions. As Microsoft prevents direct communication without user consent, these permissions must be granted once1.
✅When using Interact widgets for a direct-to-user communication, note that …
- … Adaptive Cards are now a requirement. Every newly added user (or Contact Center Agent) that handles instant messages must grant this permission to the Nimbus bot once, as MS Teams will otherwise block the communication. For these reasons …
- … you need Instruct users to register with the IM chat bot1. This is done via Nimbus Portal > User Preferences or a consent link. Detail instructions are below.
1💡Good to know: Chat interactions received and distributed via service (e.g. shown in My Sessions, Attendant Console, or Assistant UI) do not require the IM Signaling Bot registration anmd consent, as Nimbus handles the distribution with admin-delegated permissions.
-
As an administrator:
- Within the User Administration > Interact tab, check if the user has registered with the bot. On any new user this will most likely be the case.
- You can send the registration link to the user directly or ask your user to perform the steps below.

-
As the (future) Nimbus user:
- Either open the link sent by the administrator or head to User Preferences (Portal) and register with the bot yourself as described below:
- Click the link next to the “Not Registered” warning icon.
⮑ This will open MS Teams with the Bot as target and a predefined message.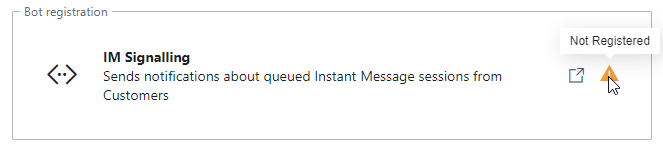
- In order to get registered, you need to send a message to the bot.
⮑ After registration, the bot is ready to invite via Adaptive Cards whenever a customer chat request is coming in via Interact.
⮑ You can now let the Admin know you are ready to receive Instant Message tasks.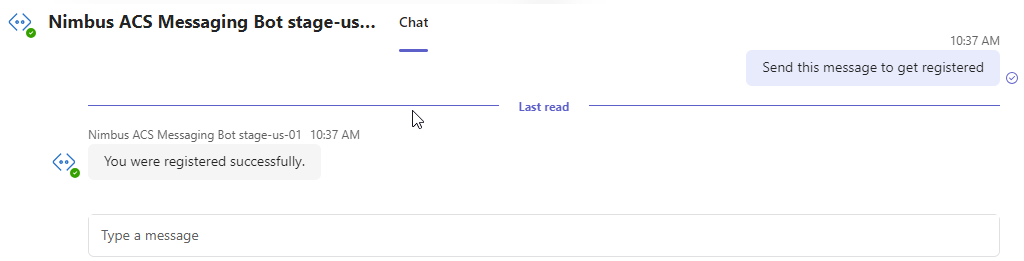
For services
Configure Your Instant Messaging Workflow
- Navigate to Nimbus Admin > Configuration.
- Select Workflows > Workflows.
- Click Create New.
- As Workflow Type, select Instant Messaging.
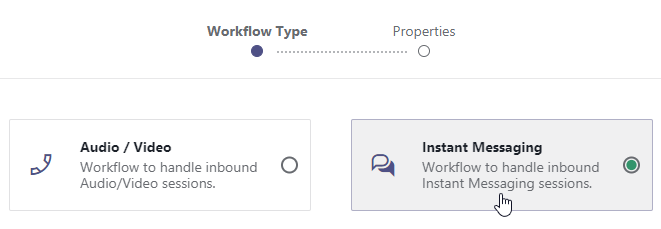
- Name your workflow and pick an Organization Unit that is equal or higher to your IM-handling service.
-
Design your workflow in the editor.💡Refer to Workflow Activities for a full list.
- Start with "Accept Conversation" and a "Message" activity to welcome your customer.
- Follow up with a "Queue Task" activity to assign the IM task to the queue of your service.
- Once the queue limit is reached, don't forget to use "Cancel Task", and "Disconnect" the user as you would in a call.
💡A friendly "Sorry" message goes a long way for your customers.
Configure your service for IM
💡Now, it's time to apply your new workflow.
- Navigate to Nimbus Admin > Service Settings.
- Select your service. Ensure that it has a Contact Center license assigned.
- Go to the tab Modalities (Modalities Service Settings).
-
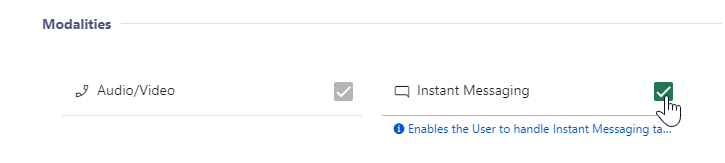
Enable Instant Messaging.
⮑ A new section “Instant Messaging” appears. If you don't see it, scroll down to the end of the page. - In the “Instant Messaging Workflow” dropdown, select your newly created Instant Messaging workflow from the previous step.
- OPTIONAL: In the “Service System Messages” dropdown, select a service system message created previously in the chapter above.
💡⮑ This message configuration is shown to all users / customers during to a chat session when engaging with the service. - Head over to the tab Interact (Interact Service Settings) and enable Interact by switching on the toggle.
- Enable "Instant Messaging" and other modalities you want to allow in the service.
- Finally, copy the service snippet (in the section “Integration”) and paste it into your website once you are ready to go live.
Prepare your users service-distributed Instant Messaging
💡Finally, you need to ensure that users are part of the service and can handle incoming instant message tasks.
- Go to Admin > User Administration.
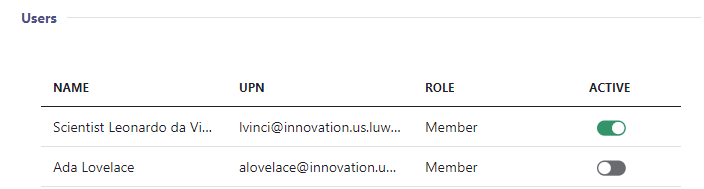
- In General User Settings, enable Instant Messaging for each user you want to allow to handle IM tasks.
- Navigate to Nimbus Admin > Service Settings.
- Select your service and go to the tab Users.
- Ensure that at least one user with an assigned “Instant Messaging” modality license is added to the service in order to receive the IM tasks.
💡The IM modality is enabled on the user's General Settings tab.
Testing your Integration snippets
✅Tenant Admin / Website Admin:
The final step for setting up Interact is to copy and test snippets for your services and users to your customer-facing homepage. The procedure for both services and users If you do not have the expertise, ask your web administrator to embed the widget snippets for you.
- In the Interact tab (either in Interact User Settings for users or Interact User Settings for services), go section Integration
-
Click Preview.
⮑ A mockup website with the Interact functionality opens. This is how it will look like for the customer. - If you are satisfied with the preview, copy the HTML code snippet and insert it into your website.
💡Keep in mind:- Users and services have individual IDs and widget keys. Make sure not to mix these details when pasting them on your website.
- When you applied Interact Domain Templates (CORS) earlier in this Use Case, remember that the restrictions can be applied to both users or services.
- ⮑ All users (behind a service or standalone) should now be able to chat with outside customers. Test the chat interaction via your website.
🔍 Refer to Call Handling and Instant Message Handling to see how the interaction looks like on the Nimbus Portal UI.
Troubleshooting
🤔 Preview or embed code not working? Check if:
✅Prerequisites check:
- When using Instant Messaging modality for the first time, further Tenant setup may be required first. Refer to Use Case - Setting Up Instant Messaging for details.
✅Configuration check:
- Interact is enabled on Tenant Level within the Tenant Administration.
- Interact is enabled for the service or user respectively.
- All relevant configuration items and service / user settings have been saved at least once so they are effective,.
✅Access and permission check:
- The access for the user is not restricted by a Interact Domain Templates (CORS). Disable Restrict Access to test this quickly.
- When "Authorization" is enabled for Interact on Tenant level, you require an access token, as described in Use Case - Enabling additional authorization for Interact.
Known Limitations
INC Known Interact Limitations
KNOWN INTERACT LIMITATIONS
- Interact has certain JavaScript calling limitations in regards to operating systems and browsers. Refer to the official MSFT documentation.
- Audio/Video Calls initiated from Interact have the following workflow limitations:
| Workflow Activity | Limitations |
|---|---|
| Transfer |
Can only target services. Not supported targets are:
|
| Queue | "Pickup" distribution type is not supported. |
| Voice Message | Not supported. |
| Customer Input | Sending DTMF over Interact (Client/SDK) is not supported |
WhatsApp Setup
Setting up WhatsApp
🔎Source: Use Case - Setting Up a WhatsApp Integration in Twilio.
Use Case - Setting Up a WhatsApp Integration in Twilio
In this Use Case, we're going to verify your WhatsApp business account with Facebook and integrate everything into Twilio. The goal is to establish a Twilio WhatsApp messaging service with an API endpoint which Nimbus can integrate into.
PRECONDITIONS
✅Before you start
- This Use Case is a follow-up to Use Case - Setting Up Instant Messaging. Refer to it for general and licensing preconditions on your tenant.
- For this Use Case to work, the Instant Messaging modality must be enabled on your tenant. If this hasn't been done already, please get in contact with your Luware Customer Success specialist to discuss terms and License Management details.
✅User Permissions
- You require Tenant Administrator permissions to make all adjustments in Nimbus.
- You also require rights to do the necessary administration in your Twilio instance.
✅Infrastructure Requirements
For the Instant Messaging integration of WhatsApp into Nimbus you require:
- A verified Meta Business account for verification with WhatsApp and Twilio. 🧠 You require the “
Facebook Business Manager ID” - A WhatsApp Business account for connecting with the Twilio API.
- An exclusive phone number which needs to be associated with the WhatsApp account.
- This number must be able to receive SMS/Voice and must not be used for any other purpose other than one (singular) WhatsApp account.
- Landline or mobile numbers are allowed, but VOIP numbers may be restricted.
- You’ll will need temporary access to the number to receive a verification call or SMS, e.g. on a mobile phone.
- Please note that cost and support of Twilio-related services are not part of your Nimbus subscription.
INC Icon Legend Accordion
Show Icon Legend 💡 = A hint to signal learnings, improvements or useful informati...
Show Icon Legend
| 💡 = A hint to signal learnings, improvements or useful information in context. | 🔍 = Info points out essential notes or related page in context. |
| ☝ = Notifies you about fallacies and tricky parts that help avoid problems. | 🤔 = Asks and answers common questions and troubleshooting points. |
| ❌ = Warns you of actions with irreversible / data-destructive consequence. | ✅ = Intructs you to perform a certain (prerequired) action to complete a related step. |
Link your WhatsApp Business Account in Twilio Console
✅ Your WhatsApp Business phone number in Twilio must be linked with your Facebook Business account.
- In the Twilio Console https://console.twilio.com/ go to Conversations Messaging > Senders > WhatsApp Senders.
- Click Create new sender.

-
Select a new or a existing phone number:
- Twilio Phone Number.
- My Own Phone number (☝must fulfill → Prerequisites listed on top of this page).
-
Link with Meta/WhatsApp Business account
- Log in with Facebook and link the accounts. Use your🧠
Facebook Business Manager ID(learn how). - Select the phone number you want to register (must be able to receive voice/SMS for verification).
- Trigger the verification.
- Log in with Facebook and link the accounts. Use your🧠
-
Verify ownership of the number:
- Choose between SMS or voice call for receiving a verification code.
- Enter the code in the Twilio console to prove ownership.

WhatsApp Business Profile Setup
✅The business profile will be visible to your customers in WhatsApp.
-
Set up your business profile:
- Business display name
- Business description
- Logo/image
- Website and contact info
-
Submit your choice.
⮑ Twilio will submit your request to WhatsApp/Facebook for manual review.
☝From our experience, the business approval process can take a few hours or days, depending on your region.

Create New Conversation Service
- Go to https://console.twilio.com/.
- Go to Conversations > Manage Service > Create new Service.
-
Within “Base Configuration”:
- Add a friendly name (only needed for later identification).
-
🧠 Retrieve the
Service SIDfor later in Nimbus.
-
Within “Webhooks”:
- Fill in the Post-Event URL as follows:
https://portal.<ClusterIdentifier>.luware.cloud/api/acs/chat-handler/tenants/<YourTenantID>/twilio-callbacks
💡You can find out yourClusterIdentifierby logging into Nimbus User Portal and observing your browser URL.
💡TheTenant IDyou can see after logging into Nimbus Admin Portal and heading to the General Tenant Settings. - Further down on Webhooks:
- Leave Post-webhooks all checked.
- Leave Pre-webhooks all unchecked.
- Fill in the Post-Event URL as follows:
Link the Phone number to the Conversation Service
- Go to https://console.twilio.com/.
- Go to Conversations > Addresses > Configure addresses
- Enable "Autocreate a conversation”
- Under “Select a conversation service”, select your previously created service.

Create API Key & Secret
- Go to Account Management > Keys & Credentials.
- Create a new API key:
- (any friendly name)
- Region: United States - Default
- Key Type : Standard
-
🧠 Retrieve the
API Key SID & Secretfor later in Nimbus.

Test Your Setup
✅ Once approved, the phone number will appear as a “Verified” WhatsApp sender in Twilio Console.
- You can now send and receive WhatsApp messages using Twilio’s API.
- All production messaging must use **pre-approved templates** for outbound communication outside the 24-hour customer window.
Integrate with Nimbus
Nimbus Twilio Integration Steps
In the following we explain how you establish a connection with the Twilio Service API and a Nimbus Service.
✅ Precondition:
- You have already set up a Twilio account, a corresponding conversation service and API.
-
🧠From Twilio you have
Service SID,API Key SIDandAPI Key Secretready at hand.
Nimbus Provider Connector
- Head to Nimbus Administration > Configuration > Provider Connectors.
- Create a New Connector. Place it in a Organization Unit that ensures no crossover-usage between services.
-
🧠Enter the
API Key SIDfrom Twilio. -
🧠Enter the
API Key Secretfrom Twilio. - Select the Region from Twilio
💡Should be the same as set in Twilio - the regional selection is limited by what Twilio offers. For the time being this should be set to “United States”.
-
🧠Enter the
- Save the Connector.
Nimbus Messaging Entry
✅This step is necessary for the service initially receiving messages. You can skip it on other Nimbus Services which are not supposed to be contacted directly, but can accept transfers from your source IM service.
- Head to Nimbus Administration > Configuration > Messaging Entries.
- Create a New Messaging Entry.
💡Place it in a Organization Unit that avoids crossover-usage between services. - Select the Provider Connector created from previously above.
-
Enter the
Service SIDfrom Twilio. - Save the Messaging Entry.
💡Consideration for multi-modal services: Even if you intent to handle multiple integration channels (e.g. WhatsApp/SMS/RCS) by the same Nimbus service, we recommend to split the Service SID on Twilio's side to have a clear distinction. You can have multiple Messaging Entries in Nimbus and assign them individually in your Modalities Service Settings, as described → below. This allows you to specifically disable one channel of a service without affecting the other.
Nimbus Tenant Settings
✅ If not already done before, you now enable the related integration channels.
- Go to Modalities Tenant Settings and locate the Instant Messaging section.
- Enable Twilio and …
- … your related integration channel (e.g. WhatsApp or SMS) as configured in Twilio.
-
Save your settings.
⮑ This action enables the corresponding service settings
Nimbus Service Settings
✅ Now it's time to apply your configuration in your service.
- On your Nimbus service, go to Modalities Service Settings.
- Ensure that Instant Messaging modality is enabled for your service.
- Within the “Instant Messaging” section, enable your integration channel (WhatsApp / SMS)
⮑ Additional configuration options become available.- Select an Instant Messaging workflow.
-
Select your Messaging Entry previously created above.
💡The Messaging Entry is a unique value per service, meaning that once assigned it won't be available for selection for other services.
- Save your settings.
Test Your Chat Integration
- Depending on your chosen Twilio integration and capabilities, send a chat message to your service's associated phone number.
- Within Nimbus Portal, log in as a Service user / owner for your IM-enabled service.
- Inspect the service queue (e.g. in My Sessions) if the incoming chat is shown as new task.
- Accept the task and reply in the My Sessions chat window. 🔎 Further details can be found under Instant Message Handling.
Known Limitations
INC Instant Messaging Limitations
🔎INSTANT MESSAGING DESIGN NOTES
💡The following notes are “by design”. They describe behavior of message protocols which cannot be circumvented or fully mitigated by Nimbus.
☝Customer data visibility: During an ongoing Instant Messaging session, any messages that customer enters into the chat will be visible to the Nimbus user, including information entered during Workflow Activities such as “Collect Information”.
☝Delay consideration for Power Automate (e.g. preferred user scenarios): Note that – while Instant Messaging tasks can be routed with minimal delay – the measured roundtrip time of e.g. setting a preferred user via Power Automate in many cases lies above 1 second.
→ When you want to leverage “Preferred User Routing” in your Distribution Policies we recommend to add a delay in your workflow (e.g. via “Message” or “Delay” Conversation Handling Activity) before handing the task over to your queue.
☝Maximum message length is 1600 characters.1
- Twilio enforces a maximum message length of 1600 characters. Additional Parameters in your (automated) messages count towards this limit.
- In the UI (e.g. My Sessions, Nimbus will detect the integration channel (e.g. SMS, RCS, WhatsApp) and display limits and warning messages accordingly.
- In Workflows, e.g. a “Message” Conversation Handling Activity Nimbus cannot anticipate the incoming integration channel proactively. If the length would be exceeded (e.g. a resolved Parameter leading to a long message), the activity will be skipped.
☝SMS length is impacted by character encoding2. Please keep the length in mind:
- Please note that when you send a long message (via workflow or Nimbus UI), the customer generally receives multiple SMS at the same time. This could be considered as spam - on top of generating additional cost for the involved actors.
- The Nimbus UI will show the amount of SMS generated by a chat response. The amount of remaining characters and SMS will be adjusted when you change the encoding (e.g. by using emoticons).
💡Recommendation: If you intend to handle multiple IM channels via the same workflow and service, keep messages (including resolved Parameters) short in order to not exceed the most restrictive limits.
1Also refer to Twilio' documentation on maximum message length.
2Also refer to Twilio's documentation on SMS character limits and instruct your users accordingly before sending out long message chains.
KNOWN INSTANT MESSAGING LIMITATIONS
💡The following limitations are currently known to the Nimbus development team. We are actively working on improvements.
General limitations
- Supervision is currently not supported for Instant Messaging sessions.
-
Instant Messaging modality support for Workflow Activities is currently limited. Workflows with incompatible activities cannot be selected in the service settings.
-
Unsupported workflow activities: If a workflow is edited in post using unsupported Workflow Activities, the Nimbus Reporting session will terminate with a “failed” reporting outcome.
Show list of supported WF activities
INC Instant Messaging supported WF activities
Currently the following Workflow activities are supported for Instant Messaging workflows:
▼Workflow Activity | Chat Integration path via ►
Interact
WhatsApp
SMS
Conversation Handling
Accept
✅
✅
✅
Announcement
❌
❌
❌
Collect Information
✅
✅
✅
Delay
✅
✅
✅
Disconnect
✅
✅
✅
Disconnect as Handled
❌
❌
❌
Forward
❌
❌
❌
Input Customer
✅
✅
✅
Input Customer (Advanced)
❌
❌
❌
Mark as Handled
❌
❌
❌
Message
✅
✅
✅
Play Music
❌
❌
❌
Reply
❌
❌
❌
Save to Parameter
✅
✅
✅
Standby Duty
❌
❌
❌
Transfer
✅ (to service only)
✅ (to service only)
✅ (to service only)
Virtual User
❌
❌
❌
Voice Message
❌
❌
❌
Web Request
✅
✅
✅
Check
Availability-based Routing
✅
✅
✅
Check Opening Hours
✅
✅
✅
Check Parameter
✅
✅
✅
Get Available Users
✅
✅
✅
Get Queue Position
✅
✅
✅
Wait for Parameter
❌
❌
❌
Queue
Cancel Task
✅
✅
✅
Check Task
✅
✅
✅
Distribution Priority
✅
✅
✅
Queue
❌
❌
❌
Queue Task
✅
✅
✅
💡General Note: If a workflow is edited in post using unsupported activities, the Nimbus Reporting session will terminate with a “failed” outcome.
-
Unsupported workflow activities: If a workflow is edited in post using unsupported Workflow Activities, the Nimbus Reporting session will terminate with a “failed” reporting outcome.
-
Reporting: IM Sessions are currently not differentiated by the Integration method used (either WhatsApp or Interact).
→ A workaround is to use dedicated IM services for either integration method.
Interact specific limitations
- Directly contacting a user via Interact will block a user depending on the incoming modality. The user stays “available” during an Instant Messaging session because a chat is non-blocking, but Audio/Video will result in the user being “not available” because they are in a blocking call.
- Nimbus Reporting Model - There isn't a service nor user session reported when a user is directly contacted.
WhatsApp specific limitations
- Provider Connectors > Twilio - Currently the integration works with “United States” region only.
-
Chat functionality is currently limited to the essential only.
- HTML text formatting, inline images and attachments are not supported yet.
- Message editing & deletion, reactions and replies are not supported and will not be supported (Twilio API limitation)
SMS / RCS specific limitations
SMS specific limitations
- Provider Connectors > Twilio - Currently the integration works with “United States” region only.
RCS specific limitations
- This first implementation of RCS is showing plain text only, other “rich” media support will be supported in a future update.
SMS/RCS Setup
Setting up SMS/RCS
🔎Source: Use Case - Setting Up an SMS/RCS Integration in Twilio
Use Case - Setting Up an SMS/RCS Integration in Twilio
In this Use Case, we're going to set up and SMS/RCS-capable phone number and related messaging service in Twilio. The goal is to establish a Twilio API endpoint into which your Nimbus service can integrate into.
PRECONDITIONS
✅Before you start
- This Use Case is a follow-up to Use Case - Setting Up Instant Messaging. Refer to it for general and licensing preconditions on your tenant.
- For this Use Case to work, the Instant Messaging modality must be enabled on your tenant. If this hasn't been done already, please get in contact with your Luware Customer Success specialist to discuss terms and License Management details.
✅User Permissions
- You require Tenant Administrator permissions to make all adjustments in Nimbus.
- You also require rights to do the necessary administration in your Twilio instance.
✅Infrastructure Requirements
For the Instant Messaging integration for SMS/RCS services into Nimbus you require:
- An exclusive phone number which needs to be associated with the service account. This number must be able to receive SMS/RCS and must not be used for any other purpose other than one (singular) account.
- Please note that cost and support of Twilio-related services are not part of your Nimbus subscription.
INC Icon Legend Accordion
Show Icon Legend 💡 = A hint to signal learnings, improvements or useful informati...
Show Icon Legend
| 💡 = A hint to signal learnings, improvements or useful information in context. | 🔍 = Info points out essential notes or related page in context. |
| ☝ = Notifies you about fallacies and tricky parts that help avoid problems. | 🤔 = Asks and answers common questions and troubleshooting points. |
| ❌ = Warns you of actions with irreversible / data-destructive consequence. | ✅ = Intructs you to perform a certain (prerequired) action to complete a related step. |
Configure the Twilio Service
✅ In Twilio you need to create a service and link it to a phone number. Both elements are then combined
Creating a Conversation Service
- Go to https://console.twilio.com/.
- Go to Conversations > Manage Service > Services > Create new Service.
-
Within “Base Configuration”:
- Add a friendly name, used for later identification within Twilio.
-
🧠 Retrieve the
Service SIDfor later in Nimbus.
-
Within “Webhooks”:
☝Ensure the webhook address matches with your cluster- Fill in the Post-Event URL as follows:
https://portal.<ClusterIdentifier>.luware.cloud/api/acs/chat-handler/tenants/<YourTenantID>/twilio-callbacks
💡You can find out yourClusterIdentifierby logging into Nimbus User Portal and observing your browser URL.
💡TheTenant IDyou can see after logging into Nimbus Admin Portal and heading to the General Tenant Settings. - Further down on Webhooks:
- Leave Post-webhooks all checked.
- Leave Pre-webhooks all unchecked.
- Fill in the Post-Event URL as follows:
Creating a SMS/RCS enabled phone number
✅ Now we need to acquire an SMS/RCS-capable phone number to be used for your messaging service.
- Go to https://console.twilio.com/.
- Go to Phone Numbers > Buy a number.
- Ensure that your new number is SMS/RCS capable and purchase it as needed. → Also see related note below.
- Go to Phone Numbers > Manage > Active Numbers.

3rd party service compliance and regulation
Providing chat services: compliance and regulations
- Note that providing services via chat (in either integration scenario) underlies country-specific regulations your service needs to follow. This can involve details on the use of shortened-URLs (scam regulations), automated message generation (spam regulations), possibility for customers to opt-out of communications, privacy, data-security and retention. Breaking these regulations may result in your numbers being blacklisted or cancelled by Twilio or the mobile carriers without further notice.
- WhatsApp and SMS data residency is determined by Twilio, which currently hosts data centers primarily in the US.
Note that Luware does not provide any assistance in being compliant with local laws and regulations.
Related Source: https://www.twilio.com/en-us/changelog/data-residency-for-sms--eu--is-now-in-private-beta
Link the phone number to the Conversation Service
- Go to https://console.twilio.com/.
- Go to Conversations > Addresses > Configure addresses.
- Enable "Autocreate a conversation”.
- Under “Select a conversation service”, select your previously created service:

Create API Key & Secret
- Go to Account Management > Keys & Credentials.
- Create a new API key:
- (any friendly name)
- Region: United States - Default
- Key Type : Standard
-
🧠 Retrieve the
API Key SID & Secretfor later in Nimbus.
Test your setup
✅ Once approved, the phone number will appear as a “verified” sender in Twilio Console.
- You can now send and receive SMS/RCS messages using Twilio’s API.
Integrate with Nimbus
Nimbus Twilio Integration Steps
In the following we explain how you establish a connection with the Twilio Service API and a Nimbus Service.
✅ Precondition:
- You have already set up a Twilio account, a corresponding conversation service and API.
-
🧠From Twilio you have
Service SID,API Key SIDandAPI Key Secretready at hand.
Nimbus Provider Connector
- Head to Nimbus Administration > Configuration > Provider Connectors.
- Create a New Connector. Place it in a Organization Unit that ensures no crossover-usage between services.
-
🧠Enter the
API Key SIDfrom Twilio. -
🧠Enter the
API Key Secretfrom Twilio. - Select the Region from Twilio
💡Should be the same as set in Twilio - the regional selection is limited by what Twilio offers. For the time being this should be set to “United States”.
-
🧠Enter the
- Save the Connector.
Nimbus Messaging Entry
✅This step is necessary for the service initially receiving messages. You can skip it on other Nimbus Services which are not supposed to be contacted directly, but can accept transfers from your source IM service.
- Head to Nimbus Administration > Configuration > Messaging Entries.
- Create a New Messaging Entry.
💡Place it in a Organization Unit that avoids crossover-usage between services. - Select the Provider Connector created from previously above.
-
Enter the
Service SIDfrom Twilio. - Save the Messaging Entry.
💡Consideration for multi-modal services: Even if you intent to handle multiple integration channels (e.g. WhatsApp/SMS/RCS) by the same Nimbus service, we recommend to split the Service SID on Twilio's side to have a clear distinction. You can have multiple Messaging Entries in Nimbus and assign them individually in your Modalities Service Settings, as described → below. This allows you to specifically disable one channel of a service without affecting the other.
Nimbus Tenant Settings
✅ If not already done before, you now enable the related integration channels.
- Go to Modalities Tenant Settings and locate the Instant Messaging section.
- Enable Twilio and …
- … your related integration channel (e.g. WhatsApp or SMS) as configured in Twilio.
-
Save your settings.
⮑ This action enables the corresponding service settings
Nimbus Service Settings
✅ Now it's time to apply your configuration in your service.
- On your Nimbus service, go to Modalities Service Settings.
- Ensure that Instant Messaging modality is enabled for your service.
- Within the “Instant Messaging” section, enable your integration channel (WhatsApp / SMS)
⮑ Additional configuration options become available.- Select an Instant Messaging workflow.
-
Select your Messaging Entry previously created above.
💡The Messaging Entry is a unique value per service, meaning that once assigned it won't be available for selection for other services.
- Save your settings.
Test Your Chat Integration
- Depending on your chosen Twilio integration and capabilities, send a chat message to your service's associated phone number.
- Within Nimbus Portal, log in as a Service user / owner for your IM-enabled service.
- Inspect the service queue (e.g. in My Sessions) if the incoming chat is shown as new task.
- Accept the task and reply in the My Sessions chat window. 🔎 Further details can be found under Instant Message Handling.
Known Limitations
INC Instant Messaging Limitations
🔎INSTANT MESSAGING DESIGN NOTES
💡The following notes are “by design”. They describe behavior of message protocols which cannot be circumvented or fully mitigated by Nimbus.
☝Customer data visibility: During an ongoing Instant Messaging session, any messages that customer enters into the chat will be visible to the Nimbus user, including information entered during Workflow Activities such as “Collect Information”.
☝Delay consideration for Power Automate (e.g. preferred user scenarios): Note that – while Instant Messaging tasks can be routed with minimal delay – the measured roundtrip time of e.g. setting a preferred user via Power Automate in many cases lies above 1 second.
→ When you want to leverage “Preferred User Routing” in your Distribution Policies we recommend to add a delay in your workflow (e.g. via “Message” or “Delay” Conversation Handling Activity) before handing the task over to your queue.
☝Maximum message length is 1600 characters.1
- Twilio enforces a maximum message length of 1600 characters. Additional Parameters in your (automated) messages count towards this limit.
- In the UI (e.g. My Sessions, Nimbus will detect the integration channel (e.g. SMS, RCS, WhatsApp) and display limits and warning messages accordingly.
- In Workflows, e.g. a “Message” Conversation Handling Activity Nimbus cannot anticipate the incoming integration channel proactively. If the length would be exceeded (e.g. a resolved Parameter leading to a long message), the activity will be skipped.
☝SMS length is impacted by character encoding2. Please keep the length in mind:
- Please note that when you send a long message (via workflow or Nimbus UI), the customer generally receives multiple SMS at the same time. This could be considered as spam - on top of generating additional cost for the involved actors.
- The Nimbus UI will show the amount of SMS generated by a chat response. The amount of remaining characters and SMS will be adjusted when you change the encoding (e.g. by using emoticons).
💡Recommendation: If you intend to handle multiple IM channels via the same workflow and service, keep messages (including resolved Parameters) short in order to not exceed the most restrictive limits.
1Also refer to Twilio' documentation on maximum message length.
2Also refer to Twilio's documentation on SMS character limits and instruct your users accordingly before sending out long message chains.
KNOWN INSTANT MESSAGING LIMITATIONS
💡The following limitations are currently known to the Nimbus development team. We are actively working on improvements.
General limitations
- Supervision is currently not supported for Instant Messaging sessions.
-
Instant Messaging modality support for Workflow Activities is currently limited. Workflows with incompatible activities cannot be selected in the service settings.
-
Unsupported workflow activities: If a workflow is edited in post using unsupported Workflow Activities, the Nimbus Reporting session will terminate with a “failed” reporting outcome.
Show list of supported WF activities
INC Instant Messaging supported WF activities
Currently the following Workflow activities are supported for Instant Messaging workflows:
▼Workflow Activity | Chat Integration path via ►
Interact
WhatsApp
SMS
Conversation Handling
Accept
✅
✅
✅
Announcement
❌
❌
❌
Collect Information
✅
✅
✅
Delay
✅
✅
✅
Disconnect
✅
✅
✅
Disconnect as Handled
❌
❌
❌
Forward
❌
❌
❌
Input Customer
✅
✅
✅
Input Customer (Advanced)
❌
❌
❌
Mark as Handled
❌
❌
❌
Message
✅
✅
✅
Play Music
❌
❌
❌
Reply
❌
❌
❌
Save to Parameter
✅
✅
✅
Standby Duty
❌
❌
❌
Transfer
✅ (to service only)
✅ (to service only)
✅ (to service only)
Virtual User
❌
❌
❌
Voice Message
❌
❌
❌
Web Request
✅
✅
✅
Check
Availability-based Routing
✅
✅
✅
Check Opening Hours
✅
✅
✅
Check Parameter
✅
✅
✅
Get Available Users
✅
✅
✅
Get Queue Position
✅
✅
✅
Wait for Parameter
❌
❌
❌
Queue
Cancel Task
✅
✅
✅
Check Task
✅
✅
✅
Distribution Priority
✅
✅
✅
Queue
❌
❌
❌
Queue Task
✅
✅
✅
💡General Note: If a workflow is edited in post using unsupported activities, the Nimbus Reporting session will terminate with a “failed” outcome.
-
Unsupported workflow activities: If a workflow is edited in post using unsupported Workflow Activities, the Nimbus Reporting session will terminate with a “failed” reporting outcome.
-
Reporting: IM Sessions are currently not differentiated by the Integration method used (either WhatsApp or Interact).
→ A workaround is to use dedicated IM services for either integration method.
Interact specific limitations
- Directly contacting a user via Interact will block a user depending on the incoming modality. The user stays “available” during an Instant Messaging session because a chat is non-blocking, but Audio/Video will result in the user being “not available” because they are in a blocking call.
- Nimbus Reporting Model - There isn't a service nor user session reported when a user is directly contacted.
WhatsApp specific limitations
- Provider Connectors > Twilio - Currently the integration works with “United States” region only.
-
Chat functionality is currently limited to the essential only.
- HTML text formatting, inline images and attachments are not supported yet.
- Message editing & deletion, reactions and replies are not supported and will not be supported (Twilio API limitation)
SMS / RCS specific limitations
SMS specific limitations
- Provider Connectors > Twilio - Currently the integration works with “United States” region only.
RCS specific limitations
- This first implementation of RCS is showing plain text only, other “rich” media support will be supported in a future update.
Prepare your users for Instant Messages
Once the technical integration is done, you can do the following:
-
Let service owners and administrators know that the Instant Messaging modality is now enabled.
☝Don't forget to regularly read about ongoing changes and known limitations, as communicated via our Latest Release Notes. - Inform your Nimbus users about Instant Message Handling changes for both the Nimbus UI and Nimbus Reporting.
☝Integration channel consideration when using Distribution Policies: In addition to the modality Nimbus also considers the previously used service integration channel (e.g. via WhatsApp or Interact) for preferred- and last user routing Distribution Policies. For example:
- Whatsapp session 1 → Multiple users available, user A is selected by policy.
- Interact session 2 → Multiple users available, user B is selected by policy.
- Whatsapp session 3 → Last user routing policy applies → User A is selected as preferred.
Known Limitations
INC Instant Messaging Limitations
🔎INSTANT MESSAGING DESIGN NOTES
💡The following notes are “by design”. They describe behavior of message protocols which cannot be circumvented or fully mitigated by Nimbus.
☝Customer data visibility: During an ongoing Instant Messaging session, any messages that customer enters into the chat will be visible to the Nimbus user, including information entered during Workflow Activities such as “Collect Information”.
☝Delay consideration for Power Automate (e.g. preferred user scenarios): Note that – while Instant Messaging tasks can be routed with minimal delay – the measured roundtrip time of e.g. setting a preferred user via Power Automate in many cases lies above 1 second.
→ When you want to leverage “Preferred User Routing” in your Distribution Policies we recommend to add a delay in your workflow (e.g. via “Message” or “Delay” Conversation Handling Activity) before handing the task over to your queue.
☝Maximum message length is 1600 characters.1
- Twilio enforces a maximum message length of 1600 characters. Additional Parameters in your (automated) messages count towards this limit.
- In the UI (e.g. My Sessions, Nimbus will detect the integration channel (e.g. SMS, RCS, WhatsApp) and display limits and warning messages accordingly.
- In Workflows, e.g. a “Message” Conversation Handling Activity Nimbus cannot anticipate the incoming integration channel proactively. If the length would be exceeded (e.g. a resolved Parameter leading to a long message), the activity will be skipped.
☝SMS length is impacted by character encoding2. Please keep the length in mind:
- Please note that when you send a long message (via workflow or Nimbus UI), the customer generally receives multiple SMS at the same time. This could be considered as spam - on top of generating additional cost for the involved actors.
- The Nimbus UI will show the amount of SMS generated by a chat response. The amount of remaining characters and SMS will be adjusted when you change the encoding (e.g. by using emoticons).
💡Recommendation: If you intend to handle multiple IM channels via the same workflow and service, keep messages (including resolved Parameters) short in order to not exceed the most restrictive limits.
1Also refer to Twilio' documentation on maximum message length.
2Also refer to Twilio's documentation on SMS character limits and instruct your users accordingly before sending out long message chains.
KNOWN INSTANT MESSAGING LIMITATIONS
💡The following limitations are currently known to the Nimbus development team. We are actively working on improvements.
General limitations
- Supervision is currently not supported for Instant Messaging sessions.
-
Instant Messaging modality support for Workflow Activities is currently limited. Workflows with incompatible activities cannot be selected in the service settings.
-
Unsupported workflow activities: If a workflow is edited in post using unsupported Workflow Activities, the Nimbus Reporting session will terminate with a “failed” reporting outcome.
Show list of supported WF activities
INC Instant Messaging supported WF activities
Currently the following Workflow activities are supported for Instant Messaging workflows:
▼Workflow Activity | Chat Integration path via ►
Interact
WhatsApp
SMS
Conversation Handling
Accept
✅
✅
✅
Announcement
❌
❌
❌
Collect Information
✅
✅
✅
Delay
✅
✅
✅
Disconnect
✅
✅
✅
Disconnect as Handled
❌
❌
❌
Forward
❌
❌
❌
Input Customer
✅
✅
✅
Input Customer (Advanced)
❌
❌
❌
Mark as Handled
❌
❌
❌
Message
✅
✅
✅
Play Music
❌
❌
❌
Reply
❌
❌
❌
Save to Parameter
✅
✅
✅
Standby Duty
❌
❌
❌
Transfer
✅ (to service only)
✅ (to service only)
✅ (to service only)
Virtual User
❌
❌
❌
Voice Message
❌
❌
❌
Web Request
✅
✅
✅
Check
Availability-based Routing
✅
✅
✅
Check Opening Hours
✅
✅
✅
Check Parameter
✅
✅
✅
Get Available Users
✅
✅
✅
Get Queue Position
✅
✅
✅
Wait for Parameter
❌
❌
❌
Queue
Cancel Task
✅
✅
✅
Check Task
✅
✅
✅
Distribution Priority
✅
✅
✅
Queue
❌
❌
❌
Queue Task
✅
✅
✅
💡General Note: If a workflow is edited in post using unsupported activities, the Nimbus Reporting session will terminate with a “failed” outcome.
-
Unsupported workflow activities: If a workflow is edited in post using unsupported Workflow Activities, the Nimbus Reporting session will terminate with a “failed” reporting outcome.
-
Reporting: IM Sessions are currently not differentiated by the Integration method used (either WhatsApp or Interact).
→ A workaround is to use dedicated IM services for either integration method.
Interact specific limitations
- Directly contacting a user via Interact will block a user depending on the incoming modality. The user stays “available” during an Instant Messaging session because a chat is non-blocking, but Audio/Video will result in the user being “not available” because they are in a blocking call.
- Nimbus Reporting Model - There isn't a service nor user session reported when a user is directly contacted.
WhatsApp specific limitations
- Provider Connectors > Twilio - Currently the integration works with “United States” region only.
-
Chat functionality is currently limited to the essential only.
- HTML text formatting, inline images and attachments are not supported yet.
- Message editing & deletion, reactions and replies are not supported and will not be supported (Twilio API limitation)
SMS / RCS specific limitations
SMS specific limitations
- Provider Connectors > Twilio - Currently the integration works with “United States” region only.
RCS specific limitations
- This first implementation of RCS is showing plain text only, other “rich” media support will be supported in a future update.